How To Draw Pizza
Here is the introduction paragraph: Drawing a pizza can be a fun and creative activity, whether you're an artist or just a pizza lover. With a few simple steps and some basic drawing skills, you can create a delicious-looking pizza that's almost good enough to eat. In this article, we'll take you through the process of drawing a pizza, from understanding the basics of drawing a pizza to adding the final details. First, we'll cover the basics of drawing a pizza, including the shapes and proportions that make up a typical pizza. Then, we'll provide a step-by-step guide on how to sketch a pizza, including the crust, sauce, cheese, and toppings. Finally, we'll show you how to add details and finishing touches to your pizza drawing, including textures, patterns, and other embellishments. By the end of this article, you'll be able to create a mouth-watering pizza drawing that's sure to impress. So, let's get started by understanding the basics of drawing a pizza.
Understanding the Basics of Drawing a Pizza
Drawing a pizza can be a fun and creative activity, but it requires some basic understanding of shapes, forms, and techniques. To get started, it's essential to familiarize yourself with the different shapes and forms that make up a pizza, such as the circular crust, triangular slices, and various toppings. Additionally, choosing the right drawing tools and materials can make a significant difference in the quality of your artwork. A set of sharp pencils, a sketchbook, and a comfortable drawing space can help you achieve the desired results. By setting up your drawing space for comfort and efficiency, you can focus on the creative process and bring your pizza drawing to life. In this article, we will explore the basics of drawing a pizza, starting with the fundamental shapes and forms that make up this delicious dish. Let's begin by familiarizing yourself with pizza shapes and forms.
Familiarizing Yourself with Pizza Shapes and Forms
Familiarizing yourself with pizza shapes and forms is a crucial step in drawing a realistic pizza. Pizzas come in various shapes, including circular, rectangular, square, and even triangular. The most common shape is the circular pizza, which is typically cut into triangular slices. To draw a circular pizza, start by sketching a circle for the crust, then add a slightly smaller circle for the sauce and toppings. For a rectangular pizza, draw a rectangle with rounded corners, and for a square pizza, draw a square with slightly rounded edges. Triangular pizzas are less common, but can be drawn by sketching a triangle with a curved edge for the crust. Understanding the different shapes and forms of pizzas will help you to accurately depict the pizza you want to draw. Additionally, pay attention to the crust's thickness, the sauce's spread, and the toppings' arrangement, as these details can greatly impact the overall appearance of your pizza drawing. By studying the shapes and forms of pizzas, you'll be able to create a more realistic and appetizing drawing.
Choosing the Right Drawing Tools and Materials
Choosing the right drawing tools and materials is essential to create a realistic and detailed drawing of a pizza. To start, you'll need a pencil, preferably a graphite pencil with a range of hardness levels (HB, 2B, 4B, 6B) to achieve varying line weights and shading. A sharpener is also necessary to keep your pencils sharp and ready to use. For added texture and depth, consider using a range of drawing tools such as charcoal, pastels, or colored pencils. A blending stump or tortillon can help smooth out transitions and create subtle gradations of tone. Additionally, a eraser, such as a kneaded eraser or a white vinegar eraser, is crucial for correcting mistakes and creating highlights. When it comes to paper, choose a high-quality, smooth paper with a medium to heavy weight (around 80-100 gsm) to allow for a range of techniques and minimal buckling. Look for paper with a slight texture or "tooth" to help create expressive lines and subtle shading. Finally, consider using a drawing board or other stable surface to support your paper and prevent it from moving around while you draw. By selecting the right tools and materials, you'll be well on your way to creating a delicious and visually appealing drawing of a pizza.
Setting Up Your Drawing Space for Comfort and Efficiency
Setting up your drawing space for comfort and efficiency is crucial to produce high-quality artwork, including drawing a pizza. To start, choose a quiet and comfortable spot with good lighting, preferably natural light, to minimize eye strain. Invest in a sturdy and ergonomic chair, a spacious desk, and a drawing board that can hold your paper securely in place. Ensure your drawing tools, such as pencils, erasers, and markers, are organized and within easy reach to save time and reduce distractions. Consider using a pencil case or a desk organizer to keep your supplies tidy. Additionally, keep a trash can nearby to dispose of any waste, such as eraser shavings or discarded paper. A comfortable and well-organized drawing space will help you stay focused and motivated, allowing you to create a delicious-looking pizza drawing.
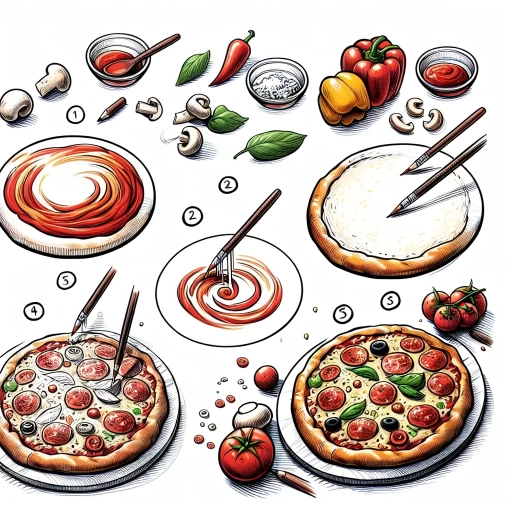
Sketching the Pizza: A Step-by-Step Guide
Sketching a pizza can be a fun and creative activity, but it requires some skill and attention to detail to make it look realistic. To create a mouth-watering pizza sketch, you need to consider several key elements, including the crust, toppings, and sauce and cheese effects. In this article, we will break down the process of sketching a pizza into three main steps: drawing the crust, adding toppings, and creating realistic sauce and cheese effects. By following these steps, you can create a delicious-looking pizza sketch that will make anyone's mouth water. First, let's start with the foundation of a great pizza sketch: the crust. A well-drawn crust can make or break the entire sketch, so it's essential to get it right. In the next section, we'll explore the key elements of drawing a realistic crust, including thickness, texture, and shape.
Drawing the Crust: Thickness, Texture, and Shape
Drawing the crust is a crucial step in sketching a pizza, as it provides the foundation for the entire pie. To start, consider the thickness of the crust, which can vary greatly depending on the type of pizza being depicted. A thin crust, such as that found on a Neapolitan-style pizza, will be almost delicate and crackery, while a thick crust, like that on a Chicago-style deep-dish pizza, will be more robust and doughy. When drawing the crust, use gentle, curved lines to suggest the rounded shape of the pizza, taking care to vary the thickness of the lines to convey the texture of the crust. For a crispy crust, use short, sharp lines to suggest the crunch and crackle of the cooked dough, while for a softer crust, use longer, more flowing lines to convey a sense of pliability. The shape of the crust is also important, as it can be round, oblong, or even square, depending on the type of pizza being drawn. To capture the shape of the crust, use a combination of curved and straight lines, taking care to suggest the gentle rise of the dough as it meets the sauce and toppings. By paying attention to the thickness, texture, and shape of the crust, artists can create a convincing and appetizing pizza that will make viewers' mouths water.
Adding Toppings: Proportions, Placement, and Variety
Adding toppings to your pizza drawing is where the magic happens, and it's essential to get the proportions, placement, and variety just right. Start by considering the size and shape of your pizza, as this will determine how many toppings you can fit and where they should be placed. A good rule of thumb is to balance your toppings in a way that creates visual harmony, with a mix of large and small elements, and a variety of textures and colors. For a classic margherita pizza, you might add a few slices of tomato, some fresh basil leaves, and a sprinkle of mozzarella cheese. For a meat-lovers pizza, you could add pepperoni, sausage, and bacon, along with some onions and bell peppers. Don't be afraid to get creative and add your own favorite toppings, but remember to keep the proportions in check – you don't want your pizza to look overloaded or messy. When it comes to placement, consider creating a pattern or a focal point, such as a cluster of toppings in the center of the pizza or a sprinkle of cheese around the edges. Finally, think about the variety of toppings you're using, and try to include a mix of different flavors, textures, and colors to create a visually appealing and appetizing pizza.
Creating Realistic Sauce and Cheese Effects
When it comes to creating realistic sauce and cheese effects in your pizza drawing, there are a few key techniques to keep in mind. For the sauce, start by using a warm red or orange color to create a base layer, then add subtle texture and shading to give it a sense of depth and dimension. You can use a small brush or a textured tool to create the illusion of tiny sauce bubbles and ridges. To add an extra layer of realism, try using a glazing technique to create a sense of shine and moisture on the surface of the sauce. This can be achieved by layering a thin, transparent wash of color over the top of the sauce, allowing it to pool and blend in certain areas. For the cheese, start by using a creamy white or yellow color to create a base layer, then add texture and shading to give it a sense of meltiness and stretchiness. You can use a palette knife or a textured tool to create the illusion of melted, gooey cheese strings. To add an extra layer of realism, try using a drybrushing technique to create a sense of crustiness and texture on the surface of the cheese. This can be achieved by dragging a almost-dry brush across the surface of the cheese, picking up texture and creating a sense of roughness. By combining these techniques, you can create a realistic and mouth-watering sauce and cheese effect that will make your pizza drawing look almost good enough to eat.
Adding Details and Finishing Touches to Your Pizza Drawing
Adding the final details to your pizza drawing can elevate it from a simple illustration to a mouth-watering masterpiece. To take your drawing to the next level, consider adding shading and lighting effects to create depth and dimension. This can be achieved by using various shading techniques, such as hatching and cross-hatching, to create a range of values and textures. Additionally, you can add background elements to create context and depth, such as a kitchen or restaurant setting, to help tell a story and engage the viewer. Finally, adding colors and textures can bring your pizza drawing to life, making it almost irresistible to the viewer. By incorporating these elements, you can create a visually appealing and engaging pizza drawing that will leave a lasting impression. Let's start by exploring how to enhance your pizza with shading and lighting effects.
Enhancing Your Pizza with Shading and Lighting Effects
When it comes to adding depth and dimension to your pizza drawing, shading and lighting effects can make all the difference. By incorporating these techniques, you can create a more realistic and appetizing pizza that seems to jump off the page. To start, consider the light source in your drawing. Is it coming from above, the side, or perhaps a warm glow from the oven? Once you've established the light source, you can begin to add shading to your pizza. Use a range of values, from light to dark, to create depth and dimension. For example, the crust might be lighter on top and darker towards the edges, while the cheese and toppings could be shaded to create a sense of texture and volume. Don't forget to add some subtle shading to the plate or surface the pizza is sitting on, as this will help to ground the drawing and create a sense of context. In addition to shading, you can also use lighting effects to enhance your pizza drawing. Consider adding some highlights to the cheese and toppings to create a sense of shine and freshness. You could also use a warm glow to suggest the pizza is hot and straight from the oven. By combining shading and lighting effects, you can create a pizza drawing that's not only visually appealing but also mouth-watering and inviting. Whether you're drawing a classic margherita or a loaded meat-lovers, these techniques will help to bring your pizza to life and make it a true showstopper.
Adding Background Elements to Create Context and Depth
Adding background elements to your pizza drawing can elevate it from a simple illustration to a visually appealing and engaging artwork. By incorporating context and depth, you can create a more immersive experience for the viewer. Start by adding a subtle gradient or texture to the background to give it some depth and dimension. You can also add some ambient lighting to create a warm and inviting atmosphere. Consider adding some background objects such as utensils, plates, or a tablecloth to create a sense of setting and context. These elements can help to tell a story and draw the viewer's eye into the composition. Additionally, you can experiment with different shapes and forms to create a sense of movement and energy in the background. For example, you can add some curved lines to suggest a plate or a bowl, or some geometric shapes to create a sense of texture and pattern. By adding these background elements, you can create a more dynamic and engaging pizza drawing that draws the viewer in and invites them to explore the composition.
Finalizing Your Drawing with Colors and Textures
Finalizing your drawing with colors and textures is the last step in bringing your pizza masterpiece to life. To start, choose a color palette that reflects the warm and inviting atmosphere of a freshly baked pizza. Earthy tones such as golden brown, crimson red, and olive green can evoke the feeling of a brick oven, while brighter colors like yellow and orange can add a pop of fun and playfulness. Consider the type of pizza you're drawing and the toppings you've included, as these can influence your color choices. For example, a Hawaiian pizza with ham and pineapple might call for a more vibrant and tropical color scheme. Once you've selected your colors, use a range of techniques such as hatching, cross-hatching, and stippling to add depth and texture to your drawing. You can also experiment with different materials like colored pencils, markers, or even paint to achieve the desired effect. To add an extra layer of realism, pay attention to the textures of the different elements in your drawing, from the crispy crust to the gooey cheese and savory toppings. By incorporating these details, you'll be able to create a drawing that's not only visually appealing but also mouth-wateringly delicious.