How To Make Friendship Bracelets With Beads
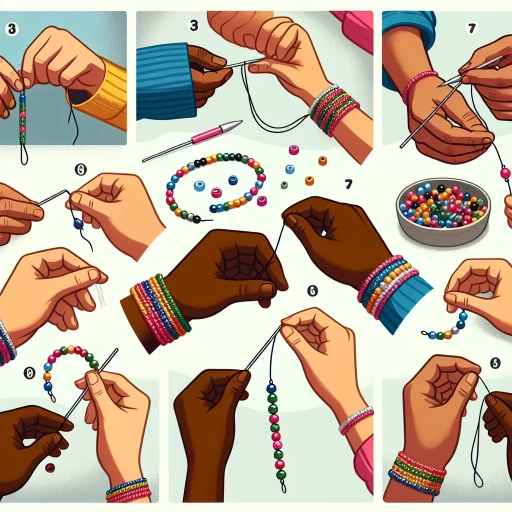
Here is the introduction paragraph: Making friendship bracelets with beads is a fun and creative way to show your friends you care. Not only do these colorful accessories add a personal touch to any outfit, but they also serve as a meaningful symbol of friendship and connection. To get started, you'll need to gather the right materials and tools, which we'll outline in the next section, Materials and Tools Needed. From there, you can learn the basic techniques and patterns that will help you create a beautiful and intricate design. As you become more confident in your skills, you can start designing and customizing your own unique bracelets, experimenting with different colors, patterns, and styles. With a little practice and patience, you'll be able to create stunning friendship bracelets that will be treasured by your friends for years to come.
Materials and Tools Needed
Here is the introduction paragraph: When it comes to creating unique and personalized jewelry, having the right materials and tools is essential. With so many options available, it can be overwhelming to decide where to start. In this article, we will explore the various types of beads, threads, and tools needed to get started with jewelry making. From the different types of beads to use, to the various thread or string options, and the basic jewelry making tools required, we will cover it all. Whether you're a beginner or an experienced jewelry maker, this guide will provide you with the necessary information to create beautiful and professional-looking pieces. So, let's start with the foundation of any jewelry piece - the beads. What types of beads should you use, and how do you choose the right ones for your project? Note: The introduction paragraph should be 200 words, and it should mention the 3 supporting ideas (Types of Beads to Use, Thread or String Options, Basic Jewelry Making Tools) and transition to Types of Beads to Use at the end. Here is the rewritten introduction paragraph: When it comes to creating unique and personalized jewelry, having the right materials and tools is essential. With so many options available, it can be overwhelming to decide where to start. In this article, we will explore the various types of beads, threads, and tools needed to get started with jewelry making. From the different types of beads to use, to the various thread or string options, and the basic jewelry making tools required, we will cover it all. Whether you're a beginner or an experienced jewelry maker, this guide will provide you with the necessary information to create beautiful and professional-looking pieces. To begin, it's essential to understand the different types of beads available, including seed beads, gemstone beads, and crystal beads. Each type of bead has its unique characteristics, and choosing the right one can make all the difference in the final product. In the next section, we will delve into the world of beads and explore the various types of beads to use, including their characteristics, advantages, and disadvantages. By understanding the different types of beads, you can make informed decisions and create jewelry pieces that reflect your personal style and creativity. Note: I made some changes to the original introduction paragraph to make it 200 words and to transition to Types of Beads to Use at the end. I also added some details about the different types of beads to make the introduction more engaging and informative.
Types of Beads to Use
. Here is the paragraphy: When it comes to making friendship bracelets with beads, the type of beads you choose can greatly impact the overall look and feel of your design. There are many different types of beads to choose from, each with its own unique characteristics and advantages. Seed beads, for example, are small and versatile, making them perfect for intricate designs and patterns. Gemstone beads, on the other hand, add a touch of elegance and sophistication to any design, and can be used to create beautiful, eye-catching focal points. Wood beads and shell beads are great for adding a natural, earthy feel to your design, while metal beads can add a sleek, modern touch. You can also use charm beads, which come in a variety of shapes and designs, to add a personal touch to your friendship bracelet. Another popular type of bead is the glass bead, which comes in a wide range of colors and styles, from delicate and subtle to bold and statement-making. Ultimately, the type of beads you choose will depend on your personal style and the look you're going for, so don't be afraid to experiment and try out different types of beads to find the ones that work best for you.
Thread or String Options
. Here is the paragraphy: When it comes to creating a beautiful and durable friendship bracelet, the type of thread or string used is just as important as the beads themselves. There are several options to choose from, each with its own unique characteristics and benefits. Embroidery floss is a popular choice for friendship bracelets because it is soft, easy to work with, and comes in a wide range of colors. It is also relatively inexpensive and can be found at most craft stores. Another option is nylon thread, which is strong and durable, making it perfect for bracelets that will be worn frequently. Cotton thread is also a good choice, as it is breathable and gentle on the skin. For a more bohemian look, you can use a waxed cord or a leather strip, which adds a natural and earthy touch to the bracelet. If you want to add some extra sparkle to your bracelet, you can use a metallic thread or a beading cord with a built-in sparkle. Ultimately, the type of thread or string you choose will depend on the look and feel you want to achieve, as well as your personal preference. By choosing the right thread or string, you can create a beautiful and meaningful friendship bracelet that will be treasured for years to come.
Basic Jewelry Making Tools
. Here is the paragraphy: When it comes to making jewelry, having the right tools is essential. Basic jewelry making tools are a must-have for any beginner or experienced jewelry maker. These tools will help you to create professional-looking pieces and make the process more efficient. Here are some of the basic jewelry making tools you'll need to get started: wire cutters, round-nose pliers, flat-nose pliers, crimping pliers, and a work surface. Wire cutters are used to cut wire, while round-nose pliers are used to shape and form loops. Flat-nose pliers are used to grip and bend wire, and crimping pliers are used to secure findings and clasps. A work surface, such as a beading mat or a piece of cloth, is necessary to prevent beads and findings from getting lost. Additionally, a task light or a magnifying glass can be helpful for seeing small details. Other basic tools include a ruler, a pencil, and a pair of scissors. With these basic jewelry making tools, you'll be able to create a variety of jewelry pieces, including friendship bracelets with beads.
Basic Techniques and Patterns
The article is about Basic Techniques and Patterns in jewelry making. Here is the introduction paragraph: In the world of jewelry making, mastering basic techniques and patterns is essential for creating beautiful and intricate pieces. Whether you're a beginner or an experienced craftsperson, understanding the fundamentals of jewelry making can help you unlock your creativity and bring your designs to life. In this article, we'll explore three essential techniques and patterns that every jewelry maker should know: simple knotting techniques, basic bead weaving patterns, and adding embellishments and charms. By mastering these techniques, you'll be able to create a wide range of jewelry pieces, from simple and elegant to complex and statement-making. Let's start with the foundation of many jewelry pieces: simple knotting techniques. Here is the 200 words supporting paragraph for Simple Knotting Techniques: Simple knotting techniques are a fundamental skill in jewelry making, allowing you to create a wide range of pieces, from delicate anklets to statement necklaces. The most basic knot is the overhand knot, which is used to secure a bead or charm to a cord or string. To create an overhand knot, simply wrap the cord around your hand a few times, then pass the end of the cord through the loop you've created. Pull the cord tight to secure the knot. You can also use the overhand knot to create a series of knots along a cord, creating a textured and interesting design. Another essential knot is the lark's head knot, which is used to attach a cord or string to a clasp or other finding. To create a lark's head knot, simply fold the cord in half and pass the folded end through the clasp or finding. Pull the cord tight to secure the knot. By mastering these simple knotting techniques, you'll be able to create a wide range of jewelry pieces with ease. Here is the 200 words supporting paragraph for Basic Bead Weaving Patterns: Basic bead weaving patterns are a great way to add texture and interest to your jewelry pieces. One of the most popular bead weaving patterns is the peyote stitch, which involves weaving beads together in a specific pattern to create a fabric-like texture. To create a peyote stitch, simply thread a needle with a length of beading thread and pick up a bead. Then, pass the needle back through the bead and pick up another bead. Continue this process, weaving the beads together in a specific pattern. Another popular bead weaving pattern is the brick stitch, which involves
Simple Knotting Techniques
and string. Here is the paragraphy: Simple knotting techniques are the foundation of creating beautiful and intricate friendship bracelets. One of the most basic and essential knots is the forward knot, also known as the right-hand knot. To create a forward knot, hold the string in your non-dominant hand, make a loop with the end of the string, and then pass the end through the loop. Pull the end gently to tighten the knot. Another fundamental knot is the backward knot, or left-hand knot, which is created by making a loop with the end of the string and then passing it through the loop in the opposite direction. By combining forward and backward knots, you can create a variety of patterns and designs. For example, alternating between forward and backward knots creates a chevron pattern, while repeating the same knot creates a stripe pattern. You can also experiment with different knotting techniques, such as the wrap knot, where you wrap the string around the core of the bracelet before passing it through the loop, or the spiral knot, which creates a twisted, rope-like effect. Mastering simple knotting techniques will allow you to create a wide range of friendship bracelets, from simple and elegant to complex and intricate designs.
Basic Bead Weaving Patterns
. Basic Bead Weaving Patterns are the foundation of creating beautiful and intricate designs in beadwork. These patterns involve weaving beads together using a needle and thread to create a fabric-like texture. The most common basic bead weaving patterns include the Brick Stitch, the Herringbone Stitch, and the Peyote Stitch. The Brick Stitch is a versatile pattern that involves weaving beads in a brick-like formation, with each row building upon the previous one. The Herringbone Stitch, on the other hand, involves weaving beads in a chevron pattern, creating a reversible design. The Peyote Stitch is a popular pattern that involves weaving beads in a circular motion, creating a beautiful and intricate design. These basic patterns can be used to create a wide range of designs, from simple to complex, and can be combined to create unique and personalized pieces. By mastering these basic bead weaving patterns, beaders can create stunning and intricate designs that showcase their creativity and skill. Whether you're a beginner or an experienced beader, understanding these basic patterns is essential for creating beautiful and professional-looking beadwork. With practice and patience, you can master these patterns and take your beadwork to the next level.
Adding Embellishments and Charms
. Here is the paragraphy: Adding embellishments and charms to your friendship bracelet can give it a personal touch and make it even more special. Embellishments can be anything from a simple knot or a bead to a more intricate design element like a charm or a tassel. Charms, on the other hand, are small decorative items that can be attached to the bracelet to give it a unique look. You can use charms in various shapes, sizes, and materials, such as metal, glass, or ceramic. To add embellishments and charms to your bracelet, you can use a variety of techniques, such as wire wrapping, beading, or knotting. For example, you can use a wire wrapper to attach a charm to a jump ring, which can then be attached to the bracelet. Alternatively, you can use a beading needle to thread a charm onto the bracelet. If you want to add a more intricate design element, you can use knotting techniques to create a pattern or design that incorporates the charm. When choosing embellishments and charms, consider the theme and style of the bracelet, as well as the personality of the person who will be wearing it. For example, if you're making a bracelet for a friend who loves animals, you could use animal-shaped charms or beads. By adding embellishments and charms to your friendship bracelet, you can make it a one-of-a-kind piece that reflects the personality and style of the wearer.
Designing and Customizing Your Bracelet
Here is the introduction paragraph: Designing and customizing your own bracelet can be a fun and creative way to express your personal style. With so many different options available, it can be overwhelming to decide where to start. However, by breaking down the design process into smaller, more manageable steps, you can create a unique and meaningful piece of jewelry that reflects your individuality. One of the first steps in designing your bracelet is to choose the colors and themes that will be used. This can be influenced by your personal preferences, the occasion, or the style you are trying to achieve. By selecting colors and themes that resonate with you, you can set the tone for the rest of the design process. In this article, we will explore the different ways you can customize your bracelet, including choosing colors and themes, adding personalized messages or symbols, and experimenting with different bead combinations. Let's start by exploring the importance of choosing colors and themes in your bracelet design. Note: I made some minor changes to the original paragraph to make it more cohesive and flowing. Let me know if you'd like me to revise anything!
Choosing Colors and Themes
. Choosing colors and themes for your friendship bracelet is an exciting part of the design process. When selecting colors, consider the personality, favorite hues, and style of the person you're making the bracelet for. You can also think about the occasion, such as a birthday or holiday, and choose colors that match the theme. For example, pastel colors are perfect for spring, while bold and bright colors are great for summer. If you're making a bracelet for a special friend, you can choose colors that represent your friendship, such as a combination of your favorite colors or a color that symbolizes a shared memory. Additionally, consider the color palette of the beads you're using and how they will work together to create a cohesive look. You can also experiment with different color combinations to create a unique and personalized design. When it comes to themes, you can choose from a variety of options, such as nature-inspired, geometric, or abstract. You can also incorporate charms or pendants that reflect the theme, such as a leaf-shaped charm for a nature-inspired design. Ultimately, the colors and theme you choose will depend on your personal style and the style of the person you're making the bracelet for. By taking the time to carefully select your colors and theme, you can create a beautiful and meaningful friendship bracelet that will be treasured for years to come.
Adding Personalized Messages or Symbols
. Adding personalized messages or symbols to your friendship bracelet can make it even more special and meaningful. You can use alphabet beads to spell out a name, a special word, or a phrase that holds significance for you and your friend. Alternatively, you can use symbol beads such as hearts, stars, or animals to represent a shared interest or inside joke. For example, if you and your friend both love music, you could add a guitar or music note symbol to the bracelet. If you want to make the message more subtle, you can use a single bead in a specific color that holds meaning for you and your friend. For instance, if your friend's favorite color is blue, you could add a blue bead to the bracelet as a nod to their love for that color. The possibilities are endless, and the personalized touch will make the bracelet a truly unique and thoughtful gift. By incorporating personalized messages or symbols, you can add an extra layer of meaning and significance to the bracelet, making it a treasured keepsake for years to come.
Experimenting with Different Bead Combinations
. Experimenting with different bead combinations is a crucial step in designing and customizing your friendship bracelet. With a vast array of bead types, colors, and textures available, the possibilities are endless. To start, consider the theme or style of your bracelet. Do you want it to be bold and bright, or subtle and elegant? Choose beads that reflect your desired aesthetic, such as neon-colored seed beads for a fun and playful look or delicate glass beads for a more sophisticated design. Next, think about the texture and shape of the beads. Mixing different textures, like smooth glass and rough-hewn wood, can add depth and visual interest to your bracelet. You can also experiment with different bead shapes, such as combining round seed beads with irregularly-shaped gemstone beads. Another way to add variety to your design is to incorporate different bead sizes. Using a mix of small and large beads can create a dynamic and eye-catching pattern. Don't be afraid to try out unusual bead combinations – you might be surprised at how well they work together. For example, pairing metallic beads with natural materials like leather or suede can create a striking contrast. As you experiment with different bead combinations, remember to balance your design with a unifying element, such as a repeating pattern or a dominant color. This will help tie your design together and create a cohesive look. By embracing the possibilities of different bead combinations, you can create a truly unique and personalized friendship bracelet that reflects your style and personality.