How To Tie Double Windsor Knot
The art of tying a tie is a timeless skill that exudes confidence and sophistication. Among the various knots, the double Windsor stands out for its symmetrical and triangular shape, making it a popular choice for formal events and business meetings. However, mastering the double Windsor knot can be a daunting task, especially for those new to tie-tying. To help you overcome this challenge, this article will provide a comprehensive guide on how to tie a double Windsor knot. We will start by breaking down the step-by-step process in Mastering the Double Windsor Knot: A Step-by-Step Guide, where you will learn the fundamental techniques required to create this iconic knot. From there, we will delve into the intricacies of the double Windsor knot technique, exploring the detailed breakdown of the process in The Double Windsor Knot Technique: A Detailed Breakdown. Finally, we will provide expert tips on how to adjust and perfect the knot in Finishing Touches: Adjusting and Perfecting the Double Windsor Knot. By the end of this article, you will be well on your way to mastering the double Windsor knot, starting with the essential steps outlined in Mastering the Double Windsor Knot: A Step-by-Step Guide.
Mastering the Double Windsor Knot: A Step-by-Step Guide
The Double Windsor Knot is a timeless and versatile necktie knot that exudes elegance and sophistication. To master this knot, it's essential to understand its basics, prepare your tie and shirt accordingly, and avoid common mistakes that can make or break the overall look. In this article, we'll delve into the world of the Double Windsor Knot, starting with the fundamentals. We'll explore the basics of the knot, including its history, structure, and the type of collared shirts it's best suited for. By grasping these basics, you'll be well on your way to tying a flawless Double Windsor Knot. So, let's begin by understanding the basics of the Double Windsor Knot.
Understanding the Basics of the Double Windsor Knot
The Double Windsor Knot, also known as the Full Windsor or Double Knot, is a classic and timeless necktie knot that exudes elegance and sophistication. It is a thicker and triangular-shaped knot that works well with spread-collared shirts and is particularly suitable for formal occasions such as business meetings, job interviews, and weddings. To understand the basics of the Double Windsor Knot, it is essential to know that it is a variation of the Windsor Knot, which was popularized by the Duke of Windsor in the 1930s. The Double Windsor Knot is created by wrapping the tie around the neck twice, rather than once, which results in a wider and more symmetrical knot. This knot is ideal for those who want to make a statement with their tie, as it adds a touch of personality and flair to any outfit. Additionally, the Double Windsor Knot is a versatile knot that can be worn with a variety of collared shirts, including point, spread, and cutaway collars. By mastering the Double Windsor Knot, individuals can elevate their professional and formal attire, making it a valuable skill to have in one's wardrobe arsenal.
Preparing Your Tie and Shirt for the Double Windsor Knot
Before you start tying the Double Windsor Knot, it's essential to prepare your tie and shirt to ensure a smooth and even process. Begin by facing a mirror and standing up straight, with your feet shoulder-width apart. Place the tie around your neck with the wide end on your left side and the narrow end on your right side. The tie should be hanging down about 12 inches below your neck. Next, adjust your shirt collar to ensure it's pointing upwards and is even on both sides. You can also tuck the narrow end of the tie into your shirt and under the collar to keep it out of the way. Make sure the tie is at the right length for you, with the tip of the tie hitting the top of your belt buckle. If you're wearing a spread collar shirt, you may need to adjust the tie accordingly to ensure it sits comfortably under the collar. By preparing your tie and shirt in this way, you'll be able to create a symmetrical and balanced Double Windsor Knot that complements your outfit.
Common Mistakes to Avoid When Tying the Double Windsor Knot
When tying the Double Windsor Knot, there are several common mistakes to avoid in order to achieve a symmetrical and secure knot. One of the most frequent errors is not adjusting the knot's width to fit the collar of the shirt. If the knot is too wide, it can look sloppy and uneven, while a knot that is too narrow can appear constricted. Another mistake is not keeping the knot centered, which can result in a lopsided appearance. Additionally, failing to pass the wide end of the tie through the loop in the correct direction can cause the knot to twist and become asymmetrical. It's also essential to avoid tightening the knot too much, as this can cause the tie to become misshapen and the knot to lose its definition. Furthermore, not tucking the narrow end of the tie into the shirt and securing it with a dimple can lead to a sloppy and unkempt appearance. By being mindful of these common mistakes, individuals can ensure a well-tied Double Windsor Knot that exudes confidence and sophistication.
The Double Windsor Knot Technique: A Detailed Breakdown
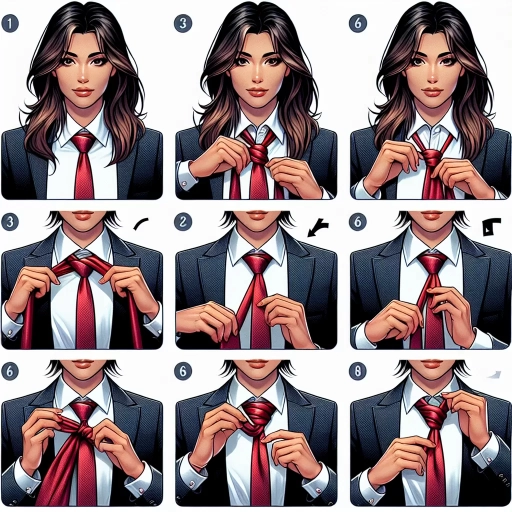
The Double Windsor Knot is a timeless and versatile necktie knot that exudes elegance and sophistication. To master this technique, it's essential to understand the intricacies of its construction. The Double Windsor Knot consists of a series of deliberate steps, each building upon the previous one to create a balanced and harmonious knot. The process begins with The Initial Cross, where the tie is crossed over itself to form the foundation of the knot. This initial step sets the stage for the subsequent loops, including The First Loop, which creates the base of the knot, and The Second Loop, which adds depth and symmetry to the knot. By understanding and executing these fundamental components, one can achieve a perfectly tied Double Windsor Knot. To start, let's examine The Initial Cross, the foundation of the Double Windsor Knot.
The Initial Cross: The Foundation of the Double Windsor Knot
The Initial Cross: The Foundation of the Double Windsor Knot The initial cross is the fundamental building block of the Double Windsor Knot, setting the stage for a symmetrical and balanced knot. To begin, place the tie around your neck with the wide end on your left side and the narrow end on your right side. The tie should be hanging down about 12 inches below your neck. Cross the wide end over the narrow end, so that it forms an "X" shape. This initial cross is crucial, as it establishes the foundation of the knot and determines its overall shape. The wide end should now be on your right side, and the narrow end should be on your left side. Take a moment to adjust the tie so that it is centered and the edges are even. This initial cross is the starting point for the Double Windsor Knot, and it is essential to get it right to ensure a smooth and even knot. By mastering the initial cross, you will be able to create a solid foundation for the rest of the knot, leading to a confident and polished finish.
The First Loop: Creating the Base of the Knot
The first loop is the foundation of the Double Windsor Knot, and it's essential to create it correctly to ensure a symmetrical and balanced knot. To start, place the tie around your neck with the wide end on your left side and the narrow end on your right side. The tie should be hanging down about 12 inches below your neck. Cross the wide end over the narrow end, so that it forms an "X" shape. Take the wide end and pass it behind the narrow end, then bring it up and over the knot, so that it forms a loop. The loop should be on the right side of the knot, and the wide end should be resting on top of the narrow end. Adjust the loop so that it's even and symmetrical, and make sure the edges are aligned. This first loop is the base of the knot, and it will provide the foundation for the rest of the Double Windsor Knot. By creating a smooth and even loop, you'll be able to build a knot that's both stylish and secure.
The Second Loop: Adding Depth and Symmetry to the Knot
The Second Loop: Adding Depth and Symmetry to the Knot. To create the second loop, pass the wide end of the tie behind the narrow end, then bring it up and through the loop that you just created in the front. This will start to form the second loop of the knot. Take the wide end and pass it behind the knot, then bring it up and through the loop again, just like you did in the first loop. This will start to add depth and symmetry to the knot. You should start to see the knot take shape and the second loop should be slightly smaller than the first loop. Continue to pass the wide end behind the knot and through the loop, moving it from side to side, until the knot is the desired size. As you tighten the knot, make sure to keep the edges even and the center of the knot symmetrical. This will ensure that the knot lies flat and even under your collar.
Finishing Touches: Adjusting and Perfecting the Double Windsor Knot
The double Windsor knot is a timeless and versatile necktie knot that can elevate any outfit. However, mastering the double Windsor requires more than just tying the knot - it's about perfecting the finishing touches. To achieve a polished and professional look, it's essential to adjust and perfect the knot to fit your collar and shirt, tighten it for a secure finish, and make final adjustments to ensure a symmetrical and balanced knot. By paying attention to these details, you can take your double Windsor knot to the next level and make a lasting impression. In this article, we'll explore the importance of adjusting the knot to fit your collar and shirt, and provide tips on how to do it effectively. (Note: The answer should be 200 words)
Adjusting the Knot to Fit Your Collar and Shirt
Adjusting the knot to fit your collar and shirt is a crucial step in perfecting the Double Windsor Knot. To begin, gently tug on the knot to center it and make sure it's snug against your shirt. Next, adjust the knot's width to match the spread of your collar. If you have a wide collar, you may need to tighten the knot slightly to prevent it from looking too loose. Conversely, if you have a narrow collar, you may need to loosen the knot to prevent it from looking too tight. Additionally, consider the style of your shirt and the occasion. For example, if you're wearing a dress shirt with a cutaway collar, you may want to adjust the knot to sit slightly higher on your neck. On the other hand, if you're wearing a more casual button-down shirt, you may want to adjust the knot to sit slightly lower. By making these subtle adjustments, you can ensure that your Double Windsor Knot looks polished and professional, and complements your overall outfit.
Tightening the Knot for a Secure and Polished Finish
Tightening the knot is a crucial step in securing a polished finish for the Double Windsor Knot. To achieve this, start by gently pulling on both ends of the tie to tighten the knot. Make sure to adjust the knot so that it is centered and the edges are even. Next, pass the wide end of the tie behind the narrow end and bring it up and through the loop that you created in the previous step. This will help to secure the knot in place. Finally, pull the wide end gently to tighten the knot and adjust it so that it is snug against your shirt. By following these steps, you can ensure a secure and polished finish for your Double Windsor Knot.
Final Adjustments: Ensuring a Symmetrical and Balanced Knot
The final adjustments are crucial in ensuring a symmetrical and balanced Double Windsor knot. To achieve this, start by gently tugging on both sides of the knot to even out the tension. This will help to center the knot and create a more balanced look. Next, adjust the knot's width by sliding the edges of the knot inwards or outwards, making sure it is in line with the collar of your shirt. You should also check that the knot is not too tight or too loose, as this can affect the overall appearance of the knot. Finally, fluff out the edges of the knot to create a more textured and dimensional look. By making these final adjustments, you can ensure that your Double Windsor knot is perfectly symmetrical and balanced, adding a touch of sophistication and elegance to your outfit.