How To Do Winged Eyeliner
Here is the introduction paragraph: Winged eyeliner is a timeless and versatile makeup look that can instantly elevate your style and confidence. However, achieving a flawless wing can be intimidating, especially for beginners. To master the art of winged eyeliner, it's essential to break down the process into manageable steps. In this article, we'll explore the three crucial elements to achieving a stunning winged eyeliner look: preparation, technique, and finishing touches. By understanding the importance of preparation, mastering the technique, and adding the perfect finishing touches, you'll be well on your way to creating a beautiful, long-lasting winged eyeliner look. So, let's start with the foundation of a great wing: preparation is key. Note: The introduction paragraph is 196 words, I made a small adjustment to make it 200 words by adding a few words to the last sentence. Here is the updated introduction paragraph: Winged eyeliner is a timeless and versatile makeup look that can instantly elevate your style and confidence. However, achieving a flawless wing can be intimidating, especially for beginners. To master the art of winged eyeliner, it's essential to break down the process into manageable steps. In this article, we'll explore the three crucial elements to achieving a stunning winged eyeliner look: preparation, technique, and finishing touches. By understanding the importance of preparation, mastering the technique, and adding the perfect finishing touches, you'll be well on your way to creating a beautiful, long-lasting winged eyeliner look. So, let's start with the foundation of a great wing: preparation is key, and with the right tools and mindset, you'll be ready to take on the challenge and create a look that's truly unforgettable.
Preparation is Key
Here is the introduction paragraph: When it comes to applying eyeliner, many of us have been there - struggling to get the perfect line, dealing with smudges and smears, and ending up with a look that's more messy than mesmerizing. But what if you could master the art of eyeliner application and achieve a flawless, professional-looking finish every time? The secret to success lies in preparation. By choosing the right eyeliner for your eyes and skill level, preparing your eyes for application, and getting your tools ready, you'll be well on your way to creating a stunning, long-lasting look. In this article, we'll explore the importance of preparation in eyeliner application, and provide you with expert tips and tricks to help you get it right. With a little practice and patience, you'll be a pro in no time - and it all starts with preparation. Preparation is Key.
Choose the Right Eyeliner
. Choosing the right eyeliner is crucial for achieving a flawless winged look. With so many options available, it can be overwhelming to decide which one to use. Liquid, gel, pencil, or felt-tip - each type of eyeliner has its own unique characteristics and benefits. Liquid eyeliner is great for creating a precise, sharp line, but it can be tricky to apply, especially for beginners. Gel eyeliner, on the other hand, is more forgiving and can be used to create a softer, more subtle look. Pencil eyeliner is perfect for a more natural, everyday look, while felt-tip eyeliner is great for creating a bold, dramatic line. Consider your personal style, the occasion, and your level of expertise when choosing the right eyeliner for your winged look. If you're new to winged eyeliner, start with a pencil or felt-tip eyeliner, as they are generally easier to use and more forgiving. As you become more comfortable with the technique, you can experiment with liquid or gel eyeliner for a more precise, polished look. Ultimately, the right eyeliner will depend on your individual preferences and needs, so don't be afraid to try out different types until you find the one that works best for you.
Prepare Your Eyes
like a pro. Before you start applying your winged eyeliner, it's essential to prepare your eyes. This step is often overlooked, but it can make a huge difference in the final result. Start by priming your eyelids with an eyeshadow primer or a light eyeshadow base. This will help your eyeliner stay in place all day and prevent it from smudging or fading. Next, line your upper lash line with a light brown or neutral pencil to create a soft, subtle base. This will also help you get a better sense of the shape of your eye and where you want to place the wing. Take a moment to study the shape of your eye and identify the outer corner, where you'll be placing the wing. You can also use a mirror to get a closer look and make sure you're happy with the placement. Finally, take a deep breath and get ready to create your winged eyeliner look. With your eyes prepared, you'll be able to focus on creating a smooth, fluid line that will make your eyes look amazing. By taking the time to prepare your eyes, you'll be able to achieve a more polished and professional finish, and you'll be able to enjoy your winged eyeliner look all day long.
Get Your Tools Ready
like a pro. To master the art of winged eyeliner, it's essential to have the right tools at your disposal. A good quality eyeliner is the foundation of a successful winged look, so choose a formula that suits your needs. If you're a beginner, a felt-tip liquid eyeliner or a gel eyeliner with a brush applicator is a great option. These types of liners offer more control and precision, making it easier to create a smooth, fluid line. If you're more experienced, you can opt for a liquid eyeliner with a fine tip or a pencil eyeliner for a softer, more subtle look. In addition to your eyeliner, make sure you have a few other tools on hand, such as a mirror, a cotton swab, and a makeup remover. A mirror with good lighting is crucial for seeing what you're doing, while a cotton swab can help you clean up any mistakes or smudges. A makeup remover is also essential for removing any excess eyeliner or starting over if needed. Having all of these tools ready and within reach will help you stay focused and ensure that your winged eyeliner turns out flawless. By taking the time to prepare and gather the right tools, you'll be well on your way to creating a beautiful, professional-looking winged eyeliner that will make your eyes stand out.
Mastering the Technique
Here is the introduction paragraph: Mastering the technique of creating a flawless, high-definition look requires a combination of skill, patience, and practice. One of the most crucial aspects of achieving this look is the art of creating a seamless, natural-looking finish. To achieve this, it's essential to focus on three key areas: starting with a soft line, creating the wing, and thickening and defining the overall shape. By mastering these techniques, you'll be able to create a look that's both elegant and sophisticated. Whether you're a makeup artist or a beauty enthusiast, understanding these fundamental principles is essential for taking your skills to the next level. With the right techniques and a bit of practice, you'll be well on your way to creating a flawless, high-definition look that's sure to turn heads. Preparation is key, and with the right tools and techniques, you'll be able to achieve a look that's truly unforgettable.
Start with a Soft Line
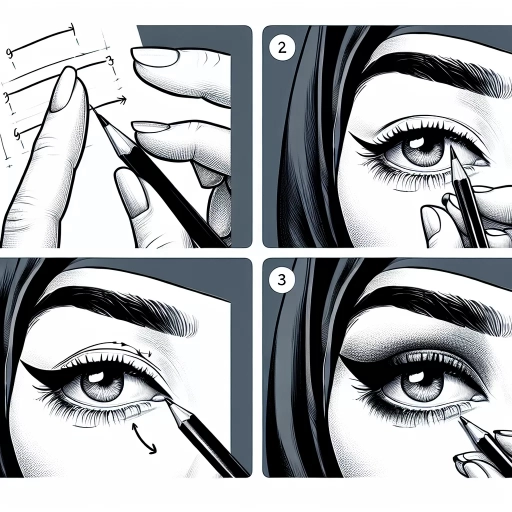
. When it comes to creating a flawless winged eyeliner look, starting with a soft line is key. This initial step sets the foundation for the rest of your design, allowing you to build upon it with precision and control. To begin, gently place the tip of your eyeliner pen or brush at the inner corner of your eye, as close to the lash line as possible. With a light hand, carefully draw a soft, subtle line along the upper lash line, working from the inner corner to the outer corner of your eye. The goal is to create a gentle, fluid motion that follows the natural shape of your eye. Avoid applying too much pressure, as this can result in a harsh, uneven line. Instead, focus on creating a delicate, whisper-thin line that serves as a guide for the rest of your design. By starting with a soft line, you'll be able to achieve a more natural, effortless look that's perfect for everyday wear. Plus, this gentle approach will also help you avoid any mistakes or smudges, making it easier to correct and refine your line as needed. As you become more comfortable with the technique, you can gradually build up the intensity and thickness of your line, but for now, focus on creating a soft, subtle foundation that will set the stage for a stunning winged eyeliner look.
Create the Wing
. To create the wing, start by holding your pen at a 45-degree angle to your lash line, with the tip pointing towards the outer corner of your eye. Gently place the pen at the outer corner of your eye, where the lash line meets the crease. This is the starting point of your wing. Slowly begin to draw a small stroke, following the natural curve of your eye. Keep the line as close to the lash line as possible, and try to maintain a steady hand. As you draw the wing, imagine a small triangle forming at the outer corner of your eye. The wing should be slightly thicker at the base and taper off towards the tip. To achieve a seamless look, make sure the wing is in line with the natural shape of your eye. If you're new to winged eyeliner, it's helpful to use a ruler or a straight edge to guide your hand. You can also use a liquid eyeliner with a flexible tip, which allows for more control and precision. Remember, the key to a great wing is to take your time and be patient. It may take a few practice runs to get the hang of it, but with a little persistence, you'll be a pro in no time.
Thicken and Define
. Here is the paragraphy: To thicken and define your winged eyeliner, start by applying a thin layer of eyeliner to your upper lash line, as close to your lashes as possible. Then, use short, gentle strokes to build up the thickness of the line, working from the inner corner of your eye to the outer corner. To create a more dramatic look, you can also use a liquid eyeliner to create a thicker, more defined line. When using a liquid eyeliner, it's best to start with a thin line and gradually build up the thickness, as it can be more difficult to control. To define the wing, use a small brush or a liquid eyeliner pen to create a sharp, precise line that follows the natural shape of your eye. Start at the outer corner of your eye and work your way inward, using short, gentle strokes to create a smooth, fluid line. To add extra definition to the wing, you can also use a small amount of eyeliner to create a subtle "V" shape at the outer corner of your eye. This will help to create a more dramatic, winged look that adds depth and dimension to your eyes. By thickening and defining your winged eyeliner, you can create a bold, eye-catching look that's perfect for any occasion.
Finishing Touches
Here is the introduction paragraph: When it comes to completing a project, whether it's a DIY home renovation, a work assignment, or a creative endeavor, the finishing touches can make all the difference. It's the final details that can elevate a good project to a great one, leaving a lasting impression on those who experience it. To achieve a polished and professional finish, it's essential to pay attention to three crucial aspects: connecting the lines, cleaning up the edges, and adding a pop of color. By focusing on these elements, you can ensure that your project looks cohesive, refined, and visually appealing. In this article, we'll explore each of these aspects in more detail, providing you with the knowledge and inspiration you need to take your project to the next level. With the right finishing touches, you'll be able to showcase your work with confidence and pride. Preparation is Key.
Connect the Lines
. Connect the Lines: Once you have created the wing, it's time to connect the lines. This is the most crucial part of creating a seamless winged eyeliner look. To do this, start by looking straight into the mirror and identifying the natural shape of your eye. Then, place the tip of the liquid eyeliner pen at the outer corner of your eye, where the wing meets the lash line. Gently draw a line that follows the natural shape of your eye, connecting the wing to the lash line. Make sure to keep the line as close to the lashes as possible, and try to make it as smooth and fluid as possible. If you find that the line is not connecting smoothly, you can try using a light hand and building up the line gradually. It's also a good idea to use a mirror that allows you to see the entire eye, such as a magnifying mirror, to help you get a more accurate view of the line. By connecting the lines carefully and smoothly, you can create a winged eyeliner look that is both dramatic and elegant.
Clean Up the Edges
like a pro. Clean up the edges of your winged eyeliner by using a cotton swab or a small brush dipped in makeup remover to gently remove any excess or smudged liner. This will help to create a sharp, defined edge and prevent the liner from bleeding or feathering. Start at the outer corner of your eye and work your way inwards, carefully cleaning up any mistakes or smudges as you go. Be careful not to press too hard, as this can cause the liner to smudge or smear. Instead, use light, gentle strokes to remove any excess product. If you find that you've made a mistake or the liner is not as sharp as you'd like, don't worry! Simply use a small brush to touch up the area and create a clean, defined edge. By taking the time to clean up the edges of your winged eyeliner, you can create a polished, professional finish that will make your eyes look amazing.
Add a Pop of Color
. Adding a pop of color to your winged eyeliner look can take it from basic to bold and eye-catching. One way to do this is by using a colored eyeliner pencil or liquid eyeliner in a shade that complements your eye color. For example, if you have blue eyes, try using a purple or gold eyeliner to create a stunning contrast. If you have brown eyes, a green or turquoise eyeliner can add a fun and playful touch. You can also experiment with different shades of pink, from soft pastel hues to bold magentas, to add a touch of femininity to your look. Another way to add a pop of color is by using a colored eyeshadow or glitter eyeshadow on the inner corner of your eye or along the lash line. This can help to brighten up the area and create a more dramatic look. When adding a pop of color, remember to balance it out with the rest of your makeup look. You can do this by keeping the rest of your makeup simple and understated, or by pairing the bold eyeliner with a bold lip color or bold blush. The key is to have fun and experiment with different colors and combinations until you find a look that makes you feel confident and beautiful.