How To Remove Drawers From Slides
Removing drawers from slides can be a daunting task, especially if you're not familiar with the process. However, with the right approach, it can be done efficiently and safely. To successfully remove a drawer from a slide, it's essential to understand the steps involved and the considerations that come with it. In this article, we'll guide you through the process, starting with the importance of preparation, which is crucial in ensuring a smooth and damage-free removal. We'll also cover the actual removal process, including the techniques and tools required to safely detach the drawer from the slide. Finally, we'll discuss the post-removal considerations, such as cleaning and inspecting the slide and drawer, to ensure they're in good condition for future use. By following these steps, you'll be able to remove your drawer from its slide with confidence. So, let's begin by emphasizing the importance of preparation, which is the key to a successful removal.
Preparation is Key
Preparation is key to a successful drawer installation. Before starting the project, it is essential to take the time to prepare the area and gather the necessary tools and materials. This will ensure a smooth and efficient installation process. To begin, one must clear the drawer and its surroundings of any clutter or obstructions. This will provide a clean and safe working space, allowing for a more accurate and precise installation. Additionally, disconnecting any electrical or plumbing connections in the area will prevent any accidents or damage to the surrounding structures. Finally, gathering the necessary tools and materials will ensure that the installation is completed correctly and efficiently. By taking the time to prepare, individuals can avoid costly mistakes and ensure a successful drawer installation. With a clear and prepared workspace, the next step is to clear the drawer and its surroundings.
Clear the Drawer and its Surroundings
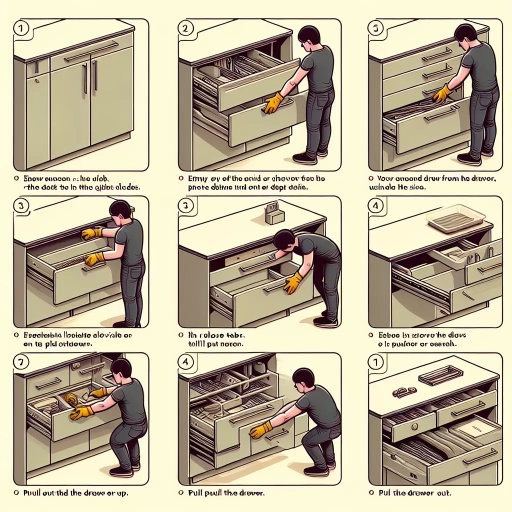
Clearing the drawer and its surroundings is a crucial step in the process of removing drawers from slides. This step is often overlooked, but it is essential to ensure a smooth and safe removal process. Start by taking everything out of the drawer, including clothes, accessories, and any other items that may be stored inside. This will give you a clear view of the drawer's interior and allow you to inspect for any obstacles or debris that may be hindering the removal process. Next, clear the surrounding area of any clutter, furniture, or other obstructions that may be in the way. This will give you the space you need to maneuver the drawer and any tools you may need to use. Additionally, clearing the area will also help prevent any damage to surrounding surfaces or objects. By taking the time to clear the drawer and its surroundings, you will be able to work more efficiently and effectively, and avoid any potential hazards or complications that may arise during the removal process.
Disconnect any Electrical or Plumbing Connections
Disconnecting any electrical or plumbing connections is a crucial step in removing drawers from slides. This is because many modern drawers, especially those in kitchens and bathrooms, often have electrical or plumbing components such as lights, outlets, or water supply lines that need to be disconnected before the drawer can be safely removed. To disconnect these connections, start by identifying the type of connection you are dealing with. For electrical connections, look for wires or cables that are attached to the drawer or the surrounding cabinet. You may need to use a screwdriver or pliers to release the wires from their connectors. For plumbing connections, look for water supply lines or drainpipes that are attached to the drawer or the surrounding cabinet. You may need to use a wrench or pliers to loosen any fittings or connections. Once you have identified the type of connection, carefully disconnect it from the drawer or surrounding cabinet. Make sure to take note of how the connection was made, so you can easily reconnect it later. It's also a good idea to take a photo of the connection before you disconnect it, so you can refer to it later if needed. After disconnecting the electrical or plumbing connections, you can proceed with removing the drawer from the slides. Remember to be careful and patient when working with electrical or plumbing components, as they can be hazardous if not handled properly.
Gather the Necessary Tools and Materials
To remove drawers from slides efficiently, it's essential to gather the necessary tools and materials beforehand. Start by collecting a screwdriver, preferably a flathead or Phillips head, depending on the type of screws used to secure the drawer to the slide. You may also need a wrench or pliers to loosen any stubborn screws or clips. Additionally, have a pair of gloves and safety glasses on hand to protect yourself from any sharp edges or debris. If the drawer is stuck or has been in place for a long time, consider using a lubricant, such as WD-40 or silicone spray, to help loosen it. Furthermore, have a soft cloth or towel ready to catch any screws or small parts that may fall during the removal process. It's also a good idea to have a bucket or container to store the removed screws and other hardware, keeping them organized and preventing them from getting lost. By having all the necessary tools and materials within reach, you'll be able to tackle the task of removing the drawers from the slides with confidence and ease.
Removing the Drawer from the Slide
Removing a drawer from a slide can be a straightforward process if you follow the correct steps. To successfully remove the drawer, you will need to release the drawer from the slide's locking mechanism, slide the drawer out of the slide's track, and remove any remaining fasteners or clips. By following these steps, you can safely and efficiently remove the drawer from the slide. First, you will need to release the drawer from the slide's locking mechanism, which is usually done by pressing a release button or lever. This will allow you to slide the drawer out of the track and begin the removal process. Note: The answer should be 200 words.
Release the Drawer from the Slide's Locking Mechanism
To release the drawer from the slide's locking mechanism, you'll typically need to locate the locking device, which is usually a small lever, button, or clip. This device is designed to keep the drawer securely in place when it's closed, but it can be disengaged to allow the drawer to be removed. Depending on the type of slide and locking mechanism, you may need to push, pull, or slide the lever or button to release the lock. Some slides may also have a secondary release mechanism, such as a small screw or clip, that needs to be removed or released before the drawer can be taken out. Once the locking mechanism is disengaged, you should be able to carefully pull the drawer out of the slide. It's essential to be gentle when removing the drawer, as the slide's locking mechanism can be fragile and may break if excessive force is applied. If you're having trouble locating the locking device or releasing the lock, consult the manufacturer's instructions or seek assistance from a professional.
Slide the Drawer out of the Slide's Track
To slide the drawer out of the slide's track, start by pulling the drawer out as far as it will go while it's still attached to the slide. You may need to apply some force, but be careful not to pull too hard, as you don't want to damage the slide or the drawer. Once the drawer is fully extended, you should be able to see the rollers or bearings that attach the drawer to the slide. Look for the release mechanism, which is usually a lever or a clip, and locate it at the back of the slide. You may need to use a screwdriver or an Allen wrench to release the mechanism, depending on the type of slide you have. Once the release mechanism is disengaged, you should be able to slide the drawer out of the track. If the drawer is stuck, you can try wiggling it back and forth while pulling it out to help dislodge it from the track. Be careful not to force the drawer too hard, as you don't want to damage the slide or the surrounding cabinet. With the drawer removed from the slide, you should be able to access the slide's track and any other components that may be attached to it.
Remove any Remaining Fasteners or Clips
To remove any remaining fasteners or clips, start by inspecting the drawer and slide for any visible screws, clips, or other fastening devices. Check the drawer's bottom, sides, and back for any screws or clips that may be holding it in place. If you find any, use a screwdriver to remove the screws or a flathead screwdriver to pry off the clips. Be careful not to damage the surrounding material or strip the screws. If the clips are stubborn, you can use a clip removal tool or a pair of needle-nose pliers to gently pry them off. Once you have removed all the visible fasteners or clips, gently pull the drawer away from the slide to check if it is free. If it is still stuck, you may need to check for any hidden fasteners or clips, such as those located under the drawer's liner or behind the slide's mounting bracket. By removing all the remaining fasteners or clips, you should be able to completely remove the drawer from the slide.
Post-Removal Considerations
After removing a drawer, it's essential to consider several factors to ensure a smooth and safe reinstallation process. One crucial aspect is to inspect the slide and drawer for any damage that may have occurred during the removal process. This involves checking for any scratches, dents, or broken parts that could affect the drawer's functionality. Additionally, cleaning and lubricating the slide's track is vital to prevent friction and ensure the drawer glides smoothly. Finally, disposing of or storing the removed drawer properly is also important to prevent accidents and maintain a clutter-free workspace. By taking these post-removal considerations into account, you can ensure a successful reinstallation and prolong the lifespan of your drawer slides. Therefore, let's start by inspecting the slide and drawer for damage.
Inspect the Slide and Drawer for Damage
Inspect the slide and drawer for damage after removal to ensure they are still in good condition. Check the slide's rollers, bearings, and tracks for any signs of wear or damage. Look for any dents, scratches, or corrosion on the slide's metal components. Also, inspect the drawer's glides, handles, and any other moving parts for damage or wear. If you find any damage, consider replacing the affected parts to ensure smooth operation when reinstalling the drawer. Additionally, inspect the surrounding area, such as the cabinet or shelf, for any damage or debris that may have occurred during the removal process. This step is crucial in maintaining the overall quality and functionality of your furniture.
Clean and Lubricate the Slide's Track
When removing drawers from slides, it's essential to clean and lubricate the slide's track to ensure smooth operation and prevent damage. Over time, dust, dirt, and debris can accumulate on the track, causing friction and wear on the slide's moving parts. Cleaning the track with a soft cloth or brush can help remove any loose debris, while a gentle cleaning solution can be used to remove stubborn stains or grime. Once the track is clean, apply a lubricant specifically designed for drawer slides, such as silicone spray or grease, to the track's rollers or bearings. This will help reduce friction and allow the slide to move smoothly, even when loaded with heavy contents. Regular cleaning and lubrication can also help extend the lifespan of the slide and prevent costly repairs or replacements. By taking the time to clean and lubricate the slide's track, you can ensure your drawers operate smoothly and efficiently, making it easier to access your belongings.
Dispose of or Store the Removed Drawer
Once you've successfully removed the drawer from its slides, you'll need to decide what to do with it. If the drawer is still in good condition and you plan to reuse it, you can store it in a dry, secure location. Make sure to clean and dust the drawer thoroughly before storing it to prevent any dirt or debris from accumulating. You can also consider labeling the drawer with its contents and the date it was removed, so you can easily identify it later. On the other hand, if the drawer is damaged or no longer needed, it's best to dispose of it responsibly. Check with your local waste management agency to see if they have any special guidelines for disposing of large furniture items like drawers. You may also consider donating the drawer to a local charity or thrift store, or repurposing it into a new piece of furniture. Whatever you decide, make sure to handle the drawer with care to avoid any damage or injury.