How To Make Dark Brown
Here is the introduction paragraph: Are you looking to achieve a rich, dark brown hair color? Whether you're seeking a dramatic change or a subtle update, dark brown hair can be a stunning and versatile option. To get the best results, it's essential to understand the basics of hair dye, prepare your hair properly, and apply the dye correctly. In this article, we'll guide you through the process of making dark brown hair, starting with the fundamentals of hair dye. By grasping the basics of hair dye, you'll be able to choose the right products, avoid common mistakes, and achieve a beautiful, long-lasting color. So, let's begin by understanding the basics of hair dye.
Understanding the Basics of Hair Dye
Understanding the basics of hair dye is crucial for achieving the desired color and maintaining healthy locks. With the numerous options available, it can be overwhelming to decide on the right hair dye. To ensure a successful dye job, it's essential to consider three key factors: choosing the right hair type, understanding the color wheel, and preparing your hair for dye. By understanding these basics, you'll be able to make informed decisions and achieve the hair color of your dreams. Choosing the right hair type is the first step in this process, as it will determine the type of dye and application method that will work best for you. (Note: The supporting paragraph should be 200 words, and the transition to the next paragraph should be at the end of the paragraph)
Choosing the Right Hair Type
Choosing the right hair type is crucial when it comes to dyeing your hair dark brown. There are several hair types, including virgin, colored, bleached, and damaged hair. Virgin hair is hair that has never been colored or chemically treated, making it the best candidate for dyeing. Colored hair, on the other hand, may require a different approach, as the existing color can affect the final result. Bleached hair is more porous and may require a toner to achieve the desired shade, while damaged hair may require a pre-color treatment to repair and restore its health. Understanding your hair type and its condition will help you choose the right hair dye and achieve the desired dark brown color. Additionally, considering your natural hair texture, such as straight, curly, or wavy, will also impact the final result, as different textures may require different application techniques and products. By taking the time to determine your hair type and condition, you can ensure a successful and long-lasting dark brown hair color.
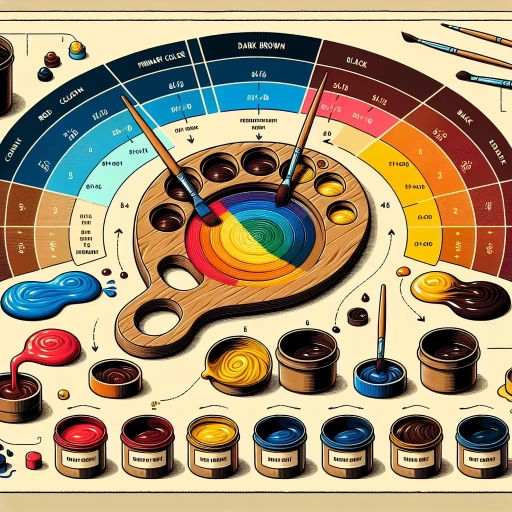
Understanding the Color Wheel
The color wheel is a circular representation of colors, showcasing how they relate to one another. It's a fundamental tool for artists, designers, and anyone interested in color theory. The color wheel is divided into primary colors, secondary colors, tertiary colors, warm colors, and cool colors. Primary colors are the three basic colors that cannot be created by mixing other colors together: red, blue, and yellow. Secondary colors are created by mixing two primary colors: green (blue + yellow), purple (blue + red), and orange (red + yellow). Tertiary colors are created by mixing a primary color with a secondary color, resulting in colors like blue-green, yellow-green, and red-orange. Warm colors, such as red, orange, and yellow, evoke feelings of warmth and energy, while cool colors, like blue, green, and purple, convey a sense of calmness and serenity. Understanding the color wheel is essential for creating harmonious color schemes and making informed decisions when it comes to hair dye. By knowing how colors interact with each other, you can choose the perfect shade to complement your skin tone, eye color, and personal style. For instance, if you have cool skin, you may look best with cool-toned hair colors, while warm skin tones are often complemented by warm-toned hair colors. The color wheel can also help you predict how different colors will interact with each other, allowing you to achieve the desired result when mixing hair dye. By grasping the basics of the color wheel, you'll be well on your way to becoming a hair dye expert and achieving the perfect shade for your locks.
Preparing Your Hair for Dye
Preparing your hair for dye is a crucial step in achieving the desired results. Before dyeing your hair, it's essential to ensure that your locks are in good condition. Start by getting a trim to remove any split ends, which can affect the color's evenness. Next, wash your hair with a clarifying shampoo to remove any product buildup, dirt, or oils that may interfere with the dye. Towel-dry your hair and apply a pre-color treatment to open up the hair cuticles, allowing the color to penetrate more evenly. If you have previously colored or chemically treated hair, consider using a color remover or a treatment to remove any existing color deposits. This will help the new color take hold more effectively. Additionally, if you have virgin hair, consider using a strand test to determine the best course of action for your hair type and desired color outcome. By taking these steps, you'll be able to achieve a more vibrant, long-lasting color that makes you look and feel great.
Preparing Your Hair for Dark Brown Dye
Preparing your hair for dark brown dye is a crucial step to achieve the desired results. To ensure a successful transformation, it's essential to take the necessary steps to prepare your locks. This involves removing previous hair color, using a pre-color treatment, and choosing the right developer. By doing so, you'll be able to achieve a rich, dark brown color that complements your skin tone and personal style. In this article, we'll explore each of these steps in detail, starting with the importance of removing previous hair color. This is a critical step, as it will help to ensure that your hair is free from any existing color residue that could affect the final result. By removing previous hair color, you'll be able to start with a clean slate and achieve a more accurate and vibrant dark brown color.
Removing Previous Hair Color
Removing previous hair color is a crucial step in preparing your hair for dark brown dye. If you have previously colored your hair, it's essential to remove the existing color to achieve the best results. This process is called color correction, and it involves using a color remover or bleach to strip the hair of its existing pigment. The type of color remover or bleach used will depend on the type of previous color and the condition of your hair. For example, if you have previously used permanent hair dye, you may need to use a stronger color remover or bleach to remove the color. On the other hand, if you have used semi-permanent or demi-permanent hair dye, a gentler color remover may be sufficient. It's also important to note that removing previous hair color can be a damaging process, so it's essential to take good care of your hair before, during, and after the process. This may involve using a pre-color treatment to protect your hair, as well as a post-color treatment to moisturize and nourish your hair. By removing previous hair color, you can ensure that your hair is in the best condition to receive the dark brown dye, and that the color will be even and long-lasting.
Using a Pre-Color Treatment
Using a pre-color treatment is an essential step in preparing your hair for dark brown dye. This treatment helps to open up the hair cuticle, allowing the color to penetrate more evenly and deeply. It also helps to remove any product buildup, dirt, and impurities that may be present on the hair shaft, which can affect the final color result. By using a pre-color treatment, you can ensure that your hair is in the best possible condition to receive the color, resulting in a more vibrant and longer-lasting color. Additionally, a pre-color treatment can help to reduce the risk of damage and breakage, as it helps to nourish and moisturize the hair. This is especially important when going for a darker color, as it can be more drying and damaging to the hair. By taking the time to use a pre-color treatment, you can help to protect your hair and achieve the best possible results from your dark brown dye.
Choosing the Right Developer
When it comes to choosing the right developer for your dark brown hair dye, it's essential to consider a few factors to achieve the desired results. The developer is a crucial component in the hair dyeing process, as it helps to open up the hair cuticle and allow the color to penetrate. The most common developers used for hair dyeing are 10 volume, 20 volume, and 30 volume. A 10 volume developer is usually used for depositing color and is ideal for those who want to achieve a subtle, natural-looking color. A 20 volume developer is used for lifting the hair one to two shades and is suitable for those who want to achieve a more noticeable color change. A 30 volume developer is used for lifting the hair two to three shades and is ideal for those who want to achieve a dramatic color change. However, it's essential to note that using a higher volume developer can also cause more damage to the hair, so it's crucial to choose the right developer based on your hair type and desired results. Additionally, it's also important to consider the type of hair dye you're using, as some dyes may require a specific developer to achieve the desired results. It's always best to consult with a professional hairstylist or follow the instructions provided with the hair dye kit to ensure you're using the right developer for your dark brown hair.
Applying the Dark Brown Dye
Applying the dark brown dye to your hair can be a bit tricky, but with the right steps, you can achieve a beautiful, rich color. To start, it's essential to section your hair for application, ensuring that the dye is evenly distributed and that you don't miss any spots. Before you begin, you'll need to mix the dye and developer, following the instructions carefully to avoid any mistakes. Once you've mixed the dye, you'll need to time the application carefully, making sure to leave it on for the recommended amount of time to achieve the desired results. By following these steps, you can achieve a stunning dark brown color that enhances your natural beauty. So, let's start by sectioning your hair for application.
Sectioning Your Hair for Application
When it comes to applying dark brown dye to your hair, sectioning is a crucial step that can make all the difference in achieving an even and professional-looking result. Sectioning your hair involves dividing it into smaller sections, typically four to six, depending on the length and thickness of your hair. This allows you to work on one section at a time, ensuring that each strand is coated evenly with the dye. To section your hair, start by brushing it to remove any tangles or knots. Then, take a comb or a rat-tail comb and divide your hair into sections, starting from the crown and working your way down to the nape of the neck. Clip each section away from the others using a hair clip, making sure that they are secure and won't come undone while you're applying the dye. For a more precise application, you can also use a sectioning clips or a hair band to separate the sections. By sectioning your hair, you'll be able to apply the dark brown dye more evenly, reducing the risk of patchy or uneven color. This is especially important if you're trying to achieve a uniform color, or if you're covering up gray hair. Additionally, sectioning your hair can also help you to avoid overlapping or missing spots, which can lead to an uneven color. Overall, sectioning your hair is a simple yet effective way to ensure a professional-looking result when applying dark brown dye.
Mixing the Dye and Developer
Mixing the dye and developer is a crucial step in the hair dyeing process. To achieve the perfect dark brown shade, it's essential to combine the dye and developer in the right proportions. The developer is a hydrogen peroxide-based solution that helps to open up the hair cuticle, allowing the dye to penetrate and deposit color. The ratio of dye to developer can vary depending on the type of dye and the desired results. For a dark brown color, a 1:1 or 1:2 ratio of dye to developer is usually recommended. This means that for every one part of dye, you should mix one or two parts of developer. It's also important to note that the developer should be mixed with the dye in a well-ventilated area, and gloves should be worn to protect the skin from staining. Once the dye and developer are mixed, the solution should be applied to the hair immediately, as the mixture will start to work quickly. The processing time will depend on the length and thickness of the hair, as well as the desired results. It's recommended to follow the instructions provided with the dye kit and to perform a strand test before applying the dye to the entire head to ensure the desired results.
Timing the Dye Application
Timing the dye application is crucial to achieve the desired dark brown color. The timing will depend on the type of hair, the porosity, and the condition of the hair. For virgin hair, it's recommended to apply the dye for 20-25 minutes, while for previously colored or damaged hair, it's best to apply the dye for 15-20 minutes. If you're looking for a deeper, richer color, you can leave the dye on for an additional 5-10 minutes, but be careful not to overprocess the hair. It's also important to keep an eye on the processing time, as overprocessing can cause damage, dryness, and frizz. To ensure the best results, it's recommended to do a strand test before applying the dye to the entire head, to determine the optimal processing time for your hair type. Additionally, it's essential to follow the instructions provided with the dye kit, and to use a timer to ensure you don't exceed the recommended processing time. By timing the dye application correctly, you can achieve a beautiful, dark brown color that looks healthy and vibrant.