How To Draw A Cowboy Hat
The art of drawing a cowboy hat is a timeless and iconic symbol of the American West. With its distinctive shape and intricate details, it's a challenging yet rewarding subject to tackle. To help you get started, this article will break down the process into three key steps: understanding the basic structure of a cowboy hat, sketching the hat, and refining and finalizing the drawing. By following these steps, you'll be able to create a realistic and detailed cowboy hat that's sure to impress. First, let's start with the foundation of our drawing: understanding the basic structure of a cowboy hat.
Understanding the Basic Structure of a Cowboy Hat
A cowboy hat is an iconic symbol of the American West, and its unique design has been a staple of Western fashion for centuries. But have you ever stopped to think about the basic structure of a cowboy hat? Understanding the key components, types, and proportions of a cowboy hat can help you appreciate its craftsmanship and functionality. In this article, we'll delve into the world of cowboy hats and explore the essential elements that make them so distinctive. We'll start by identifying the key components of a cowboy hat, including the crown, brim, and band. From there, we'll recognize the different types of cowboy hats, such as the classic Stetson and the more modern Resistol. Finally, we'll examine the proportions of a cowboy hat, including the relationship between the crown and brim. By the end of this article, you'll have a deeper understanding of the cowboy hat's basic structure and be able to appreciate its beauty and functionality. So, let's begin by identifying the key components of a cowboy hat.
Identifying the Key Components of a Cowboy Hat
When it comes to identifying the key components of a cowboy hat, there are several essential elements to look out for. The crown is the top part of the hat, which can be either flat or indented, and is typically made of a single piece of felt or straw. The brim is the wide part of the hat that shades the face and neck, and can be either narrow or wide, depending on the style. The indention, also known as the "pinch," is the small dent in the crown, which can be shallow or deep, and is a distinctive feature of many cowboy hats. The hatband is the decorative band that encircles the crown, often made of leather, fabric, or other materials, and can be plain or adorned with intricate designs. The sweatband is the inner band that fits around the wearer's forehead, designed to absorb sweat and provide a comfortable fit. The chin strap, also known as the "hat strap," is the adjustable strap that secures the hat to the head, often made of leather or fabric. Finally, the crease is the fold or bend in the crown, which can be either sharp or soft, and is a key element in defining the hat's style and character. By understanding these key components, you can better appreciate the craftsmanship and design that goes into creating a high-quality cowboy hat.
Recognizing the Different Types of Cowboy Hats
Recognizing the different types of cowboy hats is essential to accurately drawing one. There are several styles, each with its unique characteristics, history, and cultural associations. The most common types of cowboy hats include the Open Road, Cattleman, Bull Rider, and Gus. The Open Road hat is known for its wide brim and high crown, making it a classic symbol of the American West. The Cattleman hat has a more moderate brim width and a slightly lower crown, often associated with working cowboys. The Bull Rider hat is designed for rodeo riders, featuring a narrower brim and a more compact crown to prevent it from being blown off during competitions. The Gus hat, also known as the "Gambler," has a wide brim and a low, flat crown, often worn by outlaws and gamblers in the Old West. Additionally, there are other styles, such as the Tomahawk, Buckaroo, and Ranch Hand, each with its distinct features and historical context. Understanding these different types of cowboy hats will help you draw a more authentic and detailed hat, whether you're aiming for a classic look or a more modern interpretation. By recognizing the unique characteristics of each style, you can add depth and accuracy to your drawing, making it a true representation of the iconic cowboy hat.
Understanding the Proportions of a Cowboy Hat
The proportions of a cowboy hat are crucial in achieving an authentic and visually appealing design. A classic cowboy hat typically has a crown height of around 5-6 inches (13-15 cm) and a brim width of 3-3.5 inches (7.5-8.5 cm). The crown is usually slightly curved, with a gentle slope from the center to the edges. The brim is wide enough to provide shade for the face and neck, but not so wide that it becomes unwieldy. The indention, or pinch, at the front of the crown is usually around 1-2 inches (2.5-5 cm) deep, and the hatband is typically around 1 inch (2.5 cm) wide. When drawing a cowboy hat, it's essential to pay attention to these proportions to ensure that your hat looks balanced and authentic. By understanding the proportions of a cowboy hat, you can create a drawing that captures the essence of this iconic symbol of the American West.
Sketching the Cowboy Hat
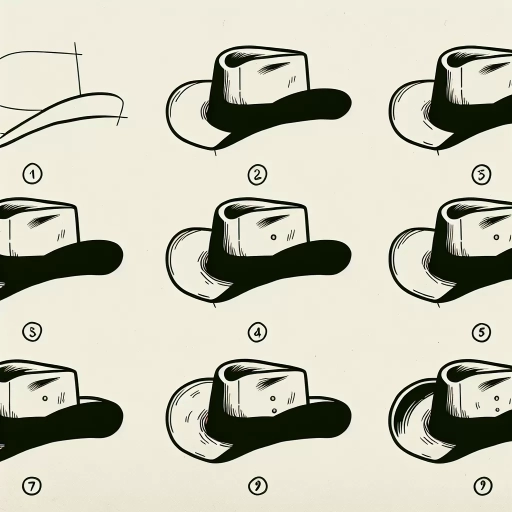
The cowboy hat is an iconic symbol of the American West, and sketching one can be a fun and rewarding experience. To create a realistic and detailed drawing of a cowboy hat, there are several key elements to focus on. First, it's essential to start with a rough outline of the hat, including the overall shape and proportions. From there, you can add the brim and crown details, such as the curved shape of the brim and the indented crown. Finally, you can define the hatband and other embellishments, such as the stitching, rivets, and decorative elements. By breaking down the sketching process into these key elements, you can create a detailed and realistic drawing of a cowboy hat. In this article, we'll explore each of these elements in more depth, starting with the first step: creating a rough outline of the hat.
Creating a Rough Outline of the Hat
When creating a rough outline of the hat, start by sketching a large oval shape for the crown, making sure it's tall enough to accommodate the hat's height. The oval should be slightly tilted, with the top end leaning towards the back of the hat. Next, draw a curved line that follows the shape of the oval, creating the hat's brim. The brim should be wider at the front and narrower at the back, with a slight upward curve at the edges. Add a small circle or oval shape at the top of the crown to indicate the hat's indentation, and a small curved line at the base of the crown to suggest the hatband. Keep in mind that the outline should be rough and not too detailed, as you'll be refining the shape and adding details in the next steps. Pay attention to the proportions of the hat, making sure the brim is in balance with the crown and the overall shape is symmetrical. By creating a solid rough outline, you'll be able to build a strong foundation for your cowboy hat drawing.
Adding the Brim and Crown Details
Adding the brim and crown details is a crucial step in drawing a cowboy hat. The brim is the wide part of the hat that shades the face and neck from the sun, while the crown is the top part of the hat that covers the head. To add the brim, start by drawing a curved line that follows the shape of the hat's base, making sure it is even and symmetrical. The brim should be slightly wider at the front and back than at the sides. Next, add a series of short, curved lines along the edge of the brim to indicate the stitching or binding that holds it in place. For the crown, draw a series of curved lines that follow the shape of the hat, starting from the base of the crown and working your way up. The lines should be closer together at the top of the crown and farther apart at the base. You can also add some texture to the crown by drawing short, curved lines that follow the shape of the hat. Additionally, you can add some details such as a hatband or a feather to the crown to give it a more authentic look. Finally, add some shading to the brim and crown to give the hat some depth and dimension.
Defining the Hatband and Other Embellishments
The hatband is a decorative element that adds a touch of personality to the cowboy hat. It is typically a ribbon or strip of fabric that is wrapped around the crown of the hat, usually just above the brim. The hatband can be made from a variety of materials, such as leather, felt, or fabric, and can be adorned with intricate stitching, embroidery, or other forms of decoration. In addition to the hatband, other embellishments that can be added to a cowboy hat include feathers, flowers, or other decorative elements. These embellishments can be attached to the hatband or directly to the hat itself, and can add a touch of elegance or whimsy to the overall design. When sketching a cowboy hat, it's essential to consider the hatband and other embellishments, as they can greatly impact the overall look and feel of the hat. By carefully rendering these details, artists can create a more authentic and visually appealing representation of the cowboy hat.
Refining and Finalizing the Drawing
Refining and finalizing a drawing is a crucial step in the creative process, as it allows artists to add depth, dimension, and emotion to their work. This stage involves making deliberate decisions about the overall aesthetic and message of the piece, and requires a range of techniques and skills. To refine and finalize a drawing, artists may choose to add shading and texture to key elements, such as a hat, to create a sense of volume and tactility. They may also enhance the details and patterns within the drawing, using techniques such as hatching and cross-hatching to create intricate and visually appealing designs. Finally, artists may choose to finalize the drawing by adding a background or context, which can help to situate the subject and create a sense of atmosphere. By carefully considering these elements, artists can create a polished and engaging drawing that effectively communicates their vision. To start, let's explore how adding shading and texture to a hat can elevate the overall impact of a drawing.
Adding Shading and Texture to the Hat
Adding shading and texture to the hat can elevate the overall appearance of the drawing and give it a more realistic look. To start, identify the areas of the hat that would naturally receive the most shade, such as the underside of the brim and the creases in the crown. Use a range of shading techniques, including hatching and cross-hatching, to create depth and dimension. For a more subtle look, use gentle, soft strokes to suggest the texture of the hat's material, such as felt or straw. To add more visual interest, incorporate texture and pattern into the design, such as the stitching or banding on the hat. Pay attention to the way the light interacts with the texture, creating highlights and shadows that add to the overall sense of depth and realism. By carefully balancing shading and texture, you can create a hat that looks like it's been plucked straight from the wild west.
Enhancing the Details and Patterns
Enhancing the details and patterns of a cowboy hat drawing involves adding texture, depth, and visual interest to the design. To start, use a range of lines and hatching techniques to create the intricate stitching and weaving patterns found on traditional cowboy hats. Pay attention to the direction and spacing of the lines to achieve a realistic and authentic look. Next, add texture to the hat band and crown by incorporating subtle shading and cross-hatching techniques. This will help to create a sense of dimension and tactility, drawing the viewer's eye to these key areas of the design. Additionally, consider adding decorative elements such as hat pins, feathers, or other embellishments to enhance the overall aesthetic and personality of the hat. When adding these details, be mindful of the hat's overall balance and harmony, ensuring that the embellishments complement rather than overwhelm the design. By carefully refining and enhancing the details and patterns of the cowboy hat, artists can create a rich, nuanced, and visually stunning drawing that captures the essence of this iconic symbol of the American West.
Finalizing the Drawing with a Background or Context
Finalizing the drawing with a background or context can elevate the overall visual appeal and storytelling of the cowboy hat illustration. To achieve this, start by lightly sketching the background elements, such as a rustic wooden fence, a desert landscape, or a vintage bandana. Consider the theme and atmosphere you want to convey, and choose a background that complements the hat's design and style. Next, refine the background details, adding texture, shading, and depth to create a sense of dimensionality. You can also experiment with different mediums, such as watercolors or digital painting, to achieve a unique and captivating background. To integrate the hat with the background, pay attention to the negative space around the hat, ensuring that it blends seamlessly with the surrounding environment. Finally, add any finishing touches, such as highlights, shadows, or subtle textures, to enhance the overall visual impact of the illustration. By incorporating a thoughtful and well-executed background, you can transform your cowboy hat drawing into a captivating and immersive artwork that tells a story.