How To Draw Hands Easy
Drawing hands can be a daunting task, even for experienced artists. However, with a solid understanding of hand anatomy, basic drawing techniques, and attention to adding realism and expression, anyone can master the art of drawing hands. To get started, it's essential to understand the underlying structure of the hand, including the bones, muscles, and tendons that work together to create movement and flexibility. By grasping the basics of hand anatomy, you'll be able to accurately depict the hand's proportions, shape, and overall appearance. In this article, we'll explore the fundamentals of drawing hands, beginning with the foundation of hand anatomy. By understanding how the hand is constructed, you'll be well on your way to creating realistic and expressive hand drawings. So, let's start by taking a closer look at the anatomy of the hand.
Understanding Hand Anatomy
The human hand is a complex and intricate structure that plays a vital role in our daily lives. To truly understand hand anatomy, it's essential to break down the various components and their relationships with one another. This involves familiarizing yourself with the overall structure of the hand, learning the names and functions of each bone and joint, and studying the relationship between the wrist, palm, and fingers. By gaining a deeper understanding of these fundamental aspects, you'll be better equipped to appreciate the hand's remarkable capabilities and address any issues that may arise. Let's start by exploring the overall structure of the hand, which serves as the foundation for its incredible dexterity and versatility.
Familiarize yourself with the overall structure of the hand
The hand is a complex and intricate part of the human body, consisting of 27 bones, 29 joints, and over 100 muscles, tendons, and ligaments. To draw hands accurately, it's essential to familiarize yourself with the overall structure of the hand. Start by identifying the three main parts of the hand: the wrist, palm, and fingers. The wrist is the joint that connects the hand to the forearm, while the palm is the flat surface of the hand that contains the palmar surface of the bones. The fingers, also known as digits, are the long, thin extensions of the hand that are used for grasping and manipulating objects. Each finger is made up of three bones, known as phalanges, which are connected by joints. The thumb, however, only has two phalanges. Understanding the relationships between these different parts of the hand is crucial for drawing hands that look natural and realistic. By studying the overall structure of the hand, you can begin to see the underlying patterns and shapes that will help you to draw hands with confidence and accuracy.
Learn the names and functions of each bone and joint
The human hand is a complex and intricate structure composed of 27 bones and 29 joints. To accurately draw hands, it's essential to learn the names and functions of each bone and joint. The hand is divided into three main parts: the wrist, palm, and fingers. The wrist, also known as the carpus, consists of eight small bones that form a semi-circular shape. These bones are the scaphoid, lunate, triquetrum, pisiform, trapezium, trapezoid, capitate, and hamate. The palm, or metacarpus, is made up of five long bones that connect the wrist to the fingers. Each finger, or phalanges, is composed of three bones: the proximal, intermediate, and distal phalanges. The joints in the hand are classified into three types: hinge, condyloid, and saddle. Hinge joints, such as the elbow and finger joints, allow for flexion and extension. Condyloid joints, like the wrist and metacarpophalangeal joints, enable flexion, extension, abduction, and adduction. Saddle joints, found in the thumb, allow for circumduction and opposition. Understanding the names and functions of each bone and joint is crucial for drawing hands accurately and confidently. By familiarizing yourself with the anatomy of the hand, you'll be able to capture its intricate details and nuances, resulting in more realistic and engaging drawings.
Study the relationship between the wrist, palm, and fingers
The relationship between the wrist, palm, and fingers is a complex one, with each component working together to facilitate a wide range of movements and functions. The wrist, also known as the carpus, is a joint that connects the forearm to the hand, allowing for flexion, extension, and rotation. The palm, or metacarpus, is the fleshy part of the hand that contains the metacarpal bones, which are connected to the fingers. The fingers, or phalanges, are the long, slender bones that make up the majority of the hand, with each finger consisting of three phalanges (proximal, intermediate, and distal) except for the thumb, which only has two. The relationship between these components is crucial for hand function, as the wrist provides the foundation for the palm and fingers to move, while the palm and fingers work together to grasp, manipulate, and perform various tasks. Understanding the relationship between the wrist, palm, and fingers is essential for drawing hands accurately, as it allows artists to capture the subtleties of hand movement and anatomy. By studying the way the wrist, palm, and fingers interact, artists can create more realistic and detailed drawings of hands, which is especially important for capturing the nuances of hand gestures and expressions.
Basic Drawing Techniques
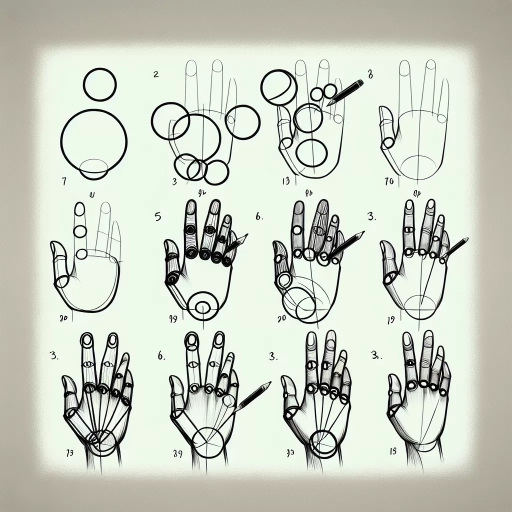
Drawing is a fundamental skill that can be developed with practice and patience. To create realistic and detailed drawings, it's essential to master basic drawing techniques. One of the key techniques is to break down complex subjects into simple shapes, which can be used to construct the hand. Additionally, practicing drawing different hand poses and angles can help artists capture the subtleties of human anatomy. Furthermore, developing skills in rendering texture and detail can add depth and realism to drawings. By mastering these techniques, artists can create stunning and lifelike drawings. In this article, we will explore the first technique in more detail, starting with the basics of constructing the hand using simple shapes.
Master the use of simple shapes to construct the hand
Mastering the use of simple shapes to construct the hand is a fundamental skill in drawing hands. To start, break down the hand into its basic components, including the palm, fingers, and wrist. The palm can be represented by a slightly flattened oval shape, while the fingers can be constructed from a series of connected cylinders. The wrist can be depicted as a smaller oval shape that connects the hand to the forearm. By combining these simple shapes, you can create a basic hand structure that can be refined and detailed later. Pay attention to the proportions of the hand, ensuring that the fingers are in proportion to the palm and wrist. The fingers should also be tapered, with the tips being narrower than the base. By using simple shapes to construct the hand, you can create a solid foundation for your drawing and ensure that the proportions and structure of the hand are accurate. This technique can also be used to draw hands in different poses and angles, allowing you to practice and refine your skills.
Practice drawing different hand poses and angles
Drawing hands can be a challenging task, but with practice, you can master the skill. One of the key techniques to focus on is drawing different hand poses and angles. This involves observing the way the hand moves and bends, and then replicating those movements on paper. Start by drawing the hand in various positions, such as with the palm facing upwards, downwards, or sideways. Practice drawing the hand with the fingers curled inwards, outwards, or stretched out straight. You can also try drawing the hand from different angles, such as from the side, front, or back. To make your drawings more realistic, pay attention to the way the fingers and thumb interact with each other, and the way the wrist and forearm connect to the hand. With consistent practice, you'll become more comfortable drawing hands in different poses and angles, and your drawings will become more confident and accurate.
Develop your skills in rendering texture and detail
Developing your skills in rendering texture and detail is a crucial aspect of drawing hands, as it allows you to capture the intricate nuances of the human hand. To achieve this, start by observing the different textures found on the hand, such as the smooth skin on the back, the creased skin on the palm, and the ridged texture of the fingernails. Practice drawing these textures using a range of techniques, including hatching, cross-hatching, and stippling. Hatching involves creating parallel lines that follow the contours of the hand, while cross-hatching involves layering lines at different angles to create depth and dimension. Stippling, on the other hand, involves creating patterns of small dots to suggest texture and shading. By mastering these techniques, you can add depth and realism to your drawings of hands. Additionally, pay attention to the details of the hand, such as the shape and size of the fingernails, the creases on the palm, and the tendons and veins that are visible on the surface of the skin. By including these details in your drawings, you can create a more accurate and lifelike representation of the human hand.
Adding Realism and Expression
When it comes to adding realism and expression to your artwork, the hands are often the most challenging yet crucial aspect to get right. A well-drawn hand can convey a wealth of emotions and personality, while a poorly drawn one can detract from the entire piece. To achieve a high level of realism and expression, it's essential to focus on the subtleties of hand gestures and movements. This involves observing the way the hands interact with the environment, experimenting with varying line weights and shading techniques to capture the nuances of texture and form, and paying attention to the way the hands convey emotion and personality. By mastering these techniques, artists can add depth and authenticity to their work, drawing the viewer in and creating a more immersive experience. By starting with the subtleties of hand gestures and movements, artists can lay the foundation for a truly expressive and realistic piece of art. Observe and capture the subtleties of hand gestures and movements.
Observe and capture the subtleties of hand gestures and movements
When drawing hands, it's essential to observe and capture the subtleties of hand gestures and movements. A hand is not just a static object, but a dynamic entity that conveys emotions, intentions, and character. To add realism and expression to your drawings, pay attention to the way the fingers, wrist, and palm interact with each other. Notice how the fingers curl, stretch, or relax, and how the wrist rotates or flexes. Observe how the palm creases and folds, and how the fingers meet the palm. These subtle details can convey a wealth of information about the person's mood, personality, and actions. For example, a clenched fist can indicate tension or anger, while a relaxed hand with open fingers can suggest calmness or friendliness. By capturing these subtleties, you can create drawings that are not only anatomically accurate but also emotionally expressive and engaging. To achieve this, practice drawing hands in different poses and gestures, and study the work of other artists who specialize in figure drawing. With time and practice, you'll develop your skills in observing and capturing the subtleties of hand gestures and movements, and your drawings will become more realistic, expressive, and captivating.
Experiment with varying line weights and shading techniques
Experimenting with varying line weights and shading techniques can add depth, dimension, and emotion to your hand drawings. By manipulating line weights, you can create a range of effects, from delicate and subtle to bold and expressive. Thicker lines can be used to define the overall shape and structure of the hand, while thinner lines can be used to suggest the gentle curves and contours of the fingers and palm. Shading techniques, such as hatching and cross-hatching, can be used to create a range of values and textures, from smooth and soft to rough and rugged. By combining different line weights and shading techniques, you can create a rich and nuanced drawing that captures the subtleties of the human hand. For example, you can use gentle hatching to suggest the softness of the skin on the back of the hand, while using bold lines and deep shading to define the knuckles and joints. By experimenting with different techniques, you can develop a unique and expressive style that brings your hand drawings to life.
Pay attention to the interaction between the hand and its environment
When drawing hands, it's essential to pay attention to the interaction between the hand and its environment. This means considering how the hand is positioned in relation to the surrounding space and objects. For example, if the hand is resting on a surface, the fingers should be relaxed and the wrist should be straight. If the hand is holding an object, the fingers should be curled around it and the thumb should be opposed to the fingers. The hand should also be in proportion to the object it's interacting with. Paying attention to these details will help create a more realistic and engaging drawing. Additionally, considering the environment and the hand's interaction with it can also help to convey emotion and tell a story. For instance, a hand grasping a cold metal railing on a winter day can convey a sense of chilliness, while a hand gently cradling a flower can convey a sense of delicacy. By paying attention to the interaction between the hand and its environment, you can add depth and meaning to your drawing.