How To Draw Hair
Understanding the Basics of Drawing Hair
The Importance of Observing Real Hair
Before diving into the actual drawing, it is critical to thoroughly observe real hair. The constant observation of how hair looks in different lights, against different backgrounds, and in movement can drastically improve your understanding of how to draw it. By gaining a closer insight into the hair’s texture, shininess, color hues, and how it falls on the shoulders or face, you can secure the essential details that make your hair drawing look more realistic.
Light and Shadow Perception
Another deciding factor of drawing hair realistically is understanding how light and shadow contribute to its appearance. By paying close attention to how hair behaves in different lighting situations, you can reproduce the depth effect – the interplay of light and shadow manifesting a 3D effect. This comes particularly to life in areas of high contrast, where the lightest strands meet the darkest shadows. So, consider adding highlights and shadows to give volume to your hair drawing.
Choosing the Right Tools
Next, choosing the right drawing material can significantly impact your ultimate result. Pencils remain the go-to choice, particularly HB and 2B for general sketching and shading, 4B and 6B for dark shadows, and 4H and 6H for light sketching and intricate details. However, the selection of tools is more vast: you can experiment with pens, markers, charcoal, or even paints, depending on the hair effect you want to achieve. Always ensure your tools are sharp to maintain control over the detailing, especially while drawing hair strands.
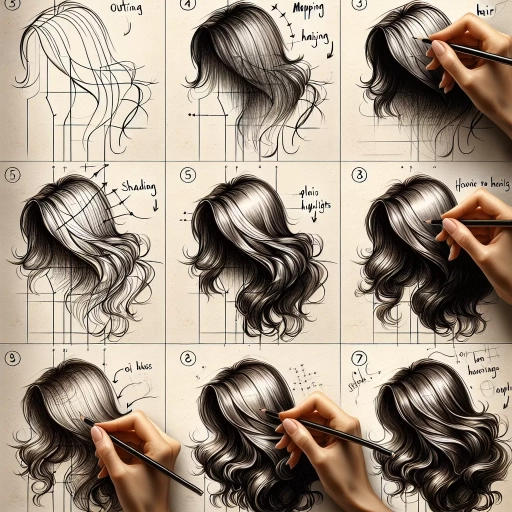
Step-by-Step Procedural Guide to Drawing Hair
Drawing the Basic Hair Shape and Structure
The initial procedure of drawing hair is to outline its overall shape and structure on the head. Rather than focusing on individual strands, aim for the general form the hair creates. Drawing hair in chunks, observing where it parts, how it falls and wraps around the head provides the basic structure needed for a realistic representation. Remember to consider the hairstyle, hair length, and its motion in your initial sketch.
Defining the Hair Volumes
After the initial structure, the layers or volumes within the hair come next. This involves identifying the clusters of hair that bundle together, essentially creating the hair volume. This process becomes simpler if you shade these areas lightly, noticing the light and shadow areas within each section. Remember, hair has a lot of depth, and layering is essential to avoid a flat look.
Adding Detail and Finalizing the Hair Drawing
Finally, shading, highlighting, and adding fine details will bring your hair drawing to life. The hair close to the scalp is generally darker and gets progressively lighter towards the tips (depending on the hair color). Try varying your pencil strokes, using a combination of straight and curved lines to represent different hair textures. Small additions like stray strands can add excellent realism to your hair drawing ensemble. Make sure to erase any visible foundational lines from the earlier stages for a clean finish.
Common Mistakes and The Corrective Measures
Ignoring Hair Directions
A common mistake made by beginners is neglecting the direction in which the hair flows. Hair has a specific pattern, and it’s crucial to pay attention to this while drawing. Look closely into the hair partition, the direction in which the strands fall, how the strands curl up or straighten. All these traits will help make your hair drawing look natural.
Drawing Every Individual Strand
Another frequent error is falling into the trap of drawing every individual hair strand. It’s an absolute myth that tracing out each strand will lead to a more realistic representation. Instead, it could lead to your drawing looking wiry or stringy. The key is to capture the overall volume, texture, and flow of the hair, filling out the larger sections with an array of fine, darker lines representing the sections with multiple strands.
Mismanaging Highlights and Shadows
Proper placement of light and shadow can make or break the realism of your hair drawing. Incorrect placement can lead to flat and lifeless portrayals. Light usually hits the top of the hair, causing highlights; the underneath portions fall in shadow. Understanding this light logic is vital to making your hair drawing believable.