How To Draw A Side Profile
Drawing a side profile can be a challenging yet rewarding artistic endeavor that allows you to capture the essence of a person's facial features from a unique perspective. Whether you're an aspiring artist or simply looking to enhance your drawing skills, mastering the art of side profile portraiture can significantly improve your overall artistic abilities. This comprehensive guide will walk you through the process of creating captivating side profile drawings, covering everything from understanding the fundamental principles to refining your technique with expert tips and tricks. We'll begin by exploring the basics of side profile drawing, including the importance of proportion, facial structure, and anatomical landmarks. Next, we'll delve into a step-by-step technique that breaks down the drawing process into manageable stages, helping you build confidence and achieve consistent results. Finally, we'll share valuable tips and tricks to elevate your side profile drawings, enabling you to add depth, character, and realism to your artwork. By the end of this article, you'll have a solid foundation for creating stunning side profile portraits that capture the unique features and personality of your subjects. Let's start by understanding the basics of side profile drawing, which will set the stage for your artistic journey.
Understanding the Basics of Side Profile Drawing
Side profile drawing is a fundamental skill in portraiture and character design, offering artists a unique perspective to capture the essence of their subjects. This challenging yet rewarding art form requires a deep understanding of facial structure, proportion, and the interplay of light and shadow. Mastering side profile drawing opens up a world of creative possibilities, allowing artists to convey emotion, personality, and depth in their work. To excel in this technique, artists must focus on three crucial aspects: studying facial proportions and anatomy, identifying key landmarks and features, and mastering the use of guidelines and basic shapes. By honing these skills, artists can create compelling and lifelike side profile portraits that captivate viewers and bring their subjects to life on paper. Whether you're a beginner looking to improve your drawing skills or an experienced artist seeking to refine your technique, understanding the basics of side profile drawing is an essential step toward creating stunning and professional-quality artwork.
Studying facial proportions and anatomy
Studying facial proportions and anatomy is a crucial step in mastering the art of drawing side profiles. This in-depth exploration of the human face's structure and measurements provides artists with the foundational knowledge needed to create accurate and lifelike representations. When focusing on the side profile, understanding these elements becomes even more critical, as the slightest deviation can significantly impact the overall likeness and realism of the portrait. To begin, artists should familiarize themselves with the basic proportions of the human face. In a typical adult, the face can be divided into three roughly equal sections: from the hairline to the brow, from the brow to the base of the nose, and from the base of the nose to the chin. These divisions serve as a helpful guide when sketching the initial outline of a side profile. Additionally, the distance between the eyes is approximately equal to the width of one eye, a principle that remains relevant even when drawing from a side view. When studying facial anatomy, it's essential to pay close attention to the underlying bone structure and musculature. The skull's shape, particularly the prominence of the brow ridge, cheekbones, and jawline, plays a significant role in defining an individual's unique profile. The zygomatic arch (cheekbone) and the angle of the mandible (jawbone) are especially important in side view drawings, as they contribute to the distinctive contours of the face. Soft tissue features, such as the nose, lips, and ears, require careful observation and understanding. The nose, for instance, varies greatly among individuals and can be a defining characteristic in a side profile. Artists should study the different shapes and angles of the nose bridge, tip, and nostrils to accurately capture this feature. Similarly, the shape and fullness of the lips, as well as the projection of the chin, can significantly impact the overall appearance of a side profile. The position and shape of the ear in relation to other facial features are often overlooked but crucial elements in side profile drawings. Typically, the top of the ear aligns with the eyebrow, while the bottom aligns with the base of the nose. Understanding these relationships helps in placing the ear correctly within the composition. As artists delve deeper into facial proportions and anatomy, they should also consider how age, gender, and ethnicity influence these features. For example, children's faces have different proportions compared to adults, with larger foreheads and smaller chins. Male faces tend to have more angular features, while female faces often display softer contours. By dedicating time to studying facial proportions and anatomy, artists equip themselves with the knowledge and skills necessary to create compelling and accurate side profile drawings. This understanding allows for greater flexibility and creativity in portraying diverse individuals while maintaining a sense of realism and authenticity in their work. As with any artistic skill, consistent practice and keen observation are key to improving one's ability to draw lifelike side profiles.
Identifying key landmarks and features
Identifying key landmarks and features is a crucial step in mastering the art of side profile drawing. By recognizing and accurately rendering these elements, artists can create more realistic and compelling portraits that capture the unique essence of their subjects. When observing a side profile, several key landmarks and features demand particular attention and precision. The most prominent feature in a side profile is typically the nose, which often serves as the focal point of the drawing. Pay close attention to its shape, size, and angle, as well as the subtle curves of the bridge and nostrils. The relationship between the nose and other facial features is essential for achieving proper proportions and perspective. Moving upward, the eye is another critical landmark. Although only one eye is visible in a side profile, its placement and shape are vital for conveying the subject's expression and character. Take note of the eye's position relative to the nose and ear, as well as the curvature of the eyelid and the presence of any visible eyelashes. The ear, often overlooked in frontal portraits, becomes a significant feature in side profile drawings. Observe its size, shape, and placement carefully, paying attention to the intricate folds and curves that give it dimension. The ear's position relative to the eye and jawline is crucial for maintaining accurate proportions. The mouth and chin area provide important information about the subject's facial structure and expression. Note the curve of the lips, the depth of the philtrum (the vertical groove between the upper lip and nose), and the prominence of the chin. These features can dramatically affect the overall character of the portrait. The forehead and hairline are essential elements that frame the face and contribute to the individual's unique appearance. Pay attention to the slope of the forehead, any visible wrinkles or creases, and the way the hair falls around the face and neck. The jawline and neck form the foundation of the side profile, defining the overall shape of the face and connecting it to the rest of the body. Observe the angle and curvature of the jaw, as well as the length and thickness of the neck. By carefully studying and accurately rendering these key landmarks and features, artists can create side profile drawings that are not only anatomically correct but also imbued with life and personality. Remember that every face is unique, and subtle variations in these features contribute to an individual's distinct appearance. As you practice, train your eye to notice these nuances and incorporate them into your drawings, bringing your side profiles to life with depth, character, and realism.
Mastering the use of guidelines and basic shapes
Mastering the use of guidelines and basic shapes is a fundamental skill that can significantly enhance your ability to draw accurate and expressive side profiles. These simple yet powerful tools serve as the foundation for creating well-proportioned and visually appealing portraits, allowing artists to capture the essence of their subjects with precision and confidence. Guidelines are essentially light, temporary lines that act as a roadmap for your drawing. When working on a side profile, start by sketching a vertical line down the center of your paper to represent the spine of the face. This line will help you maintain proper alignment and balance throughout the drawing process. Next, add horizontal lines to mark key facial features such as the hairline, eyebrows, eyes, nose, mouth, and chin. These guidelines will ensure that all elements of the face are properly positioned in relation to one another, creating a harmonious and realistic representation. Basic shapes play a crucial role in simplifying complex facial structures, making them easier to draw and understand. Begin by visualizing the head as a large oval or egg shape, with the narrow end representing the chin. This basic form provides a solid foundation for adding more detailed features later on. The nose can be simplified into a triangle or wedge shape, while the ear can be seen as a modified "C" shape. Breaking down facial features into these elementary forms allows you to focus on their essential characteristics without becoming overwhelmed by intricate details. As you become more comfortable with guidelines and basic shapes, you'll find that they not only improve the accuracy of your drawings but also speed up your creative process. These techniques enable you to quickly establish the overall structure of the face, allowing you to make necessary adjustments early on before committing to more detailed work. This approach is particularly beneficial when sketching multiple side profiles or experimenting with different facial expressions and angles. It's important to remember that guidelines and basic shapes are meant to be flexible tools that adapt to your subject's unique features. As you gain experience, you'll develop the ability to adjust these elements intuitively, creating more nuanced and personalized representations. Practice regularly by observing and sketching various side profiles, paying close attention to how different facial structures can be interpreted using these fundamental techniques. By mastering the use of guidelines and basic shapes, you'll build a strong foundation for creating captivating side profile drawings. These skills will not only improve your ability to accurately capture the likeness of your subjects but also enhance your overall artistic confidence and versatility. As you continue to refine your technique, you'll find that these simple yet effective tools become an indispensable part of your creative process, allowing you to bring your side profile drawings to life with greater ease and precision.
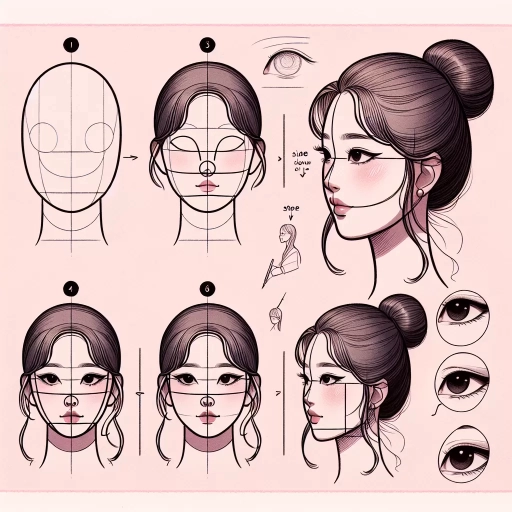
Step-by-Step Technique for Drawing a Side Profile
Drawing a side profile can be a challenging yet rewarding artistic endeavor that allows artists to capture the essence of a person's facial structure and character. This step-by-step technique for drawing a side profile will guide both beginners and experienced artists through the process of creating a lifelike and expressive portrait. By breaking down the complex task into manageable stages, artists can develop their skills and confidence in portraiture. This article will explore three key aspects of side profile drawing: starting with a rough outline and basic shapes, refining facial features and adding details, and implementing shading and texture techniques. These stages will help artists progress from a basic foundation to a polished final product. Whether you're aiming to improve your portrait skills or simply looking to try something new, mastering the art of side profile drawing can enhance your overall artistic abilities and open up new creative possibilities. As we delve into the intricacies of this technique, it's essential to first understand the basics of side profile drawing, which will serve as a solid foundation for the more advanced steps to come.
Starting with a rough outline and basic shapes
Starting with a rough outline and basic shapes is a crucial first step in drawing a side profile. This foundational approach allows artists to establish the overall structure and proportions of the face before delving into the finer details. By beginning with simple geometric forms, you create a flexible framework that can be easily adjusted and refined as you progress through the drawing process. To initiate this step, start by lightly sketching a large oval shape to represent the skull. This oval will serve as the primary foundation for the entire profile. Next, add a smaller circle or oval at the bottom of the skull shape to indicate the jaw area. The positioning and size of this jaw shape will greatly influence the character of your profile, so take care to consider the age, gender, and unique features of your subject. With the basic head shape in place, it's time to add guidelines for facial features. Draw a vertical line down the center of the oval to mark the midpoint of the face. This line will help you align the nose, lips, and chin. Then, add horizontal lines to indicate the placement of the eyes, nose, and mouth. These lines should be roughly equidistant, dividing the face into thirds. However, keep in mind that these are just guidelines, and slight variations can contribute to a more natural and unique appearance. Next, sketch in the basic shapes for the individual features. For the nose, a simple triangle or curved line can suffice at this stage. The mouth can be represented by two curved lines, while the eye can be a small oval or almond shape. Don't forget to include the ear, which is often overlooked in profile drawings. Place it between the eye and nose lines, using a simple curved shape. As you work on these basic shapes, pay close attention to the relationships between different facial features. The nose, for example, typically protrudes further than the forehead and chin in a side profile. The lips usually fall behind the nose but in front of the chin. These spatial relationships are key to achieving a realistic and well-proportioned profile. Remember, the goal at this stage is not perfection but rather to create a solid foundation for your drawing. Keep your lines light and loose, allowing for easy modifications as you refine your sketch. This approach encourages experimentation and helps prevent the frustration of having to erase heavily rendered areas later in the process. By starting with a rough outline and basic shapes, you set yourself up for success in the subsequent stages of your side profile drawing. This method provides a clear roadmap for adding details, refining proportions, and capturing the unique essence of your subject. As you become more comfortable with this technique, you'll find that it not only improves the accuracy of your drawings but also enhances your overall understanding of facial structure and anatomy.
Refining facial features and adding details
Refining facial features and adding details is a crucial step in creating a lifelike and captivating side profile drawing. This stage is where your portrait truly comes to life, transforming basic shapes into a unique and expressive representation of your subject. As you progress, pay close attention to the subtle nuances that make each face distinct and memorable. Begin by focusing on the eyes, often considered the windows to the soul. In a side profile, you'll typically only see one eye, so it's essential to capture its shape, size, and placement accurately. Pay attention to the eyelid, lash line, and the subtle creases around the eye area. The eyebrow should be carefully rendered, noting its arch and thickness, as it plays a significant role in conveying expression. Next, refine the nose, a prominent feature in side profiles. Observe the unique slope of the bridge, the shape of the nostril, and the relationship between the tip of the nose and the upper lip. Small adjustments in these areas can dramatically affect the overall likeness of your subject. The mouth and lips require special attention, as they contribute greatly to the character of the face. Notice the curvature of the upper and lower lips, the depth of the philtrum (the vertical groove between the upper lip and nose), and the subtle shadowing at the corners of the mouth. Even in a side view, the fullness and shape of the lips can convey a lot about the subject's personality. Don't overlook the importance of the ear in a side profile. While it may seem less significant than other features, a well-drawn ear adds authenticity to your portrait. Study the intricate folds and curves of the ear, ensuring it's proportionate to the rest of the face. As you refine these features, start incorporating finer details such as skin texture, wrinkles, and blemishes. These elements add depth and realism to your drawing. Use varying line weights and shading techniques to create dimension and highlight the interplay of light and shadow across the face. Remember to step back periodically and assess your work as a whole. Sometimes, focusing too intently on individual features can lead to losing sight of the overall harmony of the face. Make adjustments as needed to ensure all elements work together cohesively. Lastly, consider the hairline and hairstyle of your subject. Hair can frame the face beautifully in a side profile, adding character and completing the portrait. Pay attention to the texture and flow of the hair, using your chosen medium to capture its unique qualities. By meticulously refining facial features and adding these intricate details, you'll breathe life into your side profile drawing, creating a compelling and authentic representation of your subject that captures not just their physical likeness, but also a sense of their personality and essence.
Implementing shading and texture techniques
Implementing shading and texture techniques is a crucial step in bringing your side profile drawing to life, adding depth, dimension, and realism to your artwork. As you progress from the basic outline to a more detailed representation, mastering these techniques will elevate your drawing from a simple sketch to a visually striking piece. Begin by identifying the light source in your composition, as this will determine where shadows fall and highlights appear. For a side profile, the light typically comes from above and slightly to the front, creating shadows beneath the brow, nose, and chin. Use a softer pencil (such as a 2B or 4B) to gently apply shading to these areas, gradually building up the intensity with light, overlapping strokes. Remember to leave the areas where light hits the face untouched or lightly shaded to create contrast. To achieve smooth transitions between light and dark areas, employ techniques like blending and cross-hatching. Use a blending stump or your finger to softly smudge the graphite, creating seamless gradients that mimic the subtle changes in skin tone and facial contours. Cross-hatching involves layering fine lines at different angles to build up darker areas and texture, particularly effective for rendering hair and facial features like eyebrows and eyelashes. Texture plays a vital role in capturing the essence of skin, hair, and other facial elements. For skin, use a combination of tiny circular motions and light, irregular lines to suggest pores and slight imperfections, enhancing the realism of your portrait. When drawing hair, consider its direction and flow, using long, fluid strokes for straight hair or looser, more dynamic lines for curly textures. Vary the pressure and direction of your pencil to create highlights and lowlights within the hair. Don't forget to pay attention to finer details that add character to your side profile. Emphasize laugh lines, crow's feet, or other distinctive features that make the portrait unique. Use an eraser to create highlights or to soften areas that may have become too dark, adding dimension to cheekbones, the bridge of the nose, and the forehead. As you work on shading and texture, step back frequently to assess your drawing as a whole. This perspective will help you maintain balance and ensure that your shading enhances the overall composition rather than overpowering it. Remember, the goal is to create a harmonious blend of light and shadow that brings your side profile to life, capturing not just the physical likeness but also the essence and character of your subject.
Tips and Tricks for Improving Your Side Profile Drawings
Drawing side profiles can be a challenging yet rewarding aspect of artistic expression. Whether you're a seasoned artist or just starting your creative journey, mastering the art of capturing a person's likeness from the side view requires dedication, practice, and a keen eye for detail. This article will explore essential tips and tricks to help you elevate your side profile drawings, focusing on three key areas: practicing with reference photos and live models, experimenting with different art materials and styles, and developing your observational skills and artistic eye. By honing these skills, you'll be able to create more accurate, expressive, and visually striking side profile portraits. We'll delve into techniques that will help you capture the unique features and proportions of your subjects, explore various mediums to find your preferred artistic voice, and sharpen your ability to observe and translate the subtle nuances of facial structure onto paper. Whether you're working on quick sketches or detailed portraits, these strategies will help you improve your craft and bring your side profile drawings to life. Before we dive into these specific areas, let's start by understanding the basics of side profile drawing, which will serve as the foundation for your artistic growth.
Practicing with reference photos and live models
Practicing with reference photos and live models is an essential step in mastering the art of drawing side profiles. This approach provides artists with invaluable opportunities to study the intricate details and subtle nuances of human facial features from various angles. By utilizing both static images and dynamic live subjects, artists can develop a well-rounded understanding of the side profile and enhance their ability to capture its essence on paper. When working with reference photos, artists have the advantage of being able to study the subject at length without time constraints. This allows for careful observation of the relationships between facial features, the interplay of light and shadow, and the unique characteristics that define an individual's profile. High-quality photographs from different angles can help artists understand how the side profile changes with slight rotations of the head, providing insights into the three-dimensional nature of the face. It's beneficial to collect a diverse range of reference photos, including people of various ages, ethnicities, and facial structures, to broaden one's artistic repertoire and avoid falling into the trap of drawing generic or stereotypical profiles. Live models, on the other hand, offer a dynamic and interactive experience that photographs cannot replicate. Drawing from life allows artists to observe the subtle movements and expressions that bring a profile to life. It challenges the artist to capture the essence of the subject quickly, improving their ability to identify and render key features efficiently. Live drawing sessions also provide opportunities to study how light interacts with the face in real-time, enhancing the artist's understanding of form and volume. To make the most of practice sessions, artists should vary their approach. Quick gesture drawings can help capture the overall shape and energy of a profile, while longer, more detailed studies allow for exploration of specific features like the nose, lips, or ear. Experimenting with different mediums – such as pencil, charcoal, or pen – can also yield valuable insights into how best to represent the side profile. It's important to remember that the goal of practicing with references and models is not to create perfect replicas, but to train the eye and hand to work in harmony. Artists should focus on understanding the underlying structures and proportions that make each profile unique. This knowledge can then be applied to create more confident and expressive drawings, even when working from imagination. Regularly alternating between reference photos and live models helps maintain a balance between detailed observation and spontaneous interpretation. This comprehensive approach to practice ensures that artists develop both technical skill and creative intuition, ultimately leading to more authentic and compelling side profile drawings.
Experimenting with different art materials and styles
Experimenting with different art materials and styles is a crucial step in developing your side profile drawing skills and finding your unique artistic voice. By exploring various mediums and techniques, you can discover new ways to capture the essence of a subject's profile and add depth to your artwork. Begin by trying out different drawing tools, such as graphite pencils, charcoal, ink pens, or even digital drawing tablets. Each medium offers its own unique characteristics and can dramatically affect the overall look and feel of your side profile drawings. For instance, graphite pencils allow for smooth blending and subtle shading, perfect for creating realistic portraits with soft transitions between light and shadow. Charcoal, on the other hand, can produce bold, dramatic contrasts and expressive lines, ideal for more atmospheric or moody profile drawings. Ink pens offer crisp, clean lines that work well for stylized or illustrative approaches, while digital tools provide endless possibilities for experimentation with color, texture, and effects. Don't limit yourself to just one style either. Try your hand at various artistic movements and techniques to broaden your skillset. Explore the precise lines and proportions of classical realism, the exaggerated features of caricature, or the simplified forms of minimalism. You might find that incorporating elements from different styles helps you develop a unique approach to side profile drawings that sets your work apart. Experimenting with different papers and surfaces can also yield interesting results. Textured papers can add depth and character to your drawings, while smooth surfaces might be better suited for precise linework. Consider using toned paper to create striking highlights and shadows, or try unconventional surfaces like wood or fabric for a truly unique look. As you experiment, pay attention to how different materials and styles affect your portrayal of facial features, hair textures, and overall composition. You may discover that certain techniques work better for capturing specific details, such as the curve of an eyelash or the subtle contours of a jawline. Keep a sketchbook dedicated to these experiments, noting what works well and what doesn't, so you can refine your approach over time. Remember that the goal of experimentation is not just to find what works best, but also to challenge yourself and push the boundaries of your artistic comfort zone. Embrace happy accidents and unexpected results – they often lead to new insights and creative breakthroughs. By continuously exploring different art materials and styles, you'll not only improve your side profile drawing skills but also develop a more versatile and confident approach to your art as a whole.
Developing your observational skills and artistic eye
Developing your observational skills and artistic eye is a crucial step in mastering the art of drawing side profiles. This process involves training yourself to see the world differently, focusing on details and relationships between shapes that you might otherwise overlook. By honing these skills, you'll be better equipped to capture the nuances of a subject's side profile accurately and expressively. One effective way to improve your observational skills is through regular practice of gesture drawing. This technique involves creating quick, loose sketches of people or objects, focusing on capturing the essence of their form and movement rather than minute details. By doing this regularly, you'll train your eye to quickly identify the most important elements of a subject's form, which is especially useful when drawing side profiles. Another valuable exercise is negative space drawing. This involves focusing on the spaces around and between objects rather than the objects themselves. When applied to side profile drawing, this technique can help you more accurately perceive the contours of the face and the relationships between facial features. Developing a keen eye for proportions is also essential. Study the relationships between different facial features in side view – for example, how the ear aligns with the eye and nose, or how the chin relates to the neck. Practice measuring these relationships using your pencil as a guide, comparing the sizes of different facial elements to each other. Light and shadow play a crucial role in creating depth and dimension in side profile drawings. Train yourself to observe how light falls on the face from different angles, creating highlights and shadows that define the facial structure. Pay attention to the subtle gradations of tone across the face, noting how they change with the curvature of features like the cheek, nose, and chin. Regularly sketching from life is an invaluable practice for improving your observational skills. Carry a sketchbook with you and take every opportunity to draw people you see in everyday situations – on public transport, in cafes, or in parks. This not only provides ample practice but also exposes you to a wide variety of facial types and expressions. Additionally, studying the work of master artists can greatly enhance your artistic eye. Analyze how they approach side profile drawings, noting their techniques for capturing likeness, expression, and character. Pay attention to their use of line, shading, and composition. Finally, remember that developing your observational skills and artistic eye is an ongoing process. Be patient with yourself and embrace the journey of continuous improvement. With consistent practice and a curious, attentive approach to the world around you, you'll find your ability to draw compelling side profiles improving steadily over time.