Breville Espresso Machine How To Use
Here is the introduction paragraph: For coffee aficionados, there's no substitute for a rich, velvety espresso shot. The Breville espresso machine is a popular choice among coffee lovers, offering a perfect blend of style, functionality, and ease of use. However, to get the most out of your Breville espresso machine, it's essential to understand its features, prepare it properly, and operate it with confidence. In this article, we'll delve into the world of Breville espresso machines, starting with understanding the machine itself, including its components and settings. We'll then cover the essential steps to prepare for your first shot, from grinding your beans to tamping the grounds. Finally, we'll walk you through the process of operating the machine, from turning it on to pulling the perfect shot. By the end of this article, you'll be well on your way to becoming a Breville espresso machine expert. Let's start by understanding the Breville espresso machine.
Understanding the Breville Espresso Machine
Here is the introduction paragraph: The Breville espresso machine is a popular choice among coffee enthusiasts, known for its high-quality performance and user-friendly interface. To get the most out of your Breville espresso machine, it's essential to understand its components and features, as well as the different types of machines available. Additionally, familiarizing yourself with the key settings and controls will help you to customize your espresso experience. In this article, we'll delve into the world of Breville espresso machines, starting with an in-depth look at their components and features. Here is the 200 words supporting paragraph: The Breville espresso machine is a complex device that requires a good understanding of its various components and features to operate effectively. At its core, the machine consists of a pump, heating element, and brewing group, which work together to force pressurized hot water through finely ground coffee beans, resulting in a rich and creamy espresso shot. The machine's interface typically includes a control panel with buttons or a touchscreen display, allowing users to adjust settings such as coffee strength, temperature, and brewing time. Some models may also feature additional components, such as a built-in grinder or automatic milk frothing system, which can enhance the overall espresso experience. By understanding the different components and features of the Breville espresso machine, users can optimize their machine's performance and produce high-quality espresso shots with ease. With a solid grasp of the machine's components and features, users can then explore the various types of Breville espresso machines available, each with its unique characteristics and capabilities.
Components and Features
The Breville espresso machine is equipped with a range of components and features that work together to deliver high-quality espresso shots. The machine's stainless steel body and compact design make it a stylish addition to any kitchen countertop. The 15-bar pump provides the necessary pressure to force pressurized hot water through finely ground coffee, resulting in a rich and creamy espresso. The machine also features a thermocoil heating system, which allows for precise temperature control and rapid heating. The automatic grind size and tamping system ensures that the perfect amount of coffee is used for each shot, eliminating the need for manual grinding and tamping. The machine's 61-ounce water tank is removable and easy to clean, making maintenance a breeze. Additionally, the Breville espresso machine comes with a range of accessories, including a steam wand, a frothing pitcher, and a cleaning kit, allowing users to create a variety of coffee drinks and maintain their machine with ease. Overall, the Breville espresso machine's components and features work together to provide a seamless and enjoyable espresso-making experience.
Types of Breville Espresso Machines
Breville offers a wide range of espresso machines, catering to different needs, budgets, and preferences. The Bambino Plus and Bambino Pro are compact and automatic, perfect for small kitchens and beginners. The Infuser and Duo-Temp Pro are semi-automatic, providing more control over brewing parameters. The Oracle and Oracle Touch are high-end, automatic machines with advanced features like automatic grind adjustment and temperature control. The Barista Express and Barista Pro are all-in-one machines that integrate grinders, allowing for freshly ground coffee with each shot. The Cafe Barista and Cafe Solo are more affordable, entry-level options with manual frothing capabilities. Each type of Breville espresso machine is designed to deliver high-quality espresso and a unique user experience, making it essential to choose the right one that suits your coffee needs and preferences.
Key Settings and Controls
When it comes to operating the Breville espresso machine, understanding the key settings and controls is crucial for achieving the perfect shot. The machine features a user-friendly interface with a range of buttons and dials that allow you to customize your espresso experience. The power button is located at the top right corner of the machine and is used to turn it on and off. Once the machine is on, you can select from a range of preset settings, including single shot, double shot, and manual mode, using the buttons on the control panel. The manual mode allows you to adjust the brewing time and temperature to suit your taste preferences. The temperature control dial is located on the side of the machine and allows you to adjust the temperature of the water between 195°F and 205°F. The grind size dial is also located on the side of the machine and allows you to adjust the grind size of the coffee beans to suit your preferred brewing method. The steam wand is controlled by a separate button on the control panel and allows you to froth and heat milk to the perfect temperature and texture. Additionally, the machine features a built-in grinder, which can be adjusted to the desired grind size using the grind size dial. The machine also features a range of indicator lights that alert you to when the machine is ready to use, when the water tank is empty, and when the machine needs to be descaled. By understanding and using these key settings and controls, you can unlock the full potential of your Breville espresso machine and enjoy a perfect cup of espresso every time.
Preparing for Your First Shot
Preparing for your first shot of espresso can be a daunting task, especially if you're new to the world of coffee. However, with the right preparation and knowledge, you can ensure a perfect shot every time. To start, it's essential to choose the right coffee beans, as this will greatly impact the flavor and quality of your espresso. You'll also need to grind and tamp the coffee to the correct consistency, as this will affect the flow of water through the coffee. Finally, attaching the portafilter to the espresso machine is crucial, as this is where the magic happens. By mastering these three key steps, you'll be well on your way to brewing the perfect shot of espresso. So, let's start with the first step: choosing the right coffee beans.
Choosing the Right Coffee Beans
When it comes to choosing the right coffee beans for your Breville espresso machine, there are several factors to consider. First and foremost, you'll want to think about the type of coffee you like to drink. Do you prefer a strong and bold espresso, or a smoother and more balanced cup? Different coffee beans will produce different flavor profiles, so it's essential to choose a bean that aligns with your taste preferences. Next, consider the roast level of the beans. Lighter roasts tend to be more acidic and fruity, while darker roasts are richer and more bitter. If you're new to espresso, a medium roast is a good starting point. You'll also want to think about the origin of the beans. Coffee beans from different regions will have unique flavor profiles, so it's worth trying out beans from different countries to see what you like best. Finally, consider the freshness of the beans. Freshly roasted and ground beans will produce a more flavorful shot than stale beans. Look for beans that have been roasted within the past week or two, and grind them just before use for optimal flavor. By considering these factors, you can choose the right coffee beans for your Breville espresso machine and start pulling perfect shots every time.
Grinding and Tamping the Coffee
Grinding and tamping the coffee are crucial steps in preparing for your first shot of espresso. Grinding the coffee beans is essential to release the flavors and oils, and the grind size will determine the flow rate of the espresso. A burr grinder is the best type of grinder to use, as it produces a consistent grind size and doesn't generate heat, which can damage the beans. The grind size should be fine, but not too fine, as it can lead to over-extraction. The ideal grind size is similar to kosher salt. Tamping the coffee is also critical, as it ensures that the coffee is evenly distributed and compacted in the portafilter. A tamper is used to compress the coffee grounds, and it's essential to apply even pressure to avoid channeling. The tamper should be held firmly and pressed down in a smooth, even motion, making sure to cover the entire surface of the coffee. The coffee should be tamped firmly, but not too hard, as it can lead to over-extraction. The goal is to achieve a smooth, even surface that allows for optimal water flow. By grinding and tamping the coffee correctly, you'll be able to achieve a perfect shot of espresso with a rich, full-bodied flavor and a thick, creamy crema.
Attaching the Portafilter
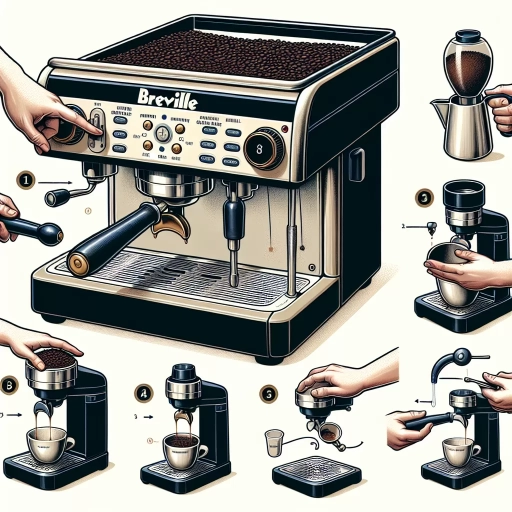
Attaching the portafilter is a crucial step in preparing for your first shot. To do this, ensure the portafilter is securely locked into place on the group head. Start by aligning the portafilter with the group head, making sure the arrows on the portafilter match up with the corresponding marks on the group head. Once aligned, gently push the portafilter forward until it clicks into place. You'll know it's secure when you hear a distinct click and the portafilter is firmly attached. Be careful not to overtighten, as this can damage the machine. A gentle but firm attachment is all that's needed. With the portafilter securely in place, you're one step closer to pulling your first shot.
Operating the Breville Espresso Machine
To operate the Breville espresso machine effectively, it's essential to understand the various steps involved in the process. From turning on and preheating the machine to extracting the perfect espresso shot, and finally, steaming and frothing milk to create a delicious coffee drink. In this article, we will guide you through each of these steps, starting with the initial process of turning on and preheating the machine. By following these steps, you'll be able to unlock the full potential of your Breville espresso machine and enjoy a perfect cup of coffee every time. First, let's begin with the fundamental step of turning on and preheating the machine, which is crucial for achieving the optimal temperature and pressure required for espresso extraction.
Turning On and Preheating the Machine
To turn on and preheat the Breville espresso machine, start by plugging it in and pressing the power button. The machine will begin to heat up, and the lights on the control panel will start to flash. Wait for about 5-10 minutes for the machine to reach the optimal temperature, which is indicated by a steady light on the temperature gauge. During this time, the machine will perform a series of automatic checks, including a self-test of the pump and a check of the temperature. Once the machine is preheated, it's ready to use. To ensure optimal performance, it's recommended to run a shot of hot water through the machine before making your first espresso. This helps to prime the pump and ensure that the machine is working at its best. With the machine preheated and primed, you're now ready to start making delicious espresso shots. Simply place a portafilter in the machine, add your coffee grounds, and close the lever to begin the brewing process. The Breville espresso machine is designed to make it easy to get started, with clear instructions and a user-friendly interface. By following these simple steps, you'll be well on your way to creating perfect espresso shots every time.
Extracting the Espresso Shot
Extracting the espresso shot is the most critical step in the espresso-making process. To extract the perfect shot, ensure the portafilter is securely locked into place, and the machine is set to the correct brewing temperature. Place a demitasse cup under the spout, and make sure it's centered to prevent any spills. Next, start the brewing process by pressing the "1 Shot" or "2 Shot" button, depending on your desired serving size. The machine will begin to force pressurized hot water through the coffee grounds, and you'll start to see the espresso flow into the cup. The ideal shot should take around 20-30 seconds to pour and have a thick, creamy crema on top. If the shot is too fast or too slow, it may be a sign that the grind of your coffee beans is off or the tamping is uneven. Adjust the grind and tamping as needed to achieve the perfect shot. As you extract the shot, pay attention to the sound of the machine, which should be a smooth, gurgling noise. If the sound is more of a loud, screeching noise, it may indicate that the machine needs to be descaled or that there's an issue with the pump. By following these steps and paying attention to the nuances of the machine, you'll be able to extract the perfect espresso shot every time.
Steaming and Frothing Milk
Steaming and frothing milk is an essential step in creating a perfect espresso-based drink. To steam and froth milk using the Breville espresso machine, start by pouring milk into a stainless steel pitcher. The ideal temperature for steaming milk is between 140°F and 160°F, and the machine's steam wand is designed to reach this temperature quickly. Place the pitcher under the steam wand, and turn on the steam function. Hold the pitcher at an angle to create a whirlpool effect, which helps to incorporate air and create a smooth, silky texture. As the milk heats up, use the steam wand to froth the milk to the desired consistency. For a cappuccino, you'll want to create a thick, creamy foam, while a latte requires a thinner, more velvety texture. To froth the milk, hold the pitcher vertically and insert the steam wand just below the surface of the milk. Move the pitcher up and down to create a swirling motion, which helps to incorporate air and create a smooth, even texture. As you froth the milk, you'll start to see it thicken and hold its shape. This is when you know it's ready to be poured into your espresso cup. With a little practice, you'll be able to create perfectly steamed and frothed milk every time, and your espresso-based drinks will be elevated to a whole new level.