How To Do Chrome Nails
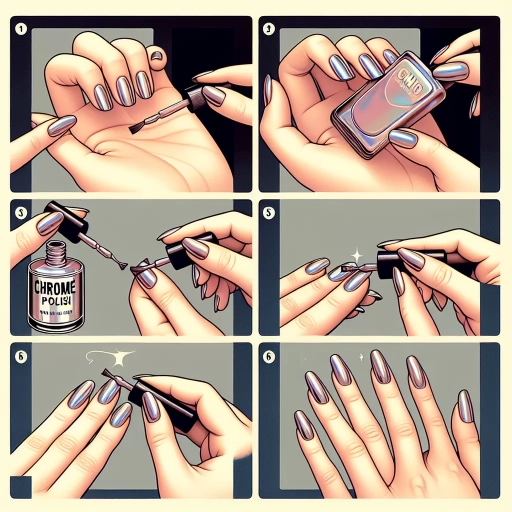
Chrome nails have become a staple in the world of nail art, with their mirror-like finish and sleek appearance. But, achieving this look at home can be a daunting task, especially for those who are new to nail art. However, with the right techniques and preparation, anyone can achieve salon-quality chrome nails from the comfort of their own home. To get started, it's essential to understand the importance of preparation, application techniques, and tips and tricks for a professional finish. In this article, we will delve into the world of chrome nails and provide you with a step-by-step guide on how to achieve this stunning look. We will begin by discussing the crucial steps to take before applying chrome nail polish, highlighting the importance of preparation in ensuring a successful outcome. Preparation is Key.
Preparation is Key
Preparation is key to achieving a long-lasting and visually appealing chrome nail finish. To ensure a successful application, it is essential to focus on three critical steps: choosing the right nail polish, prepping the nail surface, and investing in a good quality chrome powder. By selecting a polish that is specifically designed for chrome finishes, you can guarantee a strong foundation for your nail art. A well-prepared nail surface is also crucial, as it allows the polish and chrome powder to adhere evenly and prevents any imperfections. Finally, using a high-quality chrome powder is vital, as it will provide the desired shine and durability. By following these steps, you can ensure a flawless chrome finish that will last for weeks to come. So, let's start with the first step: choosing the right nail polish.
Choose the Right Nail Polish
Here is the paragraphy: Choosing the right nail polish is crucial for achieving a successful chrome nail look. With so many options available, it can be overwhelming to decide which one to use. Here are some tips to help you choose the right nail polish for your chrome nails. First, consider the color you want to achieve. Chrome nails can be done in a variety of colors, from classic silver and gold to bold and bright hues. Choose a polish that matches the color you want to achieve, and make sure it's a high-quality, chrome-finish polish. Look for polishes that are specifically labeled as "chrome" or "mirror finish," as these will give you the best results. Next, consider the finish you want to achieve. Do you want a glossy, reflective finish or a more subtle, matte finish? Choose a polish that matches the finish you want to achieve. Finally, consider the brand and quality of the polish. Look for polishes from reputable brands that are known for their high-quality, long-lasting formulas. Some popular brands for chrome nails include OPI, Essie, and Sally Hansen. By choosing the right nail polish, you'll be able to achieve a beautiful, long-lasting chrome nail look that you'll love.
Prep the Nail Surface
Here is the paragraphy: Prep the Nail Surface. To achieve a mirror-like finish, it's essential to prepare the nail surface properly. Start by gently buffing the nail to remove any ridges or imperfections. Use a buffer with a fine grit to smooth out the surface, but be careful not to over-buff, as this can weaken the nail. Next, wipe the nail clean with a lint-free wipe or cotton ball soaked in nail cleanser to remove any oils or residue. This step is crucial, as any remaining oils can interfere with the chrome powder's adhesion. Finally, apply a thin layer of base coat to the nail, making sure to cover the entire surface. This will help the chrome powder adhere evenly and prevent it from lifting off the nail. By properly prepping the nail surface, you'll be able to achieve a smooth, even finish that's essential for a successful chrome nail application.
Invest in a Good Quality Chrome Powder
Here is the paragraphy: Investing in a good quality chrome powder is essential for achieving a professional-looking chrome nail finish. A high-quality chrome powder will provide a smooth, even, and long-lasting finish, while a low-quality powder may result in a dull, uneven, and short-lived finish. When selecting a chrome powder, look for a product that is made from high-quality materials and has a fine, even texture. A good quality chrome powder will also be easy to apply and will adhere well to the nail surface. Additionally, a high-quality chrome powder will be less likely to fade or chip over time, ensuring that your chrome nails look great for longer. Some popular brands of chrome powder include Gelish, Artistic Nail Design, and ORLY. It's also important to note that using a good quality chrome powder in combination with a good quality gel polish and a proper application technique will result in a longer-lasting and more durable chrome nail finish.
Application Techniques
To achieve a high-quality, long-lasting chrome nail finish, it's essential to master the right application techniques. A smooth, even base coat is crucial for a flawless finish, and using a specialized chrome nail polish brush can make all the difference in achieving a mirror-like shine. Finally, sealing your design with a top coat is vital for extending the wear of your chrome nails. In this article, we'll dive into the specifics of each step, starting with the importance of applying a base coat for a smooth finish. By following these expert tips, you'll be able to achieve salon-quality chrome nails at home. So, let's begin by exploring the first crucial step: Apply a Base Coat for a Smooth Finish.
Apply a Base Coat for a Smooth Finish
Applying a base coat is a crucial step in achieving a smooth finish for your chrome nails. A base coat serves as a primer, creating a strong bond between your natural nail and the chrome polish. It helps to prevent staining, promotes even polish adhesion, and fills in any ridges or imperfections on the nail surface. To apply a base coat, start by gently wiping your nails with a lint-free wipe or cotton ball soaked in nail cleanser to remove any oils or residue. Next, apply a thin layer of clear base coat to each nail, making sure to cover the entire nail surface. Use smooth, even strokes to coat the nail, starting at the center and working your way out towards the tips. Allow the base coat to dry completely before moving on to the next step. A good base coat can make all the difference in the final result of your chrome nails, so don't skip this step! By taking the time to apply a base coat, you'll be rewarded with a smooth, even finish that will make your chrome nails look professional and long-lasting.
Use a Specialized Chrome Nail Polish Brush
When it comes to achieving a flawless chrome finish, using a specialized chrome nail polish brush is essential. These brushes are designed specifically for chrome nail polish and are typically made with synthetic fibers that are shorter and more densely packed than regular nail polish brushes. This unique design allows for a smoother, more even application of the polish, which is crucial for creating a mirror-like finish. The shorter fibers also help to prevent the polish from pooling at the cuticles, reducing the risk of streaks and unevenness. Additionally, chrome nail polish brushes often have a more flexible tip, which enables you to get into the corners of the nail and create a seamless finish. By using a specialized chrome nail polish brush, you can ensure a professional-looking finish that is both durable and long-lasting.
Finish with a Top Coat for Long-Lasting Results
Finishing with a top coat is a crucial step in achieving long-lasting chrome nail results. A good top coat helps to seal in the chrome finish, preventing it from chipping or fading quickly. It also adds a glossy finish to the nails, making them look more vibrant and reflective. When choosing a top coat, look for one that is specifically designed for use with chrome nail polish. These top coats are usually formulated to work well with the metallic finish of chrome polish and help to bring out its color and shine. Apply a thin layer of top coat to each nail, making sure to cover the entire surface. Use a gentle touch to avoid smudging or smearing the chrome finish. Allow the top coat to dry completely before handling your nails or exposing them to water or other chemicals. With a good top coat, your chrome nails can last for up to two weeks without chipping or fading, making them a great option for special occasions or everyday wear.
Tips and Tricks for a Professional Finish
Achieving a professional finish in nail art requires attention to detail, patience, and practice. To take your nail art game to the next level, it's essential to master a few key techniques. One of the most critical aspects of professional-looking nail art is precise application, which can be achieved with the right tools. Using a nail art brush can make all the difference in creating crisp, clean lines and intricate designs. Additionally, don't be discouraged if your initial attempts don't turn out as expected - practice makes perfect, and it's essential to keep trying until you get the desired results. Finally, sealing your design with a chrome top coat can add a touch of professionalism and make your nail art stand out. By incorporating these tips and tricks into your nail art routine, you'll be well on your way to achieving a professional finish. To start, let's take a closer look at the importance of using a nail art brush for precise application.
Use a Nail Art Brush for Precise Application
To achieve a professional finish in chrome nail application, using a nail art brush is essential for precise application. A nail art brush allows for controlled and delicate strokes, enabling you to paint on the chrome powder with accuracy and precision. The small, flexible bristles of the brush enable you to reach into small areas and create intricate designs, making it ideal for detailed work. When using a nail art brush, start by dipping the tip of the brush into the chrome powder and gently tapping off any excess. This will prevent the powder from clumping and ensure a smooth, even application. Hold the brush at a 45-degree angle and use light, gentle strokes to apply the powder to the nail. This will help to prevent the powder from pooling or becoming uneven. By using a nail art brush, you can achieve a precise and professional-looking finish that is sure to impress. Additionally, a nail art brush can be used to clean up any excess powder around the cuticles and nail bed, making it a versatile tool in your chrome nail application kit.
Practice Makes Perfect: Don't Be Discouraged by Initial Attempts
The key to mastering the art of chrome nails is practice, practice, and more practice. It's essential to remember that your initial attempts may not turn out as expected, but don't be discouraged. Every nail technician, even the most experienced ones, started from scratch and had to work their way up. The first few times you try to create chrome nails, you may encounter issues with the application, the finish, or the overall look. However, with each attempt, you'll learn what works and what doesn't, and you'll be able to refine your technique. It's crucial to be patient and not get frustrated if your first few tries don't yield the desired results. Instead, use these initial attempts as an opportunity to learn and improve. Analyze what went wrong and make adjustments accordingly. With time and practice, you'll develop the skills and confidence needed to create stunning chrome nails that will impress even the most discerning clients. So, don't be too hard on yourself if your first attempts don't turn out perfectly – it's all part of the learning process, and with persistence and dedication, you'll eventually achieve a professional finish.
Seal the Deal with a Chrome Top Coat
Seal the Deal with a Chrome Top Coat. To achieve a long-lasting, high-shine finish, it's essential to seal your chrome nail art with a top coat. A good quality top coat will not only protect your design from chipping and fading but also add an extra layer of gloss and depth. When choosing a top coat, look for a formula that is specifically designed for use with chrome powders or gel polishes. These top coats are usually formulated to be thin and flexible, allowing for a smooth, even application that won't pool or drag on the nail. Apply a thin layer of top coat over your chrome design, making sure to cover the entire nail surface. Cure the top coat under the UV or LED lamp for the recommended time, usually around 30 seconds to 1 minute. Once cured, your chrome nail art will be sealed and protected, with a glossy finish that will last for days.