How To Draw A Deer Easy
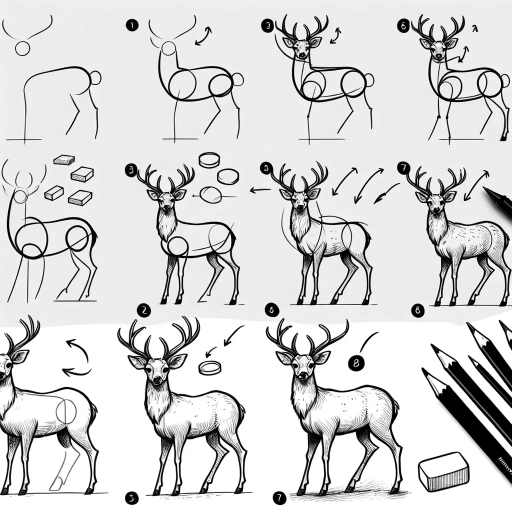
Drawing a deer can be a fun and rewarding experience, especially when you have a clear understanding of the basics. To create a realistic and captivating deer drawing, it's essential to break down the process into manageable steps. In this article, we'll explore the fundamentals of drawing a deer, starting with understanding deer anatomy. We'll then move on to sketching deer basics, covering the overall shape and proportions of the animal. Finally, we'll delve into adding details and refining your drawing, where you'll learn how to bring your deer to life with texture, shading, and other finishing touches. By following these steps, you'll be well on your way to creating a beautiful and realistic deer drawing. So, let's begin by exploring the fascinating world of deer anatomy, where we'll discover the key elements that make up this majestic creature.
Understanding Deer Anatomy
Understanding deer anatomy is essential for hunters, wildlife enthusiasts, and anyone interested in these magnificent creatures. To gain a deeper appreciation for deer, it's crucial to familiarize yourself with their body proportions, identify key features of their head, and recognize the structure of their legs and hooves. By understanding these aspects of deer anatomy, you'll be better equipped to track, observe, and appreciate these animals in their natural habitat. In this article, we'll delve into the intricacies of deer anatomy, starting with the basics of their body proportions. By examining the overall shape and size of a deer's body, you'll gain a foundation for understanding their behavior, movement patterns, and habitat preferences. Let's begin by familiarizing ourselves with deer body proportions.
Familiarizing with Deer Body Proportions
Familiarizing with Deer Body Proportions is a crucial step in drawing a deer accurately. Deer have a unique body shape, with a slender neck, a compact body, and long legs. To draw a deer, it's essential to understand the proportions of its body parts. The body of a deer is roughly 1.5 to 2 times the length of its head, with the neck making up about one-third of the body length. The legs are long and slender, with the hind legs being slightly longer than the front legs. The tail is long and slender, making up about one-quarter of the body length. Understanding these proportions will help you draw a deer that looks balanced and realistic. By studying the body proportions of a deer, you can create a more accurate and detailed drawing. Additionally, paying attention to the proportions of the deer's body will also help you capture its movement and posture, allowing you to create a more dynamic and engaging drawing.
Identifying Key Features of a Deer's Head
When drawing a deer, it's essential to capture the distinctive features of its head. Start by sketching the overall shape, which is typically triangular with a broad forehead and a tapering muzzle. The eyes are large and expressive, positioned on the sides of the head, and are often almond-shaped. The ears are long and pointed, with a rounded tip, and are usually erect, as if listening for potential threats. The nose is small and slightly upturned, giving the deer a gentle appearance. The mouth is a small slit, often barely visible, and the jawline is defined by a subtle curve. To add depth and dimension, pay attention to the subtle contours of the head, including the slight indentation above the eyes and the gentle slope of the forehead. By accurately capturing these key features, you'll be able to create a realistic and endearing deer head that will bring your drawing to life.
Recognizing Deer Leg and Hoof Structure
Recognizing deer leg and hoof structure is essential for accurately drawing these majestic creatures. Deer have a unique leg and hoof anatomy that sets them apart from other animals. Their legs are long and slender, with a distinctive shape that allows for agility and speed. The front legs are slightly shorter than the hind legs, which are more muscular and powerful. Deer hooves are cloven, meaning they are split into two toes, with a hard, keratin-based outer layer and a soft, spongy inner layer. The hooves are also shaped like a crescent moon, with the toes pointing slightly outward. When drawing deer legs and hooves, it's essential to capture their slender shape, the distinctive curve of the hooves, and the way the legs are positioned in relation to the body. Pay attention to the way the legs are angled, with the front legs often bent and the hind legs straight, and the way the hooves are placed on the ground. By accurately depicting the deer's leg and hoof structure, you can create a more realistic and engaging drawing.
Sketching Deer Basics
Sketching deer can be a fun and rewarding experience, especially when you have a good understanding of the basics. To get started, it's essential to learn how to draw a deer's body shape and posture, as this will provide the foundation for your entire sketch. From there, you can add basic facial features and antlers, which will help bring your deer to life. Additionally, learning how to sketch deer legs and hooves in different poses will allow you to capture the animal's movement and behavior. By mastering these fundamental skills, you'll be well on your way to creating realistic and engaging deer sketches. In this article, we'll start by exploring the basics of drawing a deer's body shape and posture, including the proportions, lines, and curves that define this majestic animal.
Drawing a Deer's Body Shape and Posture
Drawing a deer's body shape and posture is a crucial step in creating a realistic and captivating drawing. To start, imagine a large oval for the body, with the longer axis running horizontally. The oval should be slightly tilted, with the top end leaning towards the deer's head and the bottom end towards the tail. The body shape should be smooth and curved, with no sharp angles or edges. Next, add the neck, which should be slightly arched and connected to the body at a gentle angle. The neck should be roughly one-third the length of the body. The legs should be added next, with the front legs being slightly shorter than the back legs. The front legs should be positioned slightly forward of the body, while the back legs should be positioned slightly backward. The hooves should be small and oval-shaped, with the toes pointing slightly outward. The tail should be long and slender, with a rounded tip. The posture of the deer should be relaxed, with the head held high and the ears perked up. The body should be balanced evenly, with the weight distributed evenly between the four legs. By paying attention to these details, you can create a deer drawing that is both realistic and visually appealing.
Adding Basic Facial Features and Antlers
When adding basic facial features and antlers to your deer sketch, start by drawing two small circles for the eyes, making sure to leave enough space between them for the nose and mouth. The eyes should be positioned on either side of the head, about one-third of the way down from the top. Next, draw a small oval shape for the nose, making sure it's centered between the eyes. For the mouth, draw a small curved line below the nose, following the natural curve of the head. To add some personality to your deer, you can also draw a few eyelashes and eyebrows using short, curved lines. Moving on to the antlers, start by drawing two long, curved lines that extend from the top of the head, one on either side. The antlers should be roughly the same size and shape, with a few smaller branches extending off the main beam. You can also add some texture to the antlers by drawing short, curved lines that follow the natural curve of the antler. Finally, add some details to the ears by drawing a few curved lines that follow the natural shape of the ear, and you're done!
Sketching Deer Legs and Hooves in Different Poses
Sketching deer legs and hooves in different poses requires attention to detail and an understanding of the animal's anatomy. To start, observe the overall structure of the deer's legs, noting the proportions and relationships between the joints, bones, and muscles. The front legs are typically more slender and flexible than the hind legs, which are stronger and more muscular. When drawing the legs in different poses, consider the way the joints bend and the muscles contract or relax. For example, when a deer is running, its front legs are often stretched out in front of its body, with the hooves pointing downwards, while the hind legs are bent and pushing off the ground. In contrast, when a deer is standing still, its legs are often straight and relaxed, with the hooves pointing downwards. To capture these different poses, practice drawing the legs from various angles, using reference images or observing deer in person. Pay particular attention to the hooves, which are a distinctive feature of deer and can be challenging to draw. Note the shape and size of the hooves, as well as the way they are positioned in relation to the legs and body. With practice and patience, you can master the art of sketching deer legs and hooves in different poses, adding depth and realism to your drawings.
Adding Details and Refining Your Drawing
Adding details and refining your drawing is a crucial step in creating a realistic and engaging piece of art. This process involves paying attention to the smallest features and textures, which can make a significant difference in the overall quality of the drawing. In this article, we will explore three key aspects of adding details and refining your drawing: enhancing facial expressions and eye details, adding texture and patterns to the deer's coat, and refining antler shapes and adding final details. By focusing on these areas, you can take your drawing to the next level and create a truly impressive piece of art. By mastering these techniques, you can bring your drawing to life and capture the essence of your subject. Let's start by exploring the first aspect, enhancing facial expressions and eye details, which can greatly impact the overall mood and personality of your drawing.
Enhancing Facial Expressions and Eye Details
When it comes to adding details and refining your deer drawing, one of the most important aspects to focus on is enhancing facial expressions and eye details. The eyes are the windows to the soul, and in the case of a deer, they can convey a sense of gentleness, curiosity, or even fear. To create a believable and engaging facial expression, start by adding subtle details to the eyes, such as eyelashes, eyelids, and a slight shine to suggest moisture. You can also add a slight curve to the eyelids to give the impression of a gentle blink. Next, focus on the shape and position of the eyes, making sure they are proportionate to the rest of the face and spaced evenly apart. A good rule of thumb is to place the eyes about one-third of the way down from the top of the head. When it comes to the facial expression, consider the mood and personality you want to convey. A relaxed deer might have a slightly open mouth and a soft, gentle gaze, while a startled deer might have a wide-eyed stare and a tense, alert posture. By paying attention to these subtle details, you can create a deer drawing that is not only visually appealing but also emotionally resonant. Additionally, you can also add some details to the nose, mouth, and jawline to give your deer a more defined and realistic appearance. By taking the time to enhance the facial expressions and eye details, you can bring your deer drawing to life and create a truly captivating piece of art.
Adding Texture and Patterns to the Deer's Coat
Adding texture and patterns to the deer's coat can elevate your drawing from a simple outline to a more realistic and visually appealing representation. To start, consider the type of deer you are drawing and the environment it inhabits. For example, a white-tailed deer may have a reddish-brown coat with white undersides, while a mule deer may have a grayish-brown coat with a white rump patch. Use a range of pencils, from 2H to 6B, to create a variety of textures and shading. For a more realistic look, pay attention to the direction of the fur, using short, curved strokes to suggest the softness and smoothness of the deer's coat. You can also add patterns such as spots or stripes, using a fine-tip pen or a small brush to create delicate, intricate designs. To add depth and dimension to your drawing, use layering techniques, building up layers of texture and shading to create a sense of volume and structure. Finally, don't forget to leave some areas of the coat smooth and untextured, to create a sense of contrast and visual interest. By adding texture and patterns to the deer's coat, you can create a rich, detailed, and engaging drawing that captures the beauty and majesty of these amazing animals.
Refining Antler Shapes and Adding Final Details
Refining antler shapes and adding final details is a crucial step in creating a realistic and visually appealing deer drawing. To refine the antler shapes, start by adding more definition to the main beams, using gentle, flowing lines to suggest the natural curves and twists of the antlers. Pay attention to the proportions and symmetry of the antlers, making sure they are balanced and evenly spaced. Next, add the smaller branches and tines, using short, delicate lines to create a sense of texture and depth. Be careful not to overdo it, as too many details can make the antlers look cluttered and unnatural. Instead, focus on suggesting the overall shape and structure of the antlers, leaving some areas loose and undefined to create a sense of movement and energy. Finally, add some final details, such as the eyes, nose, and mouth, using a range of lines and shading techniques to create a sense of depth and dimension. Pay attention to the expression and personality of the deer, using subtle variations in the facial features to convey a sense of calmness, alertness, or curiosity. By refining the antler shapes and adding final details, you can bring your deer drawing to life and create a truly captivating and realistic image.