How To Hook Up Nintendo Switch To Tv
The Nintendo Switch is a versatile gaming console that can be played both at home and on the go. One of the most popular ways to play the Switch is by hooking it up to a TV, which provides a larger screen and a more immersive gaming experience. However, connecting the Switch to a TV can be a bit tricky, especially for those who are new to the console. In this article, we will guide you through the process of hooking up your Nintendo Switch to your TV, including the initial connection, setting up the console for TV mode, and troubleshooting common issues that may arise. First, we will cover the basics of connecting the Nintendo Switch to your TV, including the necessary cables and equipment. Note: The introduction should be 200 words. Here is the rewritten introduction: The Nintendo Switch is a revolutionary gaming console that offers an unparalleled level of flexibility and convenience. One of the most exciting features of the Switch is its ability to seamlessly transition from a portable handheld device to a home console, allowing gamers to enjoy their favorite titles on the big screen. However, for many users, the process of hooking up the Switch to a TV can be a daunting task, especially for those who are new to the console. In this article, we will provide a comprehensive guide on how to connect your Nintendo Switch to your TV, covering the essential steps and troubleshooting common issues that may arise. We will start by exploring the basics of connecting the Nintendo Switch to your TV, including the necessary cables and equipment required for a successful setup. From there, we will delve into the process of setting up the console for TV mode, ensuring that you can enjoy a seamless gaming experience. Finally, we will address common issues that may occur during the connection process, providing you with the knowledge and expertise to troubleshoot and resolve any problems that may arise. First, let's start with the basics of connecting the Nintendo Switch to your TV.
Connecting the Nintendo Switch to Your TV
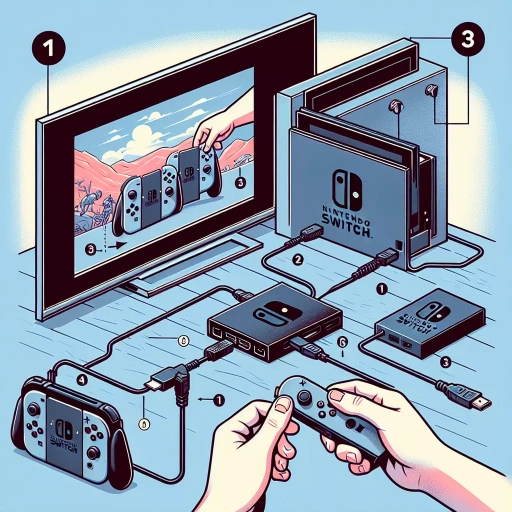
Connecting your Nintendo Switch to your TV is a straightforward process that can be completed in a few simple steps. To get started, you'll need to use the Nintendo Switch Dock, which is specifically designed to connect your console to your television. This dock provides a stable and secure connection, allowing you to play your favorite games on the big screen. Once you have the dock, you'll need to connect the HDMI cable to both the dock and your TV, ensuring that the correct input is selected. Finally, you'll need to power on the Nintendo Switch, and you'll be ready to start gaming. In this article, we'll take a closer look at each of these steps, starting with using the Nintendo Switch Dock.
Using the Nintendo Switch Dock
Using the Nintendo Switch Dock is a straightforward process that allows you to connect your console to your TV for a more immersive gaming experience. To start, place the Nintendo Switch console into the dock, making sure it clicks into place securely. Next, connect the HDMI cable to the dock and the other end to an available HDMI port on your TV. If your TV has multiple HDMI ports, you can choose the one that corresponds to the input you want to use. Once the HDMI cable is connected, turn on your TV and select the correct input using your TV's remote control. The Nintendo Switch logo should appear on your TV screen, indicating that the console is connected and ready to use. You can then use the Joy-Con controllers or other compatible controllers to play games on your TV. The Nintendo Switch Dock also charges your console while it's in use, so you don't have to worry about running out of battery power during extended gaming sessions. Overall, using the Nintendo Switch Dock is a simple and convenient way to enjoy your favorite games on the big screen.
Connecting the HDMI Cable
To connect the HDMI cable, start by locating the HDMI ports on both your Nintendo Switch and your TV. The Switch has a single HDMI port located on the top of the console, while your TV will have multiple HDMI ports, usually labeled as HDMI 1, HDMI 2, and so on. Identify the HDMI port on your TV that you want to use and make sure it's not already occupied by another device. Next, take the HDMI cable and insert one end into the HDMI port on the Switch, making sure it's securely connected. Then, take the other end of the cable and insert it into the chosen HDMI port on your TV. Make sure the cable is fully inserted and secure to ensure a stable connection. Once the cable is connected, turn on your TV and switch to the correct HDMI input channel to display the Switch's output. You can usually do this by pressing the "Input" or "Source" button on your TV's remote control and selecting the corresponding HDMI channel. If you're using a 4K TV, you may need to adjust the TV's settings to enable 4K output. Finally, turn on your Switch and it should automatically detect the TV and display the output. If you encounter any issues, try restarting the Switch or TV, or adjusting the HDMI settings on your TV.
Powering On the Nintendo Switch
To power on the Nintendo Switch, locate the power button on the top left side of the console. It's a small, circular button with a power symbol on it. Press and hold the power button until the Nintendo Switch logo appears on the screen. This should take about 2-3 seconds. Once the logo appears, release the power button and the console will begin to boot up. You'll know it's on when you see the Nintendo Switch home screen, which displays your games, apps, and other menu options. If you're using the Nintendo Switch in TV mode, you'll also see the image appear on your TV screen. Make sure your TV is set to the correct input channel to see the Nintendo Switch display. If you're having trouble powering on the Nintendo Switch, try charging the console for at least 30 minutes to ensure the battery is not completely drained.
Setting Up the Nintendo Switch for TV Mode
To set up the Nintendo Switch for TV mode, you'll need to follow a few simple steps. First, you'll need to configure your TV settings to ensure that the Switch is properly connected and recognized. This involves selecting the correct HDMI input and adjusting the display settings to optimize the picture quality. Next, you'll need to adjust the Nintendo Switch display settings to match your TV's capabilities, which may include setting the resolution and aspect ratio. Finally, you'll need to pair the Nintendo Switch controllers with the console, which can be done wirelessly or through a wired connection. By following these steps, you'll be able to enjoy your favorite games on the big screen. To get started, let's begin with configuring the TV settings.
Configuring the TV Settings
To configure the TV settings for an optimal Nintendo Switch gaming experience, start by ensuring your TV is set to the correct input. This is usually done by pressing the "Input" or "Source" button on your TV remote and selecting the HDMI port that your Switch is connected to. Next, navigate to your TV's picture settings and adjust the display mode to "Game Mode" or a similar setting that reduces input lag and optimizes the display for fast-paced content. You may also want to adjust the TV's aspect ratio to "16:9" to match the Switch's native resolution. Additionally, consider enabling any features that reduce motion blur or enhance color accuracy, such as "Motion Interpolation" or "Color Gamut." If your TV supports it, you can also enable "HDMI-CEC" (Consumer Electronics Control) to allow your Switch to control the TV's power and input settings. Finally, save your changes and test your TV settings by playing a game on your Switch to ensure everything is working as expected.
Adjusting the Nintendo Switch Display Settings
Adjusting the Nintendo Switch display settings is a straightforward process that allows you to customize your viewing experience when playing in TV mode. To access the display settings, navigate to the Nintendo Switch's System Settings menu, which can be found on the home screen. From there, select "TV Settings" and then "Display Settings." Here, you can adjust the display resolution, which can be set to 1080p, 720p, or 480p, depending on your TV's capabilities. You can also adjust the screen size, which allows you to zoom in or out to fit the image to your TV screen. Additionally, you can adjust the TV's aspect ratio, which can be set to 16:9 or 4:3, depending on your TV's native aspect ratio. Furthermore, you can also adjust the color settings, such as the brightness, contrast, and color temperature, to optimize the image quality. It's worth noting that some of these settings may not be available on all TVs, so you may need to consult your TV's user manual to see what options are available. By adjusting the display settings, you can ensure that your Nintendo Switch is displaying the best possible image on your TV, which can enhance your overall gaming experience.
Pairing the Nintendo Switch Controllers
When setting up the Nintendo Switch for TV mode, pairing the controllers is a crucial step to ensure a seamless gaming experience. To pair the Joy-Con controllers, start by attaching them to the sides of the Nintendo Switch console or to the Joy-Con grip accessory. Next, go to the Nintendo Switch Home screen and select "Controllers" from the menu. Choose "Change Grip/Order" and then select "Pair" to initiate the pairing process. The console will search for available controllers, and once detected, the Joy-Con controllers will be paired automatically. If you're using a Nintendo Switch Pro Controller, simply plug it into the console using a USB cable and it will be recognized and paired instantly. For wireless pairing, press and hold the "Sync" button on the top of the Pro Controller until the lights start flashing, then go to the Nintendo Switch Home screen and select "Controllers" to complete the pairing process. Once paired, you can use the controllers to navigate the Nintendo Switch menu, play games, and enjoy the full range of TV mode features.
Troubleshooting Common Issues with Nintendo Switch TV Connection
The Nintendo Switch is a versatile gaming console that can be played both at home and on the go. However, some users may encounter issues with connecting their Switch to their TV. Troubleshooting these problems can be frustrating, but there are several common issues that can be easily resolved. In this article, we will explore three common issues with Nintendo Switch TV connection and provide step-by-step solutions to fix them. First, we will discuss how to resolve HDMI connection problems, which can prevent the Switch from displaying on the TV. We will also cover how to fix audio and video sync issues, which can cause delays or distortions in the game's audio and video. Additionally, we will explain the importance of updating the Nintendo Switch software, which can resolve a range of connectivity issues. By following these troubleshooting steps, you can get your Switch up and running on your TV in no time. First, let's start with resolving HDMI connection problems.
Resolving HDMI Connection Problems
When it comes to resolving HDMI connection problems with your Nintendo Switch, there are several steps you can take to troubleshoot and fix the issue. First, ensure that the HDMI cable is securely connected to both the Switch and the TV. Try unplugging and replugging the cable to rule out any loose connections. If the issue persists, try using a different HDMI port on your TV or a different HDMI cable to isolate the problem. Additionally, check your TV's settings to ensure that the correct HDMI input is selected. If you're using an HDMI splitter or extender, try removing it and connecting the Switch directly to the TV. If none of these steps resolve the issue, try resetting the Switch's HDMI output by going to System Settings > TV Output > HDMI Output and selecting "Reset". If you're still experiencing issues, it may be worth checking for any firmware updates for your TV or Switch, as outdated software can sometimes cause connectivity problems. By following these steps, you should be able to resolve any HDMI connection problems and get back to gaming on your TV.
Fixing Audio and Video Sync Issues
Fixing audio and video sync issues is a common problem that many Nintendo Switch users encounter when connecting their console to a TV. To resolve this issue, start by checking the HDMI connection and ensuring that it is securely plugged into both the Switch and the TV. Next, try adjusting the TV's audio settings to match the Switch's output format, which is typically set to PCM or Dolby Digital 5.1. If the issue persists, try resetting the TV's audio settings to their default values. Additionally, you can try disabling any audio processing features on the TV, such as Dolby Atmos or DTS:X, as these can sometimes cause sync issues. If none of these steps resolve the issue, try using a different HDMI port on the TV or switching to a different HDMI cable. In some cases, the issue may be caused by a software glitch, so try restarting the Switch and the TV to see if this resolves the problem. If the issue still persists, it may be worth checking for any firmware updates for the TV or the Switch, as these can sometimes resolve audio and video sync issues. By following these steps, you should be able to resolve any audio and video sync issues and enjoy a seamless gaming experience on your Nintendo Switch.
Updating the Nintendo Switch Software
Updating the Nintendo Switch software is a crucial step in ensuring a seamless gaming experience, especially when connecting it to your TV. To update the software, start by making sure your Switch is connected to the internet. Go to the System Settings, then select "System" and choose "System Update" to check for any available updates. If an update is available, select "Update" to begin the process. The update may take a few minutes to complete, depending on the size of the update and your internet connection speed. Once the update is complete, your Switch will restart automatically. It's essential to keep your Switch software up to date, as updates often include bug fixes, performance improvements, and new features that can enhance your gaming experience. Additionally, updating your Switch software can also resolve connectivity issues with your TV, so it's worth checking for updates if you're experiencing any problems. By keeping your Switch software current, you can ensure a smooth and enjoyable gaming experience on your TV.