How To Make Polymer Clay Earrings
Here is the introduction paragraph: Polymer clay earrings are a popular and creative way to add a personal touch to your jewelry collection. With a few simple tools and some imagination, you can create unique and stylish earrings that reflect your personality. But before you start, it's essential to understand the basics of working with polymer clay, including the different types of clay, tools, and techniques involved. In this article, we'll take you through the process of making polymer clay earrings, from understanding the basics to designing and creating your earrings, and finally, finishing and assembling them. By the end of this article, you'll have the knowledge and skills to create your own beautiful polymer clay earrings. So, let's start by understanding the basics of polymer clay earrings.
Understanding the Basics of Polymer Clay Earrings
Polymer clay earrings have become increasingly popular in recent years due to their versatility, durability, and aesthetic appeal. To create beautiful and unique earrings, it's essential to understand the basics of working with polymer clay. This article will delve into the fundamental aspects of polymer clay earrings, covering what polymer clay is and its properties, the right tools and materials to use, and basic techniques for working with this medium. By grasping these concepts, you'll be well on your way to crafting stunning polymer clay earrings that showcase your creativity and style. So, let's start by exploring what polymer clay is and its properties, which will provide a solid foundation for our journey into the world of polymer clay earrings.
What is Polymer Clay and Its Properties
Polymer clay is a type of modeling clay that is made from a mixture of polymer resin and pigment. It is a versatile and popular material used in various craft projects, including jewelry making, miniatures, and decorative items. Polymer clay is known for its unique properties, which make it an ideal choice for crafting. It is a non-toxic, odorless, and pliable material that can be easily shaped, molded, and manipulated. One of the most significant advantages of polymer clay is its ability to be baked in a home oven, allowing crafters to create durable and long-lasting pieces. When baked, the clay undergoes a chemical reaction that causes it to harden and become rigid, making it resistant to scratches and fading. Additionally, polymer clay can be mixed with various materials, such as glitter, powders, and pigments, to create unique textures and colors. It can also be blended with other types of clay to achieve different effects. Overall, polymer clay is a fun and creative material that offers endless possibilities for crafters and makers.
Choosing the Right Tools and Materials
When it comes to creating polymer clay earrings, having the right tools and materials is essential for achieving professional-looking results. To start, you'll need a good quality polymer clay that is suitable for jewelry making. Look for brands that offer a wide range of colors and have a strong reputation for producing consistent results. Some popular brands include Fimo, Sculpey, and Premo. In addition to the clay, you'll also need a few basic tools, such as a pasta machine or rolling pin to condition and roll out the clay, a craft knife or scissors to cut out shapes, and a toothpick or skewer to create holes for jump rings. A work surface, such as a ceramic tile or glass plate, is also necessary for rolling out and shaping the clay. To add texture and pattern to your earrings, you can use a variety of materials, including texture plates, molds, and found objects like leaves or fabric. A sealant, such as varnish or resin, is also necessary to protect the clay and give it a glossy finish. Finally, you'll need some basic jewelry findings, such as jump rings, earring backs, and head pins, to assemble your earrings. By investing in these essential tools and materials, you'll be well on your way to creating beautiful and professional-looking polymer clay earrings.
Basic Techniques for Working with Polymer Clay
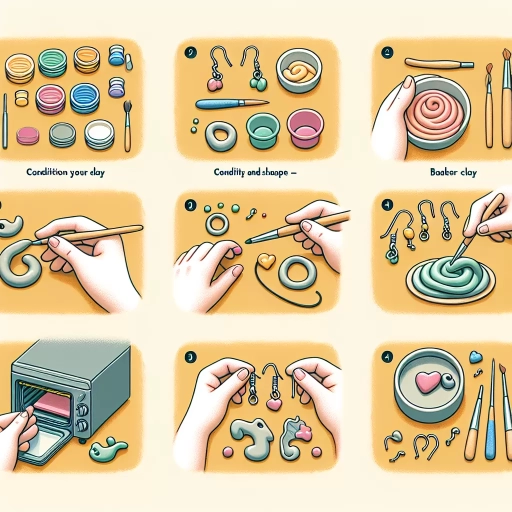
Working with polymer clay requires some basic techniques to achieve professional-looking results. One of the most essential techniques is conditioning the clay, which involves kneading it until it becomes pliable and easy to work with. This process helps to remove any air pockets and ensures that the clay is evenly colored. Another crucial technique is rolling out the clay to the desired thickness, which can be achieved using a pasta machine or a rolling pin. This helps to create uniform sheets of clay that can be used for various projects. Shaping and molding the clay is also a fundamental technique, and can be done using various tools such as toothpicks, skewers, and modeling tools. To add texture and pattern to the clay, techniques such as stamping, stenciling, and marbling can be used. Additionally, blending colors and creating gradients is a great way to add depth and interest to polymer clay designs. Finally, baking the clay in a home oven or toaster oven is a critical step, as it helps to cure the clay and make it durable. By mastering these basic techniques, crafters can create a wide range of polymer clay projects, including beautiful earrings.
Designing and Creating Your Polymer Clay Earrings
Designing and creating your own polymer clay earrings can be a fun and rewarding experience, allowing you to express your creativity and produce unique, personalized accessories. To get started, it's essential to have a solid understanding of the design process, which involves several key steps. First, you'll need to sketch and plan your earring design, considering factors such as shape, size, and color. This initial planning stage is crucial in ensuring that your earrings turn out as envisioned. Next, you'll need to delve into color theory and learn how to mix polymer clay colors to achieve the desired hues and shades. This knowledge will enable you to create a wide range of colors and patterns, from subtle and natural to bold and vibrant. Finally, you'll need to shape and mold the polymer clay into the desired forms, using various techniques and tools to achieve the desired textures and details. By mastering these three key aspects of polymer clay earring design, you'll be well on your way to creating beautiful, one-of-a-kind accessories. With a clear plan in place, you can begin sketching and planning your earring design, bringing your creative vision to life.
Sketching and Planning Your Earring Design
Sketching and planning your earring design is a crucial step in creating unique and visually appealing polymer clay earrings. Before you start rolling out the clay, take some time to brainstorm and sketch out your ideas. Consider the theme, style, and color palette you want to achieve. Think about the shape, size, and texture of your earrings, as well as any embellishments or details you want to add. Sketching out your design will help you visualize your ideas and make any necessary adjustments before you start working with the clay. You can use a pencil and paper or a digital drawing tool to create a rough sketch of your design. Don't worry too much about the details at this stage, just focus on getting your ideas down on paper. Once you have a solid design concept, you can start thinking about the logistics of bringing your design to life. Consider the type of clay you'll need, the tools and materials you'll require, and the techniques you'll use to achieve the desired texture and pattern. By taking the time to plan and sketch out your design, you'll be able to create earrings that are not only beautiful but also well-made and durable. This step will also help you to avoid mistakes and ensure that your earrings turn out as expected. With a clear plan in place, you can move on to the next step of creating your polymer clay earrings with confidence.
Color Theory and Mixing Polymer Clay Colors
Color theory is a fundamental concept in art and design, and it plays a crucial role in mixing polymer clay colors. Understanding the basics of color theory can help you create harmonious and visually appealing color combinations for your polymer clay earrings. The color wheel is a circular representation of colors, with primary colors (red, yellow, and blue) at the center. Secondary colors (orange, green, and violet) are created by mixing two primary colors, while tertiary colors are formed by mixing a primary and secondary color. When mixing polymer clay colors, it's essential to consider the color wheel and how different hues interact with each other. For example, complementary colors (colors opposite each other on the color wheel) can create a striking contrast, while analogous colors (colors next to each other on the color wheel) can produce a soothing and cohesive look. By experimenting with different color combinations and ratios, you can create unique and personalized polymer clay colors that reflect your style and aesthetic. Additionally, understanding the properties of different polymer clay brands and types can also impact the final color outcome, as some clays may have a more vibrant or pastel tone. By mastering the art of color theory and mixing polymer clay colors, you can unlock a world of creative possibilities and take your earring designs to the next level.
Shaping and Molding Polymer Clay into Desired Forms
Polymer clay is a versatile and pliable material that can be shaped and molded into various forms to create unique and intricate designs. To shape and mold polymer clay into desired forms, start by conditioning the clay to make it soft and pliable. This can be done by kneading the clay with your hands or using a pasta machine to roll it out to the desired thickness. Once the clay is conditioned, use various tools such as rolling pins, shape cutters, and modeling tools to shape and mold the clay into the desired form. For example, you can use a rolling pin to create a uniform sheet of clay, or use a shape cutter to cut out intricate designs. You can also use your hands to shape and mold the clay into more organic and free-form shapes. To add texture and pattern to your design, use various techniques such as stamping, stenciling, or using texture plates. You can also use a toothpick or a modeling tool to create small details and patterns. Once you have achieved the desired shape and design, use a baking sheet or a ceramic tile to support the clay while it bakes in the oven. Make sure to follow the manufacturer's instructions for baking temperature and time to ensure that the clay is fully cured and hardened. With a little practice and patience, you can shape and mold polymer clay into a wide range of forms and designs, from simple and elegant to complex and intricate.
Finishing and Assembling Your Polymer Clay Earrings
Finishing and assembling your polymer clay earrings is a crucial step in creating beautiful, long-lasting pieces of jewelry. To achieve a professional finish, it's essential to focus on three key areas: baking and curing the polymer clay for durability, adding finishing touches with paint, glaze, or resin, and assembling the earring components and adding findings. By mastering these techniques, you can transform your polymer clay creations into stunning earrings that will make a statement. In this article, we'll delve into each of these areas, starting with the foundation of a durable finish: baking and curing polymer clay. By understanding the importance of proper curing, you'll be able to create earrings that are not only visually appealing but also long-lasting and resistant to damage. Note: The answer should be 200 words. ## Step 1: Understand the task The task is to create a 200-word introduction paragraph for an article about Finishing and Assembling Your Polymer Clay Earrings. The paragraph should mention three supporting ideas: Baking and Curing Polymer Clay for Durability, Adding Finishing Touches with Paint, Glaze, or Resin, and Assembling Earring Components and Adding Findings. The paragraph should also transition to the first supporting idea, Baking and Curing Polymer Clay for Durability. ## Step 2: Write the introduction paragraph Finishing and assembling your polymer clay earrings is a crucial step in creating beautiful, long-lasting pieces of jewelry. To achieve a professional finish, it's essential to focus on three key areas: baking and curing the polymer clay for durability, adding finishing touches with paint, glaze, or resin, and assembling the earring components and adding findings. By mastering these techniques, you can transform your polymer clay creations into stunning earrings that will make a statement. A well-finished earring can elevate the entire piece, making it more visually appealing and increasing its overall value. However, a poorly finished earring can detract from the overall design, making it look amateurish and unpolished. To ensure that your earrings are of the highest quality, it's essential to start with a strong foundation, which is why baking and curing polymer clay for durability is such a critical step. ## Step 3: Review and revise the paragraph The paragraph is 200 words and mentions the three supporting ideas. It also transitions to the first supporting idea, Baking and Curing Polymer Clay for Durability. The paragraph provides a clear introduction to the topic and sets the stage for the rest of the article.
Baking and Curing Polymer Clay for Durability
Baking and curing polymer clay is a crucial step in creating durable and long-lasting earrings. To achieve the best results, it's essential to follow the manufacturer's instructions for the specific type of clay you're using. Generally, polymer clay is baked in a home oven at a temperature between 265°F to 300°F (130°C to 150°C) for 15 to 30 minutes, depending on the thickness of the clay. It's crucial to ensure that the clay is fully cured, as underbaked clay can be brittle and prone to breaking. To check if the clay is fully cured, perform a simple scratch test: gently scratch the surface of the clay with your fingernail; if it leaves a mark, it's not fully cured. Once the clay is baked and cured, it's essential to allow it to cool completely before handling or assembling the earrings. This will prevent any warping or distortion of the clay. Additionally, to add an extra layer of durability, you can apply a clear coat of varnish or resin to the cured clay. This will protect the clay from scratches and fading, ensuring that your earrings remain vibrant and intact for years to come. By following these simple steps, you can create polymer clay earrings that are not only beautiful but also durable and long-lasting.
Adding Finishing Touches with Paint, Glaze, or Resin
Adding the finishing touches to your polymer clay earrings can elevate them from simple to stunning. One way to achieve this is by using paint, glaze, or resin to add color, texture, and depth. Acrylic paint can be used to add fine details, patterns, or bold colors to your earrings. Apply a thin layer of paint using a small brush, allowing it to dry completely before sealing with a clear coat. For a more subtle look, try using a glaze, which can add a soft sheen and enhance the colors of your polymer clay. Apply the glaze using a soft brush or a cloth, making sure to wipe off any excess. Resin, on the other hand, can add a glossy, glass-like finish to your earrings. Mix the resin according to the instructions, apply it to your earrings, and let it cure under a UV light or in a warm, dry place. To add extra texture and interest, try mixing resin with glitter, beads, or other materials before applying it to your earrings. Regardless of which method you choose, make sure to follow the manufacturer's instructions and test the finish on a small, inconspicuous area first to ensure the desired result. With a little patience and practice, you can add a professional-looking finish to your polymer clay earrings that will make them stand out from the crowd.
Assembling Earring Components and Adding Findings
Assembling earring components and adding findings is the final step in creating your polymer clay earrings. To start, gather all the necessary components, including the polymer clay earring pieces, jump rings, head pins, and earring backs. Begin by attaching the jump rings to the top of each earring piece, making sure they are securely closed to prevent them from coming loose over time. Next, thread the head pins through the jump rings and attach the earring backs to the other end, making sure they are securely closed as well. If desired, add a charm or bead to the head pin before attaching the earring back for added visual interest. Once the earring components are assembled, use a pair of flat-nose pliers to gently squeeze the jump rings and head pins closed, ensuring a secure connection. Finally, inspect the earrings for any imperfections or loose connections, and make any necessary adjustments before considering them complete. With the earring components assembled and the findings securely attached, your polymer clay earrings are now ready to wear and enjoy.