How To Remove Uv Gel Nails
 Some beauty rituals often come with complexities masked by their sparkly allure, and the realm of UV gel nail artistry isn't an exception. In this informative and engaging guide, we aim to pull back the curtain on the nuances of removing UV gel nails safely, effectively, and with minimal damage to your natural nails. Our journey will commence by unravelling the nuts and bolts of UV gel nails, allowing you to appreciate the science behind their glossy luster and why they are so beloved in the first place. We will then navigate you through the numerous methods at your disposal for safe removal, charting a path that keeps your nails healthy yet fashionable. Finally, acknowledging that beauty doesn't end with removal, we'll delve into the often overlooked but crucial aspects of precautions and aftercare following UV gel nails removal. Read on as we transition to our first foray, understanding the enticing world of UV gel nails.
 Understanding the Basics of UV Gel Nails
UV gel nails, a popular choice for celebrities and manicure enthusiasts alike, offer a shiny, durable, and more natural alternative to traditional nail enhancement options. This pioneering beauty treatment, while appearing relatively simple on the surface, intertwines intricate scientific components, cutting-edge application processes, and meticulous maintenance routines to yield a high-quality, lasting result. This article unfolds by exploring three core components that contribute to the magic of UV gel nails. Firstly, we delve into the unique composition and the intricate process behind the application of UV gel nails, detailing the steps from primer use to the final coating. Secondly, we illuminate the role and impact of UV light, a crucial element that gives the gel its durability and glossy appearance. Lastly, we highlight the maintenance and longevity of these elegant accessories, providing insights on how best to preserve their shine and strength. As we transition into the specifics of these subjects, it's essential to unravel the journey meticulously, commencing with the composition and process of UV gel nail application.
The Composition and Process of UV Gel Nail Application
The Composition and Process of UV Gel Nail Application is a practical and creative undertaking that combines artistry with science. Engaging in this process means utilizing a complex compound with unique properties and applying specialized techniques to achieve an aesthetic and enduring result. UV gel nail polish consists mainly of methacrylate polymers. They come with a unique photoinitiator that catalyzes the reaction between the gel and UV light. The resulting compound creates a hard, glossy surface that's resistant to chipping or peeling, enhancing the durability and longevity of your manicure. Durability and beauty aside, UV gel nails are also 'soak-off,' making it easier and less abrasive to remove than traditional acrylic nails. Applying UV gel nail polish involves a meticulous process that requires accuracy, precision, and patience. First, the natural nail surface is cleansed and buffed before applying the base coat. This initial step is crucial to remove any oils or debris that might impede the adherence of the gel polish. After the base coat application, the nails are placed under a UV or LED light to cure, which polymerizes the gel, creating a hardening effect. Following the base coat's successful curing, the colored UV gel nail polish is applied in thin, even layers. It's crucial to prevent the gel from touching the skin or cuticle as it can cause lifting and decrease the manicure's lifespan. Each layer of gel polish is cured under the UV light before applying the next, ensuring each layer hardens and contributes to the polish's overall stability and strength. Finally, a clear top coat is applied and cured, creating a smooth, glossy finish that seals and protects the color. It also enhances the UV gel nails' durability, allowing them to withstand everyday wear and tear without chipping or peeling. The Composition and Process of UV Gel Nail Application support the notion that achieving a stunning UV gel nail manicure is a union of scientific understanding and artistic skill. Through the application of advanced materials and precision techniques, UV gel nails offer a durable and elegant solution for individuals who value long-lasting beauty in their daily lives. Always remember that proper application and removal techniques are critical for maintaining nail health when enjoying the benefits of UV gel nails.
The Role and Impact of UV Light in Nail Aesthetics
The Role and Impact of UV Light in Nail Aesthetics forms an integral part of understanding the basics of UV gel nails. UV light plays an essential role in the nail beauty industry, primarily through its use in hardening or 'curing' gel nail polish. The advent of gel manicures revolutionized the nail aesthetics industry, offering a gleaming, durable solution for those seeking long-lasting nail beauty. Central to this advancement is the use of Ultraviolet (UV) light, exploiting its ability to prompt a chemical reaction resulting in the hardening of the applied gel. In essence, UV light acts as a catalyst, converting the liquid gel into a solid state, enhancing its resilience, consequently providing gloss and longevity that outperforms conventional nail polish. This innovative process has catapulted UV light into the limelight of nail aesthetics, securing its indispensability. The impact of UV light on nail aesthetics is twofold, encapsulating both positive and negative aspects. On the one hand, it has transformed consumer expectations of manicures, raising the bar for durability and shine, and offering an array of creative possibilities with the gel medium. UV light has decisively amplified the perceived value of a manicure, creating an enhanced, long-lasting aesthetic that has become highly sought after. On the other hand, health concerns surrounding UV light exposure have sparked discussions and research, aiming to balance aesthetic gains with safety. Excessive UV exposure may contribute to skin aging, potential skin cancer, and may damage the underlying nail bed over time. Consequently, the nail aesthetics industry has striven to mitigate these risks, innovating safer UV lamps with less radiation and encouraging protective measures such as sunscreen application. In a nutshell, the role and impact of UV light in nail aesthetics are monumental. This fascinating science-art synergy continues to redefine the boundaries of nail beauty, fueling an ongoing commitment to balance aesthetics, durability, innovation, and health safety in the industry. With a robust understanding of the effects of UV light on gel nails, the key now lies in its responsible use, to extract maximum aesthetic benefits while minimizing potential risks, thereby ensuring a safe yet glamorous nail beauty experience for all.
Maintenance and Lifespan of UV Gel Nails
UV Gel nails are renowned for their durability, lustrous finish, and relatively long lifespan as compared to traditional nail polishes. However, the longevity and maintenance of UV gel nails primarily hinge on proper application and aftercare. The application process of UV gel nails must be accurate and meticulous for a longer lifespan. Initially, your nails are buffed and shaped, then a primer is applied which aids in better adhesion of the UV gel. Following this, several coats of UV gel are applied, each one set and cured under a UV light for a certain duration. The number of coats primarily depends on the desired thickness and durability. Once the gel coats are fully cured and hardened, a glossy topcoat is added for that extra spark and longevity. However, the onus lies not only on the perfect application but detailed homecare as well. Post-application, it is crucial to protect your nails from harsh chemicals or thermal damage. Using gloves while washing dishes, avoiding hot water, and using acetone-free nail polish remover can help prolong your UV gel nails' lifespan. Moreover, regular hydration of hands is crucial; a nourishing cuticle oil applied daily can help to keep your nails healthy and the gel polish within looking bright and glossy. One must remember that UV gel nails, although sturdy and robust, are indeed an extension of your natural nails, and thus their health impacts the lifespan of the UV gel nails as well. Over time, as your natural nail grows, you'll observe a noticeable gap at the nail base. This 'outgrowth' is natural and is typically time to visit the nail salon for a 'fill,' which involves adding more gel to the base and curing it under UV light. In conclusion, understanding the intricacies of UV gel nails' maintenance and lifespan is instrumental in enjoying the full benefits of these semi-permanent, glossy, and sturdy manicures. Correct procedures, coupled with regular upkeep, can help these gel nails last up to a whopping 3-4 weeks – an impressive feat in the world of artificial nails!
Common Methods to Remove UV Gel Nails Safely
Navigating the world of UV gel nail removal can sometimes seem daunting because safety and nail health are of utmost importance. The key to maintaining beautiful, healthy nails while enjoying the flawless look that UV gel nail polish provides, is knowing the right methods for safe removal. In this enlightening piece, we explore the three most common techniques to safely remove UV gel nails - the professional nail salon removal, the at-home soaking process, and the foil wrapping technique. By understanding these strategic approaches, you will not only protect your nails from potential damage but also enjoy the versatility that comes with changing your nail look whenever you desire. Let's first take a closer look at the professional nail salon removal method, an approach that utilizes the expertise of trained professionals to ensure absolute safety and efficiency.
Professional Nail Salon Removal
One of the most professional methods of UV gel nail removal is by visiting a nail salon, an option highly recommended for those unfamiliar with safe and accurate gel removal processes. A professional nail salon guarantees a careful and precise procedure, reducing the risk of damage to your natural nails. These salons utilize expert techniques, ensuring the elimination of gel nail layers without the need for excessive filing or scratching - factors that can cause substantial harm. They can also provide nourishing treatments that can aid in the recovery of your nails post-removal. The nail technicians at salons are highly experienced and trained to use specialized tools with great care, enabling a much gentler removal process compared to DIY methods. Some salons employ steaming devices that effectively dissolve the UV gel polish, causing minimal abrasion to the surface of your nails. This state-of-the-art equipment works by releasing a warm mist of a specially-formulated solution that gradually removes the gel polish. This process ensures that your nails are left in excellent condition, reducing the chances of experiencing dryness or peeling common in other removal methods. Extra care and attention are given to the cuticle area, a critical factor often overlooked in home removal methods. In a salon, professionals dedicate time to hydrate and protect this sensitive part of your nails, maintaining their overall health and appearance. It is these meticulous measures that make professional salon removal a superior method for taking off UV gel nails. Moreover, professional nail salons provide a safer, more hygienic environment, implementing proper sanitization measures with each client. This aspect, coupled with the trained professionals who understand the structures of your nails, means you are less likely to experience infection or damage. In conclusion, professional nail salon removal stands out as a premier option for UV gel nail removal. Its investment towards quality service, a safer environment, and expert professionals make this method worth considering despite other at-home alternatives. So, when it comes to the safety and health of your nails, trusting in the industry experts can indeed assure you of ideal results and less post-removal complications.
At-home Soaking Process
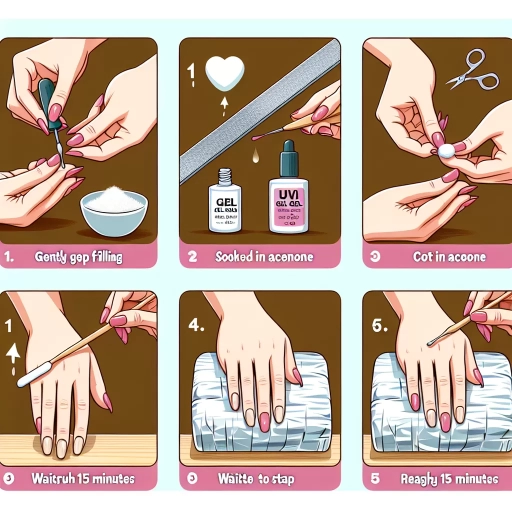
At-home soaking is an effective and safe method for removing UV gel nails, free of the potential damage that can occur when forcibly peeling the gel coating. For this technique, you will require a few simple tools: acetone, cotton balls, aluminum foil, and a nail file. Prior to soaking, it's crucial to make the gel surface porous by gently buffing the top layer with a nail file. This allows the acetone to penetrate the gel, making the removal process smoother. After removing the topcoat, you'll soak cotton balls in acetone and place one on each nail. The key lies in using pure acetone instead of regular nail polish remover, as the former is much stronger and works faster in breaking down the UV gel polymers. Following the application of acetone-soaked cotton balls on each nail, you need to wrap them in small aluminum foils. This method traps the heat generated by the acetone which accelerates the gels dissolution. It typically takes 15 to 20 minutes for the UV gel to soften and start lifting from the nail bed, but patience is key. Rushing the process can damage the nail's natural protective layers. Extra caution is crucial and if any discomfort or irritation occurs, the process should be stopped immediately and if necessary, seek professional advice. Post soaking, the remnants of the gel polish can be gently pushed off the nails using an orangewood stick or a cuticle pusher. Lastly, it's essential to treat the nails with care and apply cuticle oil post removal to restore moisture and promote nail health. Like any beauty routine, an at-home soak-off process requires careful execution and post-care. This method proves to be cost-effective and convenient while providing salon-like results right at your own home. Following these steps thoroughly, the at-home soaking process can effectively remove UV gel nails while preserving the integrity of your natural nails. With practice, your confidence and speed will increase. Just remember to prioritize safety and care over speed and instant results.
The Foil Wrapping Technique
The Foil Wrapping Technique is undeniably one of the most common and safe strategies employed in the removal of UV gel nails. This method stands out like a shining beacon in the world of nail care due to its effectiveness, accessibility, and safety. Essentially, the Foil Wrapping Technique involves gently soaking the gel nails in acetone, and then wrapping them in foil to enhance the process. This generates a gentle form of heat that facilitates the softening and subsequent removal of the UV gel nails, ensuring minimal damage to your natural nail bed. For this method, you'd need cotton balls, aluminum foil, a nail file, a wooden cuticle pusher, and, of course, acetone. Initially, you need to buff your nails using a nail file to break the seal of the gel topcoat. Following that, it’s important to soak a cotton ball in acetone, place it over your nail, and wrap it tightly in a small piece of foil. Repeat this exact process for all your nails. Leave the foil wraps on for approximately 10 to 15 minutes which allows the acetone to penetrate and soften the gel polish. Afterwards, applying gentle pressure and using a wooden cuticle pusher, helps peel off the loosened gel polish off your nails. The efficacy of this strategy is reinforced by its popularity amongst professional manicurists as well as casual users at home. The Foil Wrapping Technique is essentially the community favorite, praising it for its efficiency and for being the less damaging method if carried out properly. Primary measures should be taken to prevent over-soaking, as excessive exposure to acetone can lead to dryness and potential damage to the nail bed and surrounding skin areas. In the vast landscape of nail care and beauty, understanding the science behind our choices, such as the Foil Wrapping Technique for UV gel nail removal, is crucial. Mastering this technique not only simplifies your nail care routine but also ensures that your nails remain healthy and robust, avoiding unnecessary damage while maintaining their appealing aesthetic. Remember, health and beauty are closely intertwined - this principle undoubtedly applies to nail care. In the pursuit of beauty, never compromise on the health of your nails.
Precautions and Aftercare following UV Gel Nails Removal
The beauty of UV gel nails lies not just in their glamorous look but also in their longevity. However, a crucial part of maintaining their splendor is understanding the necessary precautions and aftercare following their removal. This understanding allows for a more seamless removal process, reduces the likelihood of damage and allows nails to maintain their healthy state even after removal. This article aims to guide you by sharing pertinent tips to minimize damage during the removal process, essential aftercare for nail health and noteworthy signs that call for professional help. We tap into expert advice and scientifically backed information, thus ensuring that every step you take is well guided. Firstly, we delve into the essential phase of minimizing potential damage during the UV gel nails removal process. Here, we guide you on how to gently and safely rid your nails of the gel polish without unnecessarily subjecting your nails to brittle and weak aftermath. Understanding and implementing these tips is a pivotal step towards maintaining the integrity and health of your nails after basking in the glory of stunning UV gel nails.
Tips to Minimize Damage During the Removal Process
Tips to Minimize Damage During the Removal Process If you don't want your nails to resemble a battlefield after having your UV gel nails removed, adhering to the right procedures and taking precautions is paramount. The removal of UV gel nails often presents a risk of damaging the natural nails underneath, but with correct handling, this risk can be significantly minimized. Firstly, avoid picking, peeling, or forcefully removing the gel by yourself. These can all result in nail damage and can even lead to infections. Instead, you should soak your nails in acetone. Although acetone is a powerful solvent, it is relatively safe when used correctly. Cover your fingers with cotton balls soaked in acetone, then wrap them snugly in tin foil. This method helps to ensure that the gel nail polish is thoroughly soaked, easing the process of removing it later on. Keep in mind that exposure to acetone should be limited, so you must not soak your fingers directly into the acetone for an extended period. Furthermore, add a little patience to your nail-care routine. Remember that it is not a quick process; holding your fingers in acetone-soaked cotton balls for at least 15-20 minutes is usually necessary for an easy and clean removal. The gel should crumble or slide off after proper soaking, but if it doesn't, resist the urge to scrape it off aggressively. If the gel is still sticking, return to soaking your fingers for an additional few minutes. Lastly, aftercare is equally important to the removal process. Just like how we need to rehydrate our skin after exposure to harsh chemicals, the same applies to our nails. Using an oil or moisturizing cream specifically designed for nails and cuticles can help restore hydration and strength to your nails. You should also allow your nails some breather from the layers of polish, giving them time to return to their healthy state. Adherence to these simple steps can help ensure minimal damage to your natural nails during the UV gel removal process. Remember, having gorgeous nails should never come at the cost of your nail health. Prioritize careful removal and meticulous aftercare for lasting nail beauty.
Essential Aftercare for Nail Health
Essential Aftercare for Nail Health following gel nails removal is an integral part of maintaining healthy, strong nails. It's vital to understand that nails, much like skin, are live tissues and demand consistent care to prevent breakage, cracking, post-removal sensitivity, and potential infections. Once the UV gel nails are removed, the nails underneath may appear dry and brittle. This is normal and a sign that your nails need immediate hydration. Apply a generous amount of moisturizer or cuticle oil to the nail bed and surrounding skin. These products are rich in vitamins and minerals, which replenish the moisture the nails lost during the gel removal process. Besides, consuming a diet filled with Vitamin E and biotin also helps to nourish the nails from within. So, consider adding foods like almonds, spinach, and fish, which are high in these nutrients, into your diet. A crucial aspect of aftercare that often gets overlooked is giving your nails a break. Even though UV gel nail manicures provide a long-lasting, sleek finish, it can weaken your nail. Allowing your nails to rest for a week or two before getting a new set of UV gels promotes healthy growth and reduces potential damage. Lastly, if any signs of infection or persistent irritation are noticed, such as prolonged redness or itching, it's important to reach out to a dermatologist or healthcare provider promptly for advice. Delaying a treatment could worsen the condition and cause lasting damage to nails. In conclusion, caring for your natural nails post-UV gel removal is as crucial as getting a manicure. It is all about taking preventive measures, consuming a healthy diet, and embracing a hydrating nail care routine. Remember: healthy nails are happy, beautiful nails.
When to Seek Professional Help for Complications
When to Seek Professional Help for Complications The process of removing UV gel nails, while typically straightforward, can present challenges that require the intervention of an experienced professional. It's vital to understand the signs of complications and when your nail health may be at stake. Persistent redness, swelling, or effusive pain are often telltale signs that your nails are grappling with possible infection or severe damage. If your nails appear discoloured or distorted in shape post the UV gel removal, this could indicate a fungal infection or even nail psoriasis, both of which mandate immediate professional help. Also, the persistent presence of dry, brittle nails that are prone to breaking can signal that your nails are severely dehydrated, a condition that could worsen over time if not addressed. When nail dehydrations or distortions become apparent, do not resort to DIY treatments, as these can often exacerbate the condition rather than remedy it. Instead, it's highly recommended that you seek the help of a professional nail technician or a dermatologist. Furthermore, individuals who have pre-existing conditions, such as diabetes, which can compromise nail health, should also consider seeking professional guidance when endeavouring to remove UV gel nails. This is because, for individuals with these conditions, a simple process like gel nail removal can potentially transition into a complex and harmful one if not conducted properly. To ensure the robustness of your nails post-removal, adopt a regimented aftercare routine. This routine must include regular moisturising to prevent dryness and strengthening practices to overcome the fragility rendered by the removal process. UV gels do often make the nails thin. Therefore, intensive care practices to restore their strength is essential. In summary, professional help is advised if you experience any unusual symptoms following UV gel nails removal, such as redness, persistent pain, or swelling. In such situations, it's best to refrain from home treatments and consult a professional to manage the situation adeptly. Remember, long-term nail health takes precedence over short-term aesthetic appeal. Therefore, give your nails the care they deserve and never hesitate to seek professional guidance when required.