How To Change Battery In Honda Key Fob
Here is the introduction paragraph: Changing the battery in your Honda key fob is a relatively simple process that can be done at home with the right tools and information. However, it's essential to approach this task with caution and preparation to avoid any potential issues or complications. In this article, we will guide you through the process of replacing the battery in your Honda key fob, from preparation to troubleshooting. To start, it's crucial to gather the necessary tools and information to ensure a smooth and successful replacement. This includes understanding the type of battery required, having the correct replacement battery, and being aware of any specific instructions or guidelines for your particular Honda model. By being prepared, you can avoid common mistakes and ensure that your key fob is functioning properly. In the next section, we will discuss the importance of preparation and provide a checklist of the necessary tools and information you'll need to get started.
Preparation is Key: Gathering the Necessary Tools and Information
When it comes to replacing the battery in your Honda key fob, preparation is key to a successful and stress-free process. To ensure a smooth replacement, it's essential to gather the necessary tools and information beforehand. This includes identifying the correct battery type for your Honda key fob, locating the key fob battery compartment, and acquiring the necessary tools for the replacement process. By taking the time to prepare, you'll be able to complete the replacement quickly and efficiently, without any unnecessary delays or complications. In this article, we'll take a closer look at each of these steps, starting with identifying the correct battery type for your Honda key fob.
Identifying the Correct Battery Type for Your Honda Key Fob
To ensure a seamless battery replacement process for your Honda key fob, it's crucial to identify the correct battery type. The most common battery types used in Honda key fobs are CR1616, CR1620, and CR2016. You can find this information in your owner's manual or on the manufacturer's website. Alternatively, you can check the existing battery in your key fob for the type designation, usually printed on the battery itself. If you're still unsure, consult with a Honda dealership or a professional locksmith for guidance. Using the correct battery type is essential to maintain the optimal performance and functionality of your key fob. Installing the wrong battery can lead to reduced signal strength, intermittent operation, or even complete failure. By taking the time to identify the correct battery type, you'll ensure a successful replacement process and avoid any potential issues down the road.
Locating the Key Fob Battery Compartment
To locate the key fob battery compartment, start by examining the key fob itself. Typically, the battery compartment is located on the back or bottom of the fob, and may be marked with a small icon or label indicating the battery location. If you're still unsure, consult your owner's manual or search online for specific instructions for your Honda model. Some key fobs may have a small sliding panel or clip that needs to be released to access the battery compartment, while others may require a small screwdriver to pry it open. Take note of any screws, clips, or panels that need to be removed to access the battery, as you'll need to replace them when you're done. Once you've located the battery compartment, you can proceed to remove the old battery and replace it with a new one.
Acquiring the Necessary Tools for the Replacement Process
Acquiring the necessary tools for the replacement process is a crucial step in ensuring a smooth and successful battery replacement in your Honda key fob. To begin, you will need a few basic tools, including a small flathead screwdriver, a Phillips screwdriver, and a pair of needle-nose pliers. These tools will allow you to carefully pry open the key fob and access the battery compartment. Additionally, you will need a replacement battery, which can be purchased at most auto parts stores or online retailers. It is essential to ensure that the replacement battery is compatible with your Honda key fob, so be sure to check the manufacturer's specifications before making a purchase. Furthermore, it is also a good idea to have a small cloth or paper towel on hand to clean any dirt or debris that may have accumulated in the key fob during the replacement process. By having all the necessary tools and materials readily available, you can ensure a quick and hassle-free battery replacement experience.
A Step-by-Step Guide to Replacing the Battery in Your Honda Key Fob
Replacing the battery in your Honda key fob is a relatively simple process that can be completed at home with a few basic tools. In this article, we will provide a step-by-step guide on how to replace the battery in your Honda key fob. The process involves three main steps: opening the key fob and accessing the battery compartment, removing the old battery and installing the new one, and reassembling the key fob and testing its functionality. By following these steps, you can ensure that your key fob is functioning properly and that you are not left stranded due to a dead battery. To begin, let's start with the first step: opening the key fob and accessing the battery compartment.
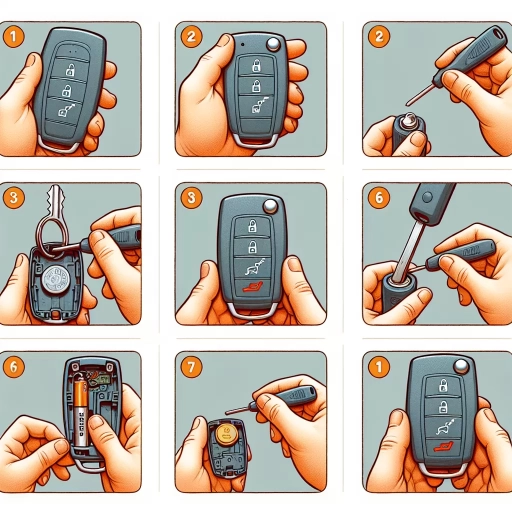
Opening the Key Fob and Accessing the Battery Compartment
To access the battery compartment in your Honda key fob, you'll need to open it up. Start by locating the small notch or seam on the back of the fob. This is usually where the two halves of the fob meet. Insert a flathead screwdriver or a similar tool into the notch and gently pry the two halves apart. Be careful not to apply too much pressure, as you don't want to damage the internal components. Once the two halves are separated, you should see the battery compartment, which is usually held in place by a small clip or screw. Remove the clip or screw to access the battery. Some Honda key fobs may have a small button or switch that needs to be pressed or slid to release the battery compartment. If you're not sure, consult your owner's manual or look for a small diagram or instructions on the back of the fob. With the battery compartment open, you should be able to see the battery itself, which is usually a small, round cell. Take note of the battery type and orientation, as you'll need to replace it with a new one that matches these specifications.
Removing the Old Battery and Installing the New One
To remove the old battery and install the new one, start by carefully prying open the key fob's casing using a flathead screwdriver or a similar tool. Be gentle to avoid damaging the surrounding plastic or any internal components. Once the casing is open, locate the battery compartment, which is usually held in place by a small clip or adhesive. Gently pry the clip or adhesive loose, taking care not to touch any of the internal electronics. Remove the old battery, taking note of its orientation and position within the compartment. Next, take the new battery and insert it into the compartment, ensuring it is properly seated and aligned. Replace the clip or adhesive to secure the battery in place, and then reassemble the key fob's casing. Make sure all parts are properly aligned and securely closed to prevent any damage or malfunction. Finally, test the key fob to ensure it is functioning properly with the new battery.
Reassembling the Key Fob and Testing its Functionality
Reassembling the key fob and testing its functionality is a crucial step in ensuring that your Honda key fob is working properly after replacing the battery. To reassemble the key fob, start by placing the circuit board back into the key fob casing, making sure it is securely seated and all the buttons are properly aligned. Next, replace the battery cover and screw it back into place, ensuring it is tightened securely. Once the key fob is reassembled, test its functionality by pressing the buttons to ensure they are working correctly. Check that the key fob is transmitting signals to your Honda vehicle by trying to lock and unlock the doors, start the engine, and activate any other features that your key fob is programmed to control. If the key fob is not functioning properly, check the battery connections and ensure that the circuit board is properly seated. If the issue persists, consult your Honda owner's manual or contact a professional for assistance. By following these steps, you can ensure that your Honda key fob is working properly and that you can continue to enjoy the convenience and security that it provides.
Troubleshooting Common Issues and Preventing Future Problems
Troubleshooting common issues with your key fob can be a frustrating experience, but it's essential to address these problems promptly to prevent future complications. When dealing with a malfunctioning key fob, it's crucial to identify the root cause of the issue to apply the most effective solution. Three common issues that can be resolved with the right approach are problems with the key fob's battery life and performance, water damage and corrosion, and the need to reset the key fob and re-synchronize it with your vehicle. By understanding how to address these issues, you can ensure your key fob functions correctly and avoid more severe problems down the line. In this article, we'll explore these common issues and provide practical solutions to get your key fob working smoothly again. First, let's start by examining the most common issue: resolving problems with the key fob's battery life and performance.
Resolving Issues with the Key Fob's Battery Life and Performance
If you're experiencing issues with your Honda key fob's battery life and performance, there are several steps you can take to resolve the problem. First, try replacing the battery with a new one, making sure to use the correct type and polarity. If the issue persists, check the key fob's battery contacts for corrosion or damage, and clean them gently with a soft cloth if necessary. Additionally, ensure that the key fob is properly paired with your vehicle, as a faulty pairing can cause battery drain. If none of these solutions work, it may be worth resetting the key fob or consulting the owner's manual for further troubleshooting instructions. In some cases, a faulty key fob may need to be replaced entirely, so it's a good idea to keep a spare key fob on hand or consider purchasing a replacement from a reputable dealer. By taking these steps, you can help extend the life of your key fob's battery and ensure reliable performance. Regular maintenance, such as cleaning the battery contacts and checking the battery level, can also help prevent future issues and keep your key fob functioning smoothly.
Preventing Water Damage and Corrosion in the Key Fob
Preventing water damage and corrosion in the key fob is crucial to ensure its longevity and proper functioning. To prevent water damage, it is essential to keep the key fob away from water and moisture. Avoid exposing the key fob to rain, snow, or excessive humidity. If the key fob gets wet, dry it immediately with a soft cloth. Avoid using heat to dry the key fob, as it can cause damage to the internal components. Additionally, apply a water-repellent coating to the key fob to provide an extra layer of protection. To prevent corrosion, clean the key fob regularly with a soft cloth and mild soap. Avoid using harsh chemicals or abrasive materials that can damage the key fob's surface. Regularly inspect the key fob for signs of corrosion, such as rust or discoloration, and address the issue promptly. By taking these preventive measures, you can help extend the life of your key fob and prevent costly repairs.
Resetting the Key Fob and Re-Synchronizing it with Your Vehicle
If your Honda key fob is not working properly after replacing the battery, you may need to reset it and re-synchronize it with your vehicle. This is a relatively simple process that can be done at home with a few basic steps. First, make sure you have the new battery installed correctly and that the key fob is functioning properly. Next, locate the small button or switch on the key fob that is used to reset it. This button is usually located on the back or side of the fob and may be labeled as "reset" or have a small icon of a car and a key. Press and hold this button for a few seconds until the key fob's lights or display start to flash. This indicates that the fob is in reset mode. Now, get into your vehicle and turn the ignition switch to the "on" position, but do not start the engine. Press the key fob's buttons in a specific sequence, usually the "lock" and "unlock" buttons simultaneously, to re-synchronize the fob with your vehicle's computer. You may need to refer to your owner's manual for the specific sequence required for your vehicle. Once the fob is re-synchronized, the lights or display on the fob should stop flashing, and the fob should be functioning properly again. If you are still having trouble, you may need to consult a professional mechanic or locksmith for further assistance.