How To Draw A Monkey
Understanding the Basics: The Fundamentals of Drawing
Recognizing Shapes in Art
Before diving into details of how to draw a monkey, it's crucial to emphasize the importance of recognizing shapes in art. Drawing is more about seeing than about making lines on the paper. When we start perceiving the world around us as a collection of shapes and forms, it becomes significantly easier to depict it in a two-dimensional plane. For example, a monkey can be broken down into a series of circles, ovals, and triangles. Mastering this skill not only improves your capacity to draw monkeys but also enhances your overall aptitude for drawing.
The Power of Observation
Observation is another key component when it comes to art. The more closely and attentively you observe a monkey's physical attributes - its facial features, its fur texture, its body proportions - the more accurately you'll be able to reproduce them on paper. Take time to study different species of monkeys, observe their similarities and differences. As you observe, take note of key details such as their eyes, their hands and how their fur lays. This attention to detail will help make your monkey drawing more believable and accurate.
Drawing Techniques and Mediums
Apart from shapes and observation, the choice of drawing techniques and mediums can dramatically affect the outcome of your work. Beginners might prefer to start with a simple pencil, which allows easy correction of mistakes. However, more experienced artists might choose inks, charcoal, or colored pencils to add depth and dimension to their monkey drawings. It's vital to experiment with different drawing techniques to find the one that best communicates your individual artistic style.
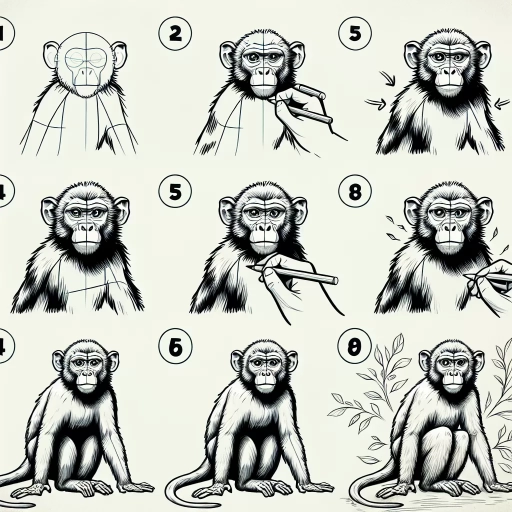
Step-by-Step Guide: How to Draw a Monkey
The Initial Sketch
The first step in drawing a monkey is drafting a rough sketch. Start by breaking down the monkey's body into basic shapes. For instance, the head can be represented as an oval shape, the body as a larger oval, and the limbs can be visualized as a series of smaller ovals and rectangles. By starting with this basic framework, we can establish the monkey's pose and proportions before adding details. Don't worry about mistakes at this point; the initial sketch is meant to be modified and refined over time.
Adding Details to the Sketch
Once you’re satisfied with your basic sketch, begin refining it by adding details to the monkey’s face and body. Start with the face, outlining the eyes, nose, and mouth. Monkeys have expressive faces, so pay careful attention to these features. Additionally, note subtle differences in various monkey species to make your drawing more species-specific. Then, refine the body, adding details such as fur, fingers, and toes.
Finalizing and Shading
With the detailed sketch ready, erase the guidelines you drew in the initial stages. You now have a clean outline of a monkey. The next step is to darken the final lines, making your monkey appear sharper and more defined. Once the lines are final, you can add shading to provide depth and dimension to your drawing. Shading techniques might differ depending on the medium you're using, but the basic rule remains the same - the darker the area, the heavier the shading should be.
Mastering Monkey Drawing: Tips and Tricks
Experiment with Poses and Expressions
Monkeys are dynamic creatures, known for their mischievous behaviors and expressive faces. Capturing these traits can make your monkey drawings come alive. Don't just stick to static or generic poses; experiment with different expressions and actions. You might want to draw your monkey swinging from a tree branch, eating fruit, or interacting with other monkeys. This can make your art more interesting and engaging.
Practice and Patience
It is essential to remember that drawing, like any other skill, requires practice and patience. Don't be disheartened if your first few monkey drawings don't turn out as expected. Keep practicing and refining your work. With time, you'll notice improvement in your skills and a growing familiarity with the monkey's form and features.
Study from Real Life
Nothing beats the experience of drawing from real life. If possible, visit a zoo, a wildlife park, or a conservatory where you can observe and sketch monkeys in their natural habitat. If that's not feasible, use photographs or videos as references. However, remember that drawing from photographs should not be a substitute for real-life observation, but a supplement to it.