How To Draw A Cherry Blossom Tree
The art of drawing a cherry blossom tree is a timeless and captivating subject that has inspired artists for centuries. With its delicate pink petals and lush green leaves, the cherry blossom tree is a beautiful and iconic symbol of spring. However, drawing a realistic and detailed cherry blossom tree can be a daunting task, especially for beginners. To help you get started, this article will guide you through the process of drawing a stunning cherry blossom tree, from understanding the basics of its structure to adding the final details. We will begin by understanding the basics of cherry blossom tree drawing, including the shapes and forms that make up the tree's framework. From there, we will move on to sketching the tree's framework, including the trunk, branches, and leaves. Finally, we will add the finishing touches, including the delicate cherry blossoms and any additional details that bring the tree to life. By following these steps, you will be able to create a beautiful and realistic cherry blossom tree that showcases your artistic skills. So, let's start by understanding the basics of cherry blossom tree drawing.
Understanding the Basics of Cherry Blossom Tree Drawing
Drawing a cherry blossom tree can be a fun and rewarding experience, but it requires some understanding of the basics. To create a beautiful and realistic drawing, it's essential to familiarize yourself with the tree's structure, recognize the importance of proportion, and choose the right drawing tools. By understanding the tree's shape, size, and arrangement of branches, you can create a more accurate and visually appealing drawing. Additionally, paying attention to proportion will help you achieve a balanced and harmonious composition. Finally, selecting the right drawing tools, such as pencils, markers, or paints, will allow you to capture the delicate details and vibrant colors of the cherry blossoms. In this article, we will explore these fundamental concepts in more detail, starting with the importance of familiarizing yourself with the tree's structure.
Familiarizing with the Tree's Structure
Familiarizing with the tree's structure is a crucial step in drawing a realistic cherry blossom tree. A typical cherry blossom tree has a broad, rounded crown with a straight trunk and branches that grow upwards and outwards. The trunk is usually thick and sturdy, with a rough, grayish-brown bark that becomes smoother with age. The branches are slender and flexible, with a smooth, reddish-brown bark that is often covered in lenticels, small, raised pores that allow for gas exchange. The leaves are alternate, simple, and ovate, with a pointed tip and serrated edges, typically measuring 2-5 inches in length. The flowers, of course, are the tree's crowning glory, with delicate, five-petaled blooms that range in color from pale pink to vibrant magenta. By understanding the tree's structure, you can better capture its essence in your drawing, from the sturdy trunk to the delicate flowers. Start by sketching the overall shape of the tree, including the trunk, branches, and leaves, using simple shapes and lines. Then, add more details, such as the texture of the bark, the shape of the leaves, and the delicate petals of the flowers. With practice and patience, you can create a beautiful and realistic cherry blossom tree drawing that captures the beauty of this iconic tree.
Recognizing the Importance of Proportion
Recognizing the importance of proportion is crucial when drawing a cherry blossom tree. Proportion refers to the relationship between the size and scale of different parts of the tree, such as the trunk, branches, leaves, and flowers. A well-proportioned drawing will create a sense of balance and harmony, while a poorly proportioned drawing can look awkward and unnatural. To achieve good proportion, start by measuring the height and width of your paper and dividing it into sections to help you place the different parts of the tree in relation to each other. Use a pencil to lightly sketch the outline of the tree, paying attention to the proportions of the trunk, branches, and leaves. For example, the trunk should be thicker at the base and taper towards the top, while the branches should be thinner and more delicate. The leaves and flowers should be in proportion to the size of the branches and trunk. By paying attention to proportion, you can create a drawing that looks realistic and visually appealing. Additionally, proportion can also help to create a sense of depth and dimension in your drawing, by creating a sense of layering and overlap between the different parts of the tree. By recognizing the importance of proportion, you can take your cherry blossom tree drawing to the next level and create a beautiful and realistic piece of art.
Choosing the Right Drawing Tools
Choosing the right drawing tools is essential for creating a beautiful and realistic cherry blossom tree drawing. The type of tools you use can greatly impact the overall quality and appearance of your artwork. For a traditional drawing, you'll need a few basic tools, including a pencil, eraser, and paper. A graphite pencil is ideal for creating a range of values and shading, while a sharpener will help keep your pencil point sharp. A kneaded eraser is also a must-have for correcting mistakes and creating highlights. For a more detailed and realistic drawing, you may also want to consider using a range of colored pencils or markers. These can be used to add color and texture to your drawing, and can help bring your cherry blossom tree to life. Additionally, a blending stump or tortillon can be used to smooth out transitions and create subtle gradations of tone. When choosing your drawing tools, consider the type of paper you'll be using, as well as the level of detail and realism you want to achieve. With the right tools, you'll be well on your way to creating a stunning cherry blossom tree drawing.
Sketching the Cherry Blossom Tree's Framework
Sketching the framework of a cherry blossom tree is a delicate process that requires attention to detail and a gentle touch. To create a beautiful and realistic representation of this iconic tree, it's essential to start with a solid foundation. This involves creating the trunk and branches, adding the basic shape of the leaves, and incorporating the blossoms' placement. By breaking down the process into these key components, artists can ensure that their sketch is both visually appealing and structurally sound. In this article, we'll explore each of these elements in depth, starting with the foundation of the tree: creating the trunk and branches.
Creating the Trunk and Branches
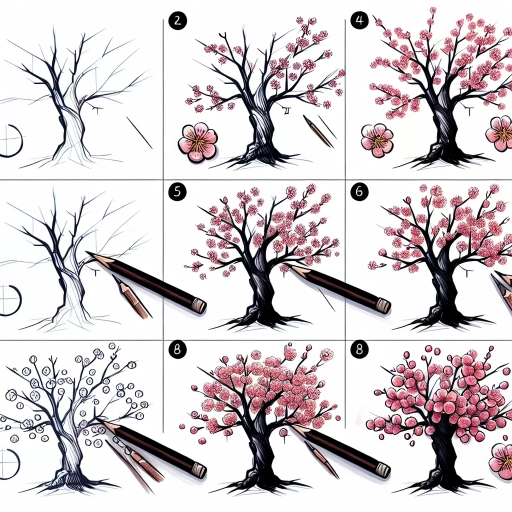
To create the trunk and branches of your cherry blossom tree, start by drawing a large vertical line to represent the trunk, making sure it's slightly thicker at the base and tapering towards the top. The trunk should be about one-third of the way up from the bottom of your paper. Next, draw two curved lines extending out from the trunk, one on either side, to form the main branches. These lines should be slightly thicker than the trunk and should curve gently upwards, with the top of each curve being slightly higher than the bottom. From these main branches, draw several smaller curved lines to represent the secondary branches, making sure to vary the length and thickness of each one to create a natural, organic look. As you draw the branches, pay attention to the overall shape and balance of the tree, making sure that the branches are evenly spaced and that the tree doesn't look too lopsided. Finally, add some texture to the trunk and branches by drawing short, curved lines that follow the contours of the tree, giving it a rough, bark-like appearance. By following these steps, you'll be able to create a sturdy and elegant trunk and branch system that will provide a beautiful framework for your cherry blossom tree.
Adding the Basic Shape of the Leaves
To add the basic shape of the leaves, start by sketching small oval shapes that are slightly pointed at the tip. These ovals should be scattered throughout the branches, with some facing upwards and others downwards to create a sense of movement and depth. The size of the ovals will vary, with larger ones near the base of the branches and smaller ones towards the tips. As you add more ovals, pay attention to the spacing and arrangement, making sure to leave some gaps between them to avoid overcrowding. You can also add some variation to the shape of the ovals by making some more rounded or elongated, which will help to create a more natural and organic look. Additionally, consider adding some gentle curves to the branches to suggest the presence of stems and veins, which will help to tie the leaves together and create a sense of cohesion. By adding these basic shapes, you'll start to see the cherry blossom tree take shape and develop a sense of texture and dimension.
Incorporating the Blossoms' Placement
Incorporating the blossoms' placement is a crucial step in drawing a realistic cherry blossom tree. To achieve a natural look, start by visualizing the overall shape and structure of the tree. Consider the direction of the branches and the way the blossoms will be distributed along them. Typically, cherry blossoms grow in clusters, with multiple flowers blooming from a single stem. To capture this, begin by lightly sketching the placement of the blossoms along the branches, using small circles or oval shapes to represent the clusters. Vary the size and spacing of the blossoms to create a sense of depth and dimensionality. Pay attention to the way the blossoms are angled and oriented, with some facing upwards and others drooping downwards. This will help create a sense of movement and energy in the drawing. As you add more blossoms, consider the negative space around them, allowing the branches and leaves to breathe and creating a sense of airiness. By carefully planning the placement of the blossoms, you can create a beautiful, balanced, and visually appealing cherry blossom tree that captures the essence of these stunning flowers.
Adding Details and Finishing Touches
When it comes to adding details and finishing touches to a piece of art, there are several key elements to consider. One of the most important aspects is drawing the blossoms and leaves in detail, as this can add a level of realism and depth to the piece. Additionally, adding texture and dimension to the tree can help to create a more immersive and engaging visual experience. Finally, enhancing the overall aesthetic with shading can help to bring the piece to life and add a sense of depth and dimension. By incorporating these elements, artists can take their work to the next level and create a truly stunning piece of art. By focusing on these details, artists can create a piece that is not only visually appealing but also engaging and immersive. Let's start by taking a closer look at drawing the blossoms and leaves in detail.
Drawing the Blossoms and Leaves in Detail
Drawing the blossoms and leaves in detail is a crucial step in creating a realistic and visually appealing cherry blossom tree. To start, focus on the blossoms, which are typically the main attraction of the tree. Use a small brush or a fine-tip pen to draw the individual blossoms, beginning with the center of the flower. Draw a small circle or oval shape to represent the center of the blossom, and then add the petals around it. The petals should be teardrop-shaped and slightly curved, with the edges slightly ruffled. Vary the size and shape of the blossoms to create a natural, organic look. Some blossoms can be fully open, while others can be partially closed or even just buds. To add depth and dimension, draw the blossoms in layers, with the ones in the front slightly overlapping the ones in the back. For the leaves, use a slightly larger brush or pen to draw the individual leaves, which are typically oval-shaped with a pointed tip. The leaves should be arranged in an alternating pattern along the branches, with the stems attached to the branch at a slight angle. To add texture and detail, draw the veins on the leaves, which should be slightly raised and curved. The leaves can also be slightly curled or bent to create a natural, relaxed look. By drawing the blossoms and leaves in detail, you can create a beautiful and realistic cherry blossom tree that captures the essence of this iconic symbol of spring.
Adding Texture and Dimension to the Tree
Adding texture and dimension to the tree can be achieved through various techniques. One way is to use different line weights and hatching patterns to create depth and visual interest. Thicker lines can be used for the trunk and branches, while thinner lines can be used for the leaves and blossoms. Hatching patterns, such as cross-hatching and stippling, can be used to create texture and shading on the trunk and branches. Another way to add texture is to use a range of values, from light to dark, to create a sense of volume and dimension. This can be achieved by using a range of pencils, from 6H to 6B, to create a range of values. Additionally, the use of white space and negative space can help to create a sense of depth and dimension, by allowing the viewer's eye to move through the composition. The texture of the paper can also be used to create a sense of texture and dimension, by using a paper with a rough or embossed texture. Finally, the use of color can also be used to add texture and dimension, by using a range of colors to create a sense of depth and dimension. By combining these techniques, the artist can create a cherry blossom tree that is not only visually appealing, but also has a sense of texture and dimension.
Enhancing the Overall Aesthetic with Shading
Enhancing the Overall Aesthetic with Shading. Shading is a crucial step in adding depth and dimension to your cherry blossom tree drawing. To create a realistic and visually appealing piece, it's essential to understand the basics of shading and how to apply it effectively. Start by identifying the light source in your drawing, as this will help you determine where to place your shadows. Typically, the light source is assumed to be coming from the top left or right, so your shadows will fall on the opposite side. Use a range of shading techniques, such as hatching, cross-hatching, and stippling, to create a sense of volume and texture. Pay particular attention to the areas where the branches and trunk meet, as these tend to be the darkest and most shaded. You can also use shading to suggest the softness of the blossoms and the delicate texture of the leaves. By carefully observing the play of light and shadow on your subject, you can create a beautiful and nuanced drawing that captures the essence of the cherry blossom tree.