How To Draw Legs
Drawing legs can be a challenging task, especially for beginners. However, with practice and patience, anyone can master the art of drawing realistic and proportionate legs. To get started, it's essential to understand the basics of drawing legs, including the overall shape, proportions, and anatomy. Once you have a solid foundation, you can add volume and definition to your drawings, creating a more three-dimensional appearance. Finally, refining your drawings with details and movement can bring your artwork to life. In this article, we will explore these three key aspects of drawing legs, starting with the fundamentals. Understanding the basics of drawing legs is crucial, as it sets the stage for creating realistic and proportionate drawings. By grasping the overall shape, proportions, and anatomy of the legs, you'll be able to create a solid foundation for your artwork. Let's dive into the basics of drawing legs and explore how to get started.
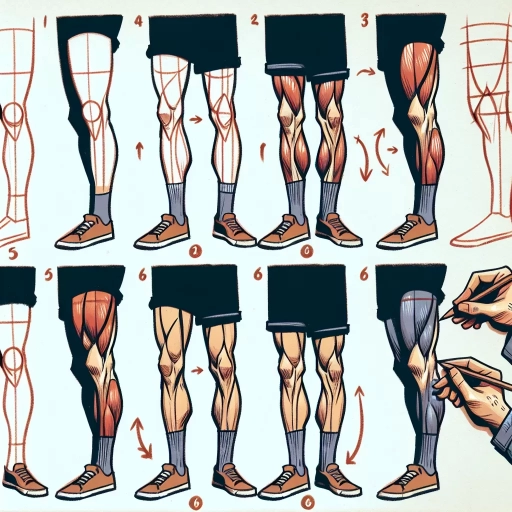
Understanding the Basics of Drawing Legs
When it comes to drawing legs, many artists struggle to capture their shape, proportion, and movement. To create realistic and believable legs, it's essential to understand the basics of drawing them. This involves familiarizing yourself with the bone structure, recognizing the importance of proportion, and mastering the basic shapes that make up the legs. By grasping these fundamental concepts, you'll be able to draw legs with confidence and accuracy. In this article, we'll delve into the world of leg drawing, starting with the foundation of it all: the bone structure. By understanding how the bones fit together, you'll be able to create a solid foundation for your drawings and bring your characters to life. So, let's begin by exploring the bone structure of the legs and how it can inform your drawing practice.
Familiarizing Yourself with the Bone Structure
The human leg consists of two long bones, the femur and tibia, which are connected by the patella, or kneecap. The femur is the longest bone in the body and extends from the hip joint to the knee joint. The tibia, or shinbone, is the second-longest bone and runs from the knee joint to the ankle. The fibula is a smaller bone that runs parallel to the tibia and provides additional support. The ankle joint is formed by the tibia, fibula, and talus bones. The leg also contains many smaller bones, including the tarsal bones, metatarsal bones, and phalanges, which make up the foot. Understanding the bone structure of the leg is essential for drawing accurate and realistic legs. Familiarizing yourself with the shape and proportions of each bone will help you create more convincing and detailed drawings. It's also important to note that the bones of the leg are connected by muscles, tendons, and ligaments, which can affect the shape and appearance of the leg. By studying the bone structure and how it relates to the surrounding muscles and tissues, you can create more realistic and dynamic drawings of the leg.
Recognizing the Importance of Proportion
The proportions of the legs can make or break the overall look of your drawing. The proportions refer to the size and relationship between different parts of the legs. Understanding the correct proportions of the legs is essential to creating realistic and believable drawings. To begin with, the legs should be in proportion to the rest of the body. Generally, the legs should be around half the length of the entire body. The length of the legs can vary depending on the pose and the style of the drawing, but the overall proportion should remain consistent. Additionally, the proportions of the individual parts of the legs, such as the thighs, knees, calves, and ankles, should also be in balance. The thighs should be slightly longer than the calves, and the knees should be in line with the ankles. The ankles should be slightly narrower than the calves, and the feet should be in proportion to the rest of the legs. By paying attention to the proportions of the legs, you can create drawings that look natural and convincing. It's also worth noting that proportions can vary from person to person, so it's essential to observe and study the proportions of different individuals to create more realistic drawings. By understanding the importance of proportion, you can take your drawings to the next level and create more engaging and believable artwork.
Mastering the Basic Shapes
Mastering the basic shapes is essential to drawing realistic legs. The legs are composed of various shapes, including cylinders, spheres, and rectangles. To draw a leg, start by sketching a large cylinder for the thigh, making sure to capture the gentle curve of the muscle. The cylinder should be slightly tapered at the top and bottom to indicate the knee and hip joints. Next, add a smaller cylinder for the lower leg, connected to the thigh by a gentle curve. The lower leg cylinder should be slightly narrower than the thigh cylinder. To add depth and dimension to the leg, sketch a series of gentle curves to indicate the muscles and tendons. Start at the top of the thigh and work your way down, using soft, flowing lines to suggest the contours of the leg. Pay particular attention to the knee joint, where the thigh and lower leg meet. This area should be slightly indented to indicate the joint. Finally, add a small sphere to the ankle to indicate the joint, and a series of gentle curves to suggest the shape of the foot. By mastering the basic shapes of the leg, you'll be able to create a realistic and proportionate drawing. Remember to pay attention to the proportions of the leg, making sure that the thigh is slightly larger than the lower leg, and that the knee joint is in the correct position. With practice and patience, you'll be able to draw realistic legs that capture the beauty and complexity of the human form.
Adding Volume and Definition to Your Drawings
Adding volume and definition to your drawings is an essential skill for any artist to master. By incorporating a few key techniques into your practice, you can take your artwork from flat and two-dimensional to rich and lifelike. Three techniques that can help you achieve this are using shading techniques to create depth, defining the muscles and tendons, and capturing the texture of skin and fabric. By using shading techniques, you can create the illusion of depth and dimension, drawing the viewer's eye into the composition. Defining the muscles and tendons can add a sense of tension and movement to your drawings, while capturing the texture of skin and fabric can add a tactile quality that invites the viewer to touch. By incorporating these techniques into your practice, you can add volume and definition to your drawings, creating artwork that is engaging, realistic, and visually appealing. Let's start by exploring how to use shading techniques to create depth.
Using Shading Techniques to Create Depth
Using shading techniques is a crucial step in creating depth and dimension in your drawings, particularly when it comes to drawing legs. By applying different shading techniques, you can create the illusion of volume and definition, making your drawings more realistic and engaging. One of the most effective shading techniques for creating depth is hatching, which involves creating a series of closely spaced parallel lines that follow the contours of the subject. By varying the density and direction of the lines, you can create a range of values and textures that add depth and dimension to your drawings. Another technique is cross-hatching, which involves layering hatching lines at different angles to create a more detailed and nuanced texture. Stippling is also a useful technique for creating depth, as it involves creating a pattern of small dots that can be used to suggest texture and volume. By combining these techniques with other shading methods, such as gradation and atmospheric perspective, you can create a rich and detailed drawing that captures the subtleties of the human form. By paying attention to the way light falls on the subject and using shading techniques to suggest volume and texture, you can create a drawing that is not only visually appealing but also anatomically accurate.
Defining the Muscles and Tendons
The muscles and tendons in the legs are complex and intricate, working together to facilitate movement, balance, and support. The quadriceps, hamstrings, and calf muscles are the primary muscle groups in the legs, with the quadriceps responsible for knee extension and the hamstrings for knee flexion. The calf muscles, comprised of the gastrocnemius and soleus, work together to control ankle movement. Tendons, such as the Achilles tendon, connect these muscles to bones, enabling them to transmit forces and facilitate movement. Understanding the anatomy of these muscles and tendons is crucial for drawing realistic and dynamic legs, as it allows artists to accurately depict their shape, size, and relationship to one another. By studying the way these muscles and tendons interact, artists can create more nuanced and detailed drawings that capture the subtleties of human anatomy.
Capturing the Texture of Skin and Fabric
Capturing the texture of skin and fabric is a crucial aspect of drawing legs, as it adds depth and realism to your artwork. To achieve this, start by observing the way light interacts with different textures. Notice how skin tends to be smooth and reflective, while fabric can be rough and absorbent. When drawing skin, use gentle, flowing lines to suggest the softness and curvature of the surface. Pay attention to the subtle creases and folds that occur at joints and bends, as these can add a sense of tension and movement to your drawing. For fabric, use a range of lines and textures to convey the weave and drape of the material. Consider the type of fabric being depicted, as different textures will require different techniques. For example, smooth fabrics like silk or cotton can be suggested with gentle, flowing lines, while rougher fabrics like denim or wool may require more expressive, gestural marks. By capturing the texture of skin and fabric, you can add a new level of dimension and realism to your drawings, drawing the viewer's eye to the intricate details and nuances of the human form.
Refining Your Drawings with Details and Movement
When it comes to refining your drawings, there are several key elements to focus on in order to bring your artwork to life. One of the most important aspects is adding details that make your subject look realistic and authentic. This can include adding veins and scars to give your subject a sense of depth and history. Additionally, capturing the movement and flexibility of legs can add a sense of dynamism and energy to your drawing. Finally, paying attention to the interaction with the environment can help to create a sense of context and atmosphere. By focusing on these elements, you can take your drawings to the next level and create truly stunning pieces of art. In this article, we will explore each of these elements in more depth, starting with the importance of adding details such as veins and scars.
Adding Details Such as Veins and Scars
When adding details such as veins and scars to your leg drawings, it's essential to consider the anatomy and natural appearance of the human body. Veins are more visible in certain areas, such as the inner thigh, ankle, and foot, and tend to be more prominent in individuals with fair skin. To draw veins, start by lightly sketching the outline of the leg, then add gentle, curved lines to indicate the path of the veins. You can also add subtle shading to give the veins depth and dimension. Scars, on the other hand, can add a unique touch to your drawings, but it's crucial to render them realistically. Study the texture and shape of real scars, and practice drawing different types, such as linear, circular, or irregular scars. When adding scars to your drawings, consider the location, size, and shape of the scar, as well as the surrounding skin texture. You can also experiment with different shading techniques to create a more realistic appearance. Additionally, pay attention to the way the skin folds and creases around the scar, as this can add to the overall realism of your drawing. By incorporating veins and scars into your leg drawings, you can add a new level of depth and authenticity, making your artwork more engaging and believable.
Capturing the Movement and Flexibility of Legs
Capturing the movement and flexibility of legs is a crucial aspect of drawing realistic and dynamic legs. To achieve this, it's essential to understand the anatomy of the legs and how they move. The legs are made up of a complex system of bones, muscles, and joints that work together to facilitate movement. When drawing legs, it's vital to capture the subtle nuances of movement, such as the way the muscles contract and relax, the way the joints bend and straighten, and the way the skin folds and creases. One way to capture movement is to use gentle, flowing lines that suggest the direction and flow of the movement. For example, when drawing a leg that is bent, you can use a smooth, curved line to indicate the direction of the bend, and then add subtle creases and folds to suggest the movement of the skin and muscles. Another way to capture movement is to use gesture drawing, which involves quickly sketching the overall pose and movement of the legs without worrying too much about details. This can help you capture the energy and dynamism of the movement, and can be a useful exercise for loosening up your drawing style and getting a feel for the movement of the legs. Additionally, paying attention to the weight and balance of the legs can also help to convey movement and flexibility. For example, when drawing a leg that is bearing weight, you can use thicker, more solid lines to suggest the weight and stability of the leg, while a leg that is lifted or bent can be drawn with lighter, more delicate lines to suggest the movement and flexibility. By capturing the movement and flexibility of legs, you can add a sense of energy and dynamism to your drawings, and create more realistic and engaging depictions of the human form.
Paying Attention to the Interaction with the Environment
When drawing legs, it's essential to consider the interaction between the legs and the environment. Paying attention to this interaction can add depth and realism to your drawings. For instance, if you're drawing a person standing on a rocky terrain, you should depict the legs adjusting to the uneven surface. The feet should be positioned in a way that suggests balance and stability, with the weight-bearing leg slightly bent to compensate for the incline. The non-weight-bearing leg, on the other hand, can be straighter, with the foot flexed to maintain balance. Additionally, you can show the legs responding to the environment by depicting the muscles tensed or relaxed, depending on the situation. For example, if the person is standing on a slippery surface, the muscles in the legs would be tensed to maintain balance, whereas if they're standing on a soft surface, the muscles would be more relaxed. By paying attention to the interaction between the legs and the environment, you can create more dynamic and engaging drawings that tell a story.