How To Shade Hair
Here is the introduction paragraph: Shading hair is a popular technique used to add depth, dimension, and visual interest to hair. It involves applying different shades of color to specific sections of hair to create a multi-dimensional look. To achieve professional-looking results, it's essential to understand the basics of hair shading, prepare your hair and tools properly, and execute the technique with precision. In this article, we'll delve into the world of hair shading, starting with the fundamentals. We'll explore the basics of hair shading, including the different types of shading techniques, the importance of choosing the right colors, and how to determine the best shading method for your hair type. By understanding these basics, you'll be well on your way to creating stunning, shaded hairstyles that turn heads. So, let's get started by understanding hair shading basics.
Understanding Hair Shading Basics
Hair shading is a crucial aspect of hairstyling that can elevate the overall look and feel of a hairstyle. It involves creating depth and dimension by applying different shades of color to the hair. To understand hair shading basics, it's essential to know the different techniques involved, the right tools to use, and the importance of hair shading in hairstyling. In this article, we'll explore the various types of hair shading techniques, discuss the importance of choosing the right hair shading tools, and delve into the basics of hair shading, starting with the fundamental question: what is hair shading and why is it important? By understanding the basics of hair shading, hairstylists and individuals can create stunning, multi-dimensional hairstyles that enhance their natural beauty. So, let's start by exploring what hair shading is and why it's a crucial aspect of hairstyling.
What is Hair Shading and Why is it Important
Hair shading is a crucial aspect of drawing and coloring hair, as it adds depth, dimension, and realism to the overall appearance. It involves creating a gradual transition of color and value from one area of the hair to another, mimicking the way light interacts with the hair's texture and structure. Hair shading is important because it helps to create a sense of volume, texture, and movement, making the hair look more natural and lifelike. By using different shading techniques, artists can convey the hair's length, thickness, and style, as well as its interaction with the surrounding environment. For example, darker shades can be used to create the illusion of depth and dimension, while lighter shades can be used to suggest the presence of highlights and texture. By mastering hair shading, artists can take their hair drawings to the next level, creating a more realistic and engaging visual representation.
Types of Hair Shading Techniques
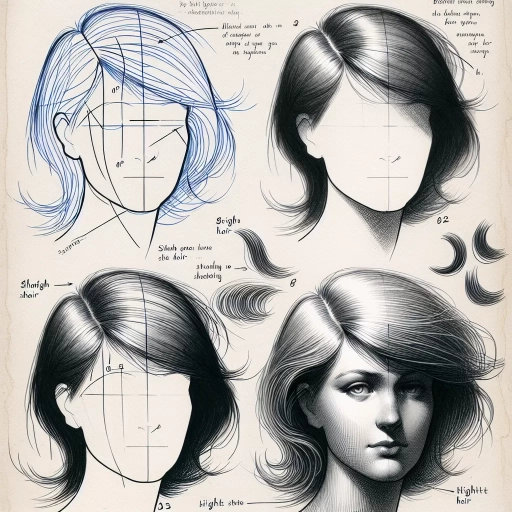
Hair shading techniques are used to create depth, dimension, and texture in hair. There are several types of hair shading techniques, including hatching, cross-hatching, stippling, and layering. Hatching involves creating parallel lines that follow the direction of the hair growth, with the lines becoming closer together in darker areas and farther apart in lighter areas. Cross-hatching involves layering hatching lines at different angles to create a more textured and dimensional look. Stippling involves creating small dots that are spaced apart to create a gradient of tone and texture. Layering involves building up layers of shading to create a more realistic and three-dimensional look. Each technique can be used alone or in combination with others to achieve the desired effect. By mastering these techniques, artists can create a wide range of hair styles and textures, from smooth and sleek to wild and unruly.
Choosing the Right Hair Shading Tools
Choosing the right hair shading tools is crucial for achieving realistic and natural-looking hair shading. The most common tools used for hair shading are pencils, markers, and digital drawing software. Pencils, such as graphite, charcoal, and colored pencils, offer a range of tonal values and textures, allowing for subtle transitions between shades. Markers, like Copic, Prismacolor, and Faber-Castell, provide vibrant colors and can be used to create bold, dynamic shading. Digital drawing software, such as Adobe Photoshop and Clip Studio Paint, offer a wide range of brushes and tools that can be customized to mimic traditional media or create unique effects. When selecting hair shading tools, consider the desired level of detail, the type of hair being shaded, and the overall style of the artwork. For example, pencils may be better suited for creating soft, natural-looking shading on curly hair, while markers may be more effective for bold, graphic shading on straight hair. Ultimately, the right tools will depend on the individual artist's preferences and the specific needs of the artwork.
Preparing for the Hair Shading Process
Preparing for the hair shading process can be a daunting task, especially for those who are new to hair coloring. To achieve the desired results, it's essential to take the necessary steps before undergoing the process. This includes consulting with a professional stylist to determine the best course of action, deciding on the right hair color and shade that complements your skin tone and personal style, and preparing your hair for the shading process to ensure optimal results. By taking these steps, you can ensure a successful hair shading experience that leaves you feeling confident and satisfied with your new look. Consulting with a professional stylist is the first step in preparing for the hair shading process, and it's crucial to find someone who understands your hair type and desired outcome.
Consulting with a Professional Stylist
Consulting with a professional stylist is a crucial step in the hair shading process. A professional stylist can help you determine the best shading technique and color for your hair type, face shape, and personal style. They will assess your hair's porosity, texture, and natural color to recommend the most suitable shading method. Additionally, a stylist can help you choose a color that complements your skin tone, eye color, and personal preferences. They can also advise on the best way to maintain your shaded hair and provide guidance on how to care for your hair at home. By consulting with a professional stylist, you can ensure that your hair shading experience is successful and that you achieve the desired results. A stylist can also help you to create a personalized plan for your hair shading, taking into account your lifestyle, hair type, and maintenance habits. They can also provide you with a clear understanding of what to expect during the shading process and how to prepare for it. Furthermore, a professional stylist can help you to avoid any potential mistakes or complications that can arise during the shading process. By working with a professional stylist, you can achieve a beautiful, natural-looking hair color that enhances your overall appearance and boosts your confidence.
Deciding on the Right Hair Color and Shade
When deciding on the right hair color and shade, it's essential to consider several factors to achieve the desired look. First, determine your skin tone, as it plays a significant role in choosing a hair color that complements your complexion. If you have a cool skin tone, look for colors with blue or pink undertones, while warm skin tones suit colors with golden or yellow undertones. Next, consider your natural hair color and the level of maintenance you're willing to commit to. If you're looking for a drastic change, consider a color that's within two to three shades of your natural color to ensure a natural-looking result. Additionally, think about your eye color and the color of your wardrobe, as these can also influence your hair color choice. For example, if you have blue eyes, a cool, ashy blonde color can create a stunning contrast. It's also crucial to consider the condition and porosity of your hair, as certain colors may not be suitable for damaged or over-processed hair. Finally, consult with a professional stylist to determine the best hair color and shade for your individual features and preferences. They can help you choose a color that not only looks great but also suits your lifestyle and maintenance routine. By taking these factors into account, you can find the perfect hair color and shade that enhances your natural beauty and boosts your confidence.
Preparing Your Hair for the Shading Process
Preparing your hair for the shading process is a crucial step to achieve the desired results. Before you start, it's essential to ensure your hair is in good condition. If you have damaged or over-processed hair, it's recommended to get a hair treatment or trim before proceeding with the shading process. This will help to repair and restore your hair's natural moisture and shine. Additionally, it's crucial to choose the right products for your hair type. If you have dry or damaged hair, use a hydrating shampoo and conditioner, while oily hair requires a clarifying shampoo and conditioner. It's also important to avoid using heat styling tools or harsh chemicals on your hair for at least a week before the shading process. This will help to minimize damage and ensure the best possible results. Furthermore, it's recommended to wash your hair with a clarifying shampoo the day before the shading process to remove any product buildup. This will help the color to penetrate more evenly and ensure a more natural-looking result. By following these steps, you can ensure that your hair is properly prepared for the shading process, resulting in a beautiful, natural-looking color that enhances your overall appearance.
Executing the Hair Shading Technique
Executing the hair shading technique requires a combination of artistic skill and technical knowledge. To achieve a natural-looking, multi-dimensional hair color, it's essential to understand the process and its various stages. The technique involves sectioning and isolating hair strands to ensure precise application of the color formula. Once the hair is sectioned, the next step is to apply the hair shading formula, which involves mixing the right combination of colors to achieve the desired shade. After the formula is applied, the hair must be processed and rinsed to reveal the final result. By mastering these stages, hairstylists can create stunning, customized hair colors that enhance their clients' natural beauty. To begin the process, it's crucial to start with sectioning and isolating hair strands, which sets the foundation for a successful hair shading technique.
Sectioning and Isolating Hair Strands
Sectioning and isolating hair strands is a crucial step in executing the hair shading technique. To achieve a natural-looking, multi-dimensional hair color, it's essential to divide the hair into sections and isolate individual strands. This process allows for a more precise application of color, enabling the stylist to target specific areas and create a seamless blend of shades. When sectioning the hair, it's best to start at the back and work your way up, using clips to keep each section separate. For a more intricate look, you can further sub-section the hair into smaller areas, such as the crown, sides, and back. Isolating individual strands involves gently teasing out a small section of hair from the rest, using a fine-tooth comb or a sectioning clips. This allows the stylist to apply color to the isolated strand, creating a subtle, nuanced effect that adds depth and dimension to the overall hair color. By sectioning and isolating hair strands, stylists can achieve a level of precision and control that's essential for creating a natural-looking, multi-dimensional hair color.
Applying the Hair Shading Formula
Applying the Hair Shading Formula requires a deep understanding of the hair's structure and the way light interacts with it. To begin, identify the hair's root color, which serves as the base tone. Next, determine the mid-tone, which is the color of the hair shaft, and the highlight color, which is the lightest point on the hair. The formula involves applying the root color to the entire head, followed by the mid-tone to the areas where the hair is not in direct sunlight, and finally, the highlight color to the areas where the hair catches the light. To add depth and dimension, apply a darker shade to the areas where the hair is in shadow, and a lighter shade to the areas where the hair is in highlight. This formula can be applied using various mediums, such as pencils, markers, or paints, and can be adjusted to suit different hair types and styles. By mastering the Hair Shading Formula, artists can create realistic and captivating hair illustrations that bring their subjects to life.
Processing and Rinsing the Hair
Processing and rinsing the hair is a crucial step in the hair shading technique. After applying the hair color or lightener, it's essential to process the hair for the recommended time to achieve the desired results. The processing time may vary depending on the type of product used, the length and thickness of the hair, and the desired outcome. It's crucial to follow the instructions carefully and keep an eye on the processing time to avoid over-processing, which can lead to damage, dryness, and breakage. Once the processing time is complete, the hair should be rinsed thoroughly with warm water to remove the product and any excess pigment. The rinsing process should be gentle, yet thorough, to prevent any remaining product from causing irritation or dryness. After rinsing, the hair should be towel-dried and prepared for the next step in the hair shading technique. Proper processing and rinsing are essential to achieve the desired results and prevent any damage to the hair.